
Holy Hannah, I totally missed that there were supposed to be two winners for the Green Giveaway!
Random.org was nice to me again and chose:
Random Integer Generator
Here are your random numbers:25
Timestamp: 2008-10-31 00:41:00 UTC
And thats:
mom2ee said...
we are trying to reduce our carbon footprint too. i use junk mail envelopes to write lists. we make sure that lights are off when not in the room. we don't use tv for "white noise". we cook seasonal fruits and vegetables that we get from the local farmer's market. i am looking for ways to make my scrapbooking greener as that is my "green" nemesis.
woot! Congrats, chickadee! Send an email to info@studiocalico.com !
:)
October 30, 2008
Halloween: Why? And Where?
As the token Brit on the DT, the girls do have a good laugh at some of my sayings and mannerisms. I don't mind being teased really and its always good conversation. The way we do things and the way we celebrate events slightly differ too. The US's 4th July celebration where people pay homage to Independence Day and wave the flag to being a US citizen is far more glamorous than our 23rd April St Georges day - our day to wave the flag for our English Saint and all things English! You guys have Thanksgiving, obviously we don't and I often wish we had something like that because other than Christmas, our UK families just do not have any other nationwide special get-together day . Although we do treat Boxing day (26th December) as an extension of Christmas day to spend family time together.
So this brings me on to Halloween.
The British, at large, celebrate this event in a more restrained tone compared the the US. Which makes me scratch my head curiously because the tradition dates back to Celtic times in Ireland (a short swim from UK shores) where Pagans would treat this night as sacrificial in preparation for their winter harvest, using what livestock they had. It was also the night they would dress with masks and costumes to mimic the dead and ward off evil plus they class 31st October as the end of the Pagan year - to them it was party night! . So when the Irish settlers found homes on US shores, they brought these tales with them and continued the celebration to what it is known and loved for today. I have to admit that Halloween is celebrated with more vigour in the US than over here in the UK.
There are a lot of homes in the UK that do not entertain children who come trick or treating. For us its a more modern celebration that the older generation have not grown accustomed to but certainly it has become more popular in the last 20 years with the latter generations because of the hype that the US bestow on the event. The general rule of thumb on Halloween over here is that if the lights are on, you may trick or treat at that house. Its funny to watch my neighbours clamber home from wherever, draw the curtains and lay low for a few hours when they don't want little ghosties and ghoulies come a-knocking! Of course the UK kids love it and do it anyway (where they can) and Id say 60% of the houses on our housing estate do play along and its just the best night for dressing up, making pumpkin faces, play bobbing apples and stuffing your face with sweeties (candy) and chocolate. My daughter selects the best houses for treat giving (based on previous years haunts) and manages about 10 or 12 houses then comes home to splurge.  We of course decorate the porch and hand out sweeties to any welcomed guest but as our house is hidden round a little nook on a street of old age pensioners, we don't get that many visitors - so we get to hoard the stash for ourselves too!
We of course decorate the porch and hand out sweeties to any welcomed guest but as our house is hidden round a little nook on a street of old age pensioners, we don't get that many visitors - so we get to hoard the stash for ourselves too!I wrote to Janine, one of our new SC DT who lives in Germany and asked if they celebrated it and her is what she had to say (thanks Janine!)
"Originally there's no Halloween here in Germany. We do have Fasching also called "carnival" in February/March where we dress up. Although the children walk with their self-made lanterns in November where they collect sweets, which can be most likely compared with 'trick or treat'. Halloween swapped over from the US some years ago, but it's no tradition here, and no trick or treat.  Some kids do it though, but most kids collect sweets when they walk with their lanterns in honor of St. Martin in November ( you can find more information under 'Folklore' there). In Germany, Halloween is an additional reason to party, hehe."
Some kids do it though, but most kids collect sweets when they walk with their lanterns in honor of St. Martin in November ( you can find more information under 'Folklore' there). In Germany, Halloween is an additional reason to party, hehe."October 29, 2008
Green Giveaway!
Oh hurray! I saw that there were 195 comments on the Reveal night Giveaway and was so worried that the random drawing would choose someone near 100 and I'd have to count it out, lol. Lucky for me, it drew #15 !
True Random Number Service
Random Integer Generator
Here are your random numbers:15
Timestamp: 2008-10-29 21:27:10 UTC
And that belongs to.....
Liz F said...
I just found your site. Seems cool. To be greenier we recycle everything we can and also try to only buy products in recyclable packaging.
October 26, 2008 10:04 PM
Congratulations Liz! Please send your address and info to info@studiocalico.com
P.S. I hope you have been checking all the DT blogs for the add-on giveaways! You still have a day or two if you haven't posted already. The more blogs you post on, the more chances you have of winning. Good luck!
October 27, 2008
It's a busy week!
Are you ready for tonight? Have you seen what the November kit looks like? Have you signed up for the newsletter yet? So many questions. Here's a looky at the November kit, Fountain Square:

The add-ons are named after Geographical locations near Studio Calico headquarters in Bowling Green, Kentucky. Scarlet posted about them here, and on her blog here. Isn't that fun?
I know it can be confusing, but I hope you are ready for tonight! We have all sorts of fun things planned, including a new Chat room! I hope you'll be able to join us for reveal night and help us work out the kinks on this great new feature.
Speaking of reveal night, Joy has yet again challenged us with Reveal night avatars. There's going to be prizes in all sorts of categories, so I hope you'll take the time to have a little fun. Let the kids join in! I have started a thread here so you can post a photo of your costume. You can post as many different photos/costumes as you'd like... the more you do the better your chances of winning a prize, right?
After you do that, post on this thread for a chance to win the Reveal night prize pack!
Speaking of prizes, there is still time to enter a layout in Nic's 2 page layout contest. Please upload your layout to the Studio Calico gallery and link it to this thread. You have until the 29th!
After you do that, don't forget to take part in Lorie's Hometown Challenge! All of the info is below this post here.
Kirsty and I have taken over the blog this week, and we have a lot of great things to share with you while we are here. Be sure to check back tomorrow... we have even more fun surprises for you!
Happy Monday! Davinie
Hometown History - Part 3
I'll start off by apologizing for getting this posted so late, today was a crazy day! Hubby and baby and snoozing away, so I have a few minutes to finish up our little history series.....some of you are probably jumping with joy that the end is in sight!
Let's talk a little about Lost River Cave. Listed on the National Register of Historic Places, this cave was discovered by American Indians along with the valley that formed when a large cave system collapsed. Lost River Cave was the site of a water-powered mill in the 19th century and a popular night club in the mid-20th century. Lost River is deemed to be the world's shortest and deepest river, measuring at least 437 feet deep and running for only 350 feet before disappearing into one of the country's largest cave entrances. Walking and float tours are available. Nature trails feature over 50 species of trees and flowers, some of which were thought to be extinct, and a butterfly house is included on the 23-acre property.
The Lost River Cave valley was a site used as a camping ground for both the Confederate and Union troops during the Civil War. Confederate soldiers moved into Bowling Green during the fall of 1861. Many were from warmer southern climates and found themselves fighting extreme temperatures and rampant disease. Measles, typhoid and pneumonia nearly wiped out the arm of 20,000 stationed in the southern part of the state. On Valentine’s Day in 1862, the rebels left Bowling Green for good. Union troops soon moved into the area and a contingent of nearly 40,000 soldiers camped around Lost River Cave & valley from 1862-1865. The men enjoyed the cave during their downtime, crawling through the underground network of passages and writing their names, ranks and companies on the ceiling and walls of the cave. They even fired their guns inside the cave passages to hear the echoes, leaving behind bullets for historic archaeologists to find more than a century later.
Here is an interesting little gem that I discovered while researching....the outlaw Jesse James lived in the area around Lost River Cave during the spring of 1868. He was born in nearby Logan county and his father was a well known preacher. His gang included nine desperate men, one of them was his brother, Frank. Jesse and his gang robbed the Southern Deposit Bank at Russellville, KY on March 18, 1868 at 2:00 p.m. Jesse, Frank and some of his gang members hid inside Lost River Cave up to a week after the robbery. This was not his first bank robbery, but it was very early in his career....he would not get his name in the papers for the first time until December of 1869.
Well, that's it, I'm all out of interesting history about Bowling Green. I hope that you have enjoyed this background information about our humble little hometown. I sure have enjoyed discovering more about this town that I love!!
Don't forget the History of Your Hometown challenge! The deadline is November 14th at 11:59 p.m. and you must use your November kit to qualify! I'll make sure to remind you via the message board and set up a special thread for you to post your layouts. I can't wait to see what all of you history buffs come up with!
October 26, 2008
Becoming Green

In October's kit, LOOKING GLASS, we featured the butterfly paper from this Tinkering Ink line. It was such a hit, we now have 2 collection packs (2 each of 6 papers), to give away.
I can certainly tell you that I'm definitely not 100% green, but I do try to do what I can. When I worked as a rep, I used to get lots of small boxes with samples each month. Instead of giving them to the recycling company, which would have been easy to do, I recycled them by giving them to my dad who manages a book store. He reused the boxes to ship books. It was a perfect arrangement: I got rid of my boxes and he didn't have to buy as many. Recycling at it's best!
So, if you'd like a chance to win this prize, post a comment here letting us know what you are doing to become green. We'll draw 2 winners this week.
October 25, 2008
Hometown History 101 - Part 2
What a gorgeous fall day....60 degrees, sunshine, slight chilly wind....sounds like a perfect day to visit the Pumpkin Patch!! We headed out to Jackson's Orchard this morning and found the perfect way to spend a lovely fall day. April has been telling me for weeks that she wanted new pictures of Natalee, so she came along to capture our family day.
So off we went, picnic lunch in tow and what a wonderful day we had. Natalee loved the "apples" which are pumpkins to everyone else. We got lots of good pictures of her sitting in the pumpkins, holding pumpkins, playing in the straw, avoiding the animals in the petting zoo and riding the pony. Here are just a few:


 Our favorite time to visit is during the month of October. They offer lots of great family fun every weekend by hosting a Pumpkin Festival. You can ride on a hay wagon out to the pumpkin patch and pick your own pumpkin, ride a pony, experience the petting zoo or get your face painted. They also offer all kinds of edible goodies - fresh popped pop corn, caramel apples, apple and peach pies, fresh apple cider and apple cider slush. We even got to sample a recipe that they have created using their own apple & honey salsa. I've included it below:
So off we went, picnic lunch in tow and what a wonderful day we had. Natalee loved the "apples" which are pumpkins to everyone else. We got lots of good pictures of her sitting in the pumpkins, holding pumpkins, playing in the straw, avoiding the animals in the petting zoo and riding the pony. Here are just a few:


So, how about some Jackson's Orchard history? According to their pamphlet, Jackson's Orchard is a 105 acre farm, and has been an orchard for over 100 years. In 1966, the Jackson's bought the land and began expansion by planting additional trees every year. The orchard now has over 13,000 peach and apple trees, not to mention a pretty impressive pumpkin patch.
In the early years of retail, they sold the fruit off of a wagon placed under the old oak trees which still stand next to the house. The apple barn was built in 1971 and they have continued throughout the years to add to the original structure. The Jackson's now have the store, apple grading area, cider press building, two cold storages and two lovely greenhouses. Here is a family picture that April took of us sitting on one of the original wagons.
 Our favorite time to visit is during the month of October. They offer lots of great family fun every weekend by hosting a Pumpkin Festival. You can ride on a hay wagon out to the pumpkin patch and pick your own pumpkin, ride a pony, experience the petting zoo or get your face painted. They also offer all kinds of edible goodies - fresh popped pop corn, caramel apples, apple and peach pies, fresh apple cider and apple cider slush. We even got to sample a recipe that they have created using their own apple & honey salsa. I've included it below:
Savory Apple & Honey Salsa-Smothered Chicken
16 frozen chicken tender strips
1/4 cup olive oil
Italian seasoning or Southern Delight Classic Seasoning
2 jars Southern Delight Savory Apple & Honey Salsa
Place frozen chicken in olive oil in large skillet, seasoning generously with Southern Delight Classic Seasoning.
Saute at medium heat, covered for 15-20 min, turning to thoroughly cook both sides (covering greatly reduces the cooking time for the frozen chicken). Uncover or partially cover during the last 5 min of cooking time. Pour 2 jars of Southern Delight Savory Apple & Honey Salsa (mild, medium or hot) over the chicken. Cover and simmer for 15 min stirring occasionally.
Serve over rice, pasta, or simply by itself. It's simply wonderful, plus it's low-carb and low-sodium. Serves 4 - ENJOY!
Salsa and seasoning avail at http://www.jacksonsorchard.com/, along with a large selection of preserves, honey, soup mixes, cobbler and muffin mixes, specialty dilled vegetables, canned peaches, salad dressing and much, much more.
OK - now what you have all been waiting for....the challenge announcement! I challenge you to scrap the history of your hometown using your November kit. The deadline for entries will be 11:59 pm on November 14th. Everyone's hometown is different, some are big, some are small, but they are all interesting! The winner will receive a $5.00 gift certificate for Studio Calico. I can't wait to see your layouts!!
Stay tuned for our last installment of Bowling Green Hometown History tomorrow as I give you the information about Lost River Valley.
October 23, 2008
Hometown History 101
It has been said that, "Home is where the heart is." I never really understood that until we moved to Bowling Green and it became our HOME. I grew up in Tennessee, have lived in Florida and Ohio but Kentucky has become my Home. Maybe it's because this is where Rich and I built our house from the ground up, maybe it's because this is where we found each other again after a rough spot in our marriage, or maybe it's because this is where we started our family....for whatever reason, Bowling Green has become our Home and I can't imagine living anywhere else!
It was so cool to learn on reveal night that April & Scarlet decided to use some of our Hometown Sights as names for this month's kits. It also occurred to me that some of you might be interested in our local sights and want some more information. Thus the idea for the Hometown History lesson, Studio Calico style ;-)
Let's start with Fountain Square - information courtesy of the official Bowling Green website.
Fountain Square - prohibitionists have marched around it, trolleys have encircled it, parades of all types-circus, military, historical, homecoming, Irish, political and patriotic- have taken place around it, scrap drives headquartered here, Civil War soldiers knew this place, hundreds of farm animals have been sold here as well as fine horses, pageants have been held here, veterans were welcomed home here, people have sold and traded every kind of item imaginable here, and buildings here have come and gone. No one familiar with local history can deny that Fountain Square is Bowling Green's touchstone to its past; it is certainly the community's most endearing and enduring landmark.
In 1881 the city trustees, in consultation with Mayor H.C. Hines, purchased a 6,000 pound precast fountain from the J.L. Mott Ironworks of New York City for $1,500. The new piece was crowned by Antonio Canova's (the original sculptor) Hebe, the goddess of youth. The old fountain was disassembled and portions sold at auction, and the new one was installed in May 1881. The statues surrounding the fountain represent the mythological figures of Ceres (goddess of grain), Pomona (goddess of fruit), Melpomane (goddess of tragedy) and Flora (goddess of flowers.) The Fiske Company of New York cast the four statues as well as the two urns at the east and west ends of the park. They are mounted on locally quarried limestone. At the north and south entrances to the park are two arched memorial entries also of Bowling Green limestone. The lush greenery of the park is due in some part to the early efforts of the Bowling Green Garden Club. Shortly after it was chartered in 1934, the Garden Club commissioned R.L. Sturtevant, a prominent landscape architect from Groton, Massachusetts, to design a planting for the park.

I've borrowed a picture that Scarlet posted earlier this week on the message board. Here you see Noah and Nadiya under one the the limestone arches.
 These are some of the shops in downtown along Fountain Square. You can find everything from a Men's clothing shop to a Subway right off the square. You can even find a couple of creative geniuses named Scarlet & April just around the corner at Studio Calico headquarters.
Now lets take a look at one of Bowling Greens most regal residences, Riverview at Hobson Grove - information courtesy of Wikipedia.
Riverview was built as the mansion home of Atwood Hobson and his wife Julia. Construction on the mansion started in the 1850's, but was halted due to the outbreak of the Civil War. During the conflict, the incomplete house was used as a munitions magazine during the winter of 1861-1862, when Bowling Green was the Confederate capital of Kentucky.
Riverview was finally completed in 1872. The Hobson family and their descendants lived in the house until 1952. After a string of various successive tenants and being damaged by fire, the structure was abandoned and condemned in 1965. The city of Bowling Green purchased the property with the intent of demolishing the house and building a golf course. The house was saved when a non-profit organization, the Hobson House Association, was formed the next year, restoring the dwelling in Victorian style. The proposed golf course was built nearby and can be viewed from the hill upon which Riverview sits.
Riverview at Hobson Grove is the centerpiece of Hobson Grove Park and was listed on the National Register of Historic Places in 1972.

This picture shows Riverview standing in all her glory atop the hill at Hobson Grove Park. During my research, I found out that the house is open to the public and can be toured for a small fee. This is something that I'll be adding to my list of things to do in Bowling Green!
Well, that's enough History for one day. Tomorrow I'll have some information for you on Jackson's Orchard and Lost River Valley. I'll also be issuing a challenge for all of you History lovers!! Stay tuned.....
Some a-gourding fans to cheer you on in the challenge! ;)
Just wanted to pop on here to encourage you all to give the Two Pager challenge a try! I saw a few pages pop up in the gallery the other day....can't wait to see more! (For more details on the challenge scroll down a post or two here.) And to help cheer you on, here are some friends I brought along....


I made these yesterday with my kids after a trip to the local pumpkin patch. These are the little gourd pumpkins. Tiny little guys. And I saw the idea for these in Family Fun magazine this month. We just painted them all black (it took two coats to completely hide the orange). Then I cut out some bat wings from black cardstock along with some little bat ears. I attached the wings and ears with little stickpins. The magazine suggests taping a skewer onto the back of the wings and sticking them on that way. Which would make the wings more durable. I may need to go back and do that. Then I cut the eyes out of some white cardstock and punched "pupils" with a hole punch. Glue dotted them on and viola....some little fun bats for our front step! My kiddos loved this. :)
Anyways, keep those two pagers coming! Go team!
It spoke to me.....
Have you ever seen a piece of paper or an embellishment and had that feeling? You know the one I'm talking about, like it was just meant for you to find and before you even know it you have an entire layout/project planned out in your mind?
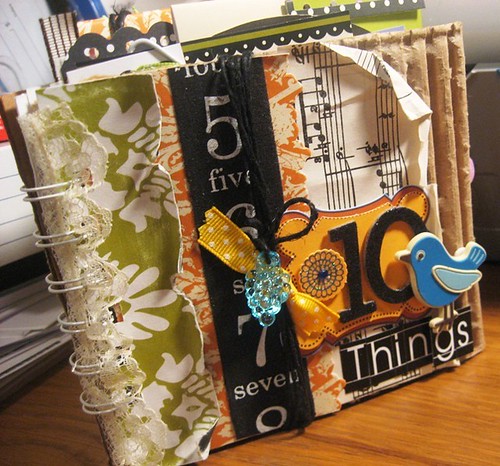
Well, it happened to me last month when we were kit packing. For you to understand the pure thrill of this discovery, I need to give you some background information. You see, I am a scrapbook wannabe! I've always wanted to be super creative and come up with gorgeous layouts that could be published in a magazine. Instead I am plain old Lorie that didn't know the difference between embellishments and stickers when I first started working for April & Scarlet. Month after month, I've handled each piece of every kit, but I've never had that inspirational flash. Don't get me wrong, I've ooohhhed and aaahhhed over most of it and wondered how on earth you guys would use some of it, but nothing has ever spoken to me like the Tweedle Dee add-on did last month.
Kit packing is pretty repetitive, to be honest, it's mindless work....you pick up the papers first, put them in the bag as tight as possible to keep them from getting damaged, then you go back and gather the embellishments to place on top of the paper, seal the bag and presto...you're done! Last month, it wasn't such a mindless job for me. From the moment I walked in and saw the Tweedle Dee add-on laid out on the table, I started getting all of these ideas for how I would create a mini-album. At first it was a little scary, I've never really had any creative mojo and then all of the sudden BOOM there it is, ticking away in my mind! The three hours that it took me to pack the kit were gone in a flash and all I could think about was getting mine home to start working on my project. I couldn't wait to lay it all out and see what it would look like.
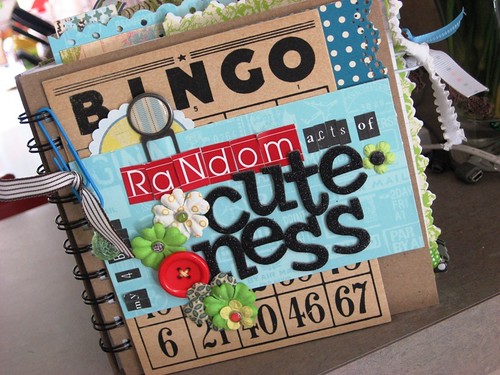
So there I was, sitting at my new desk, surrounded by all of the materials that I've collected over the last year, staring at my brown Studio Calico bag, terrified to open it. What if I couldn't get my vision out of my head? What if I messed it up? What if it looked terrible when it was done? All of these questions were thundering around in my brain....I had sweaty palms and a jittery stomach. Finally, I bit the bullet and opened the brown bag, carefully removing the red sticker to be saved for later use. As I laid all of the papers out on my desk, BAM, the visions that I had the first time that I saw the kit crowded back into my head and before I knew it I had 3 of the pages of the book completed! It just flowed out of my brain, to my hands and onto the chipboard. Techniques that I have read about on this very blog, came back to me and appeared on my chipboard. I must say, I was a little overwhelmed by my little book when I was finished and sat down and looked at it over and over again in awe! I had created this, I had actually sat down and pulled creative images out of my head and put them in an album. I was thrilled and elated, FINALLY I had done it! It was a revelation for me, a goal that I never actually thought that I would achieve, a new outlook on creativity and a new purpose to preserve the everyday happenings of life.
Without further adieu, here is my little project:


Well, it happened to me last month when we were kit packing. For you to understand the pure thrill of this discovery, I need to give you some background information. You see, I am a scrapbook wannabe! I've always wanted to be super creative and come up with gorgeous layouts that could be published in a magazine. Instead I am plain old Lorie that didn't know the difference between embellishments and stickers when I first started working for April & Scarlet. Month after month, I've handled each piece of every kit, but I've never had that inspirational flash. Don't get me wrong, I've ooohhhed and aaahhhed over most of it and wondered how on earth you guys would use some of it, but nothing has ever spoken to me like the Tweedle Dee add-on did last month.
Kit packing is pretty repetitive, to be honest, it's mindless work....you pick up the papers first, put them in the bag as tight as possible to keep them from getting damaged, then you go back and gather the embellishments to place on top of the paper, seal the bag and presto...you're done! Last month, it wasn't such a mindless job for me. From the moment I walked in and saw the Tweedle Dee add-on laid out on the table, I started getting all of these ideas for how I would create a mini-album. At first it was a little scary, I've never really had any creative mojo and then all of the sudden BOOM there it is, ticking away in my mind! The three hours that it took me to pack the kit were gone in a flash and all I could think about was getting mine home to start working on my project. I couldn't wait to lay it all out and see what it would look like.
So there I was, sitting at my new desk, surrounded by all of the materials that I've collected over the last year, staring at my brown Studio Calico bag, terrified to open it. What if I couldn't get my vision out of my head? What if I messed it up? What if it looked terrible when it was done? All of these questions were thundering around in my brain....I had sweaty palms and a jittery stomach. Finally, I bit the bullet and opened the brown bag, carefully removing the red sticker to be saved for later use. As I laid all of the papers out on my desk, BAM, the visions that I had the first time that I saw the kit crowded back into my head and before I knew it I had 3 of the pages of the book completed! It just flowed out of my brain, to my hands and onto the chipboard. Techniques that I have read about on this very blog, came back to me and appeared on my chipboard. I must say, I was a little overwhelmed by my little book when I was finished and sat down and looked at it over and over again in awe! I had created this, I had actually sat down and pulled creative images out of my head and put them in an album. I was thrilled and elated, FINALLY I had done it! It was a revelation for me, a goal that I never actually thought that I would achieve, a new outlook on creativity and a new purpose to preserve the everyday happenings of life.
Without further adieu, here is my little project:


It wasn't until I had declared myself finished that I realized that there were no pictures in my little book. I considered reworking a couple of the pages and sneaking in one morning to try to get some candid photos of Natalee and Daddy as they sat at the desk, but in the end, I decided that it didn't need it. This project was about capturing my little one's art and saving it in a way that I could keep it forever, not about having pictures of her drawing. This too was an eye opening revelation for me....I always associate pictures with scrapbooking. This has been the dam that has kept my creativity at bay....I've finally knocked it down and now I have a true picture of what it is that all of you do when you sit down to create.
I finally understand that it is not about sitting down to "scrapbook" a page, it is about creating art that represents your life. The everyday happenings that you want to remember and preserve for generations to come. I'm no longer a wanna be scrapbooker, I am a novice artist!
Make sure to check out the blog tomorrow for a small history lesson about the sights of Bowling Green that inspired the kit names this month....there may also be a challenge involved, so stay tuned!
October 21, 2008
It's challenge time!
Sorry I didn't get this posted yesterday. I was going to do a sketch for you or something but thought I'd make it more wide open so that more people would play (hopefully!). So the challenge is simple....scrap and share a new 2-page layout. That's it. For every double page spread that you share, you will be entered into a RAK drawing. If you use mostly Studio Calico kits on your layout, you will get entered a second time. :) Use up those kits to make room for the new one!!!
If you need some inspiration for your page, you could scraplift one of the layouts I posted the other day. Or, check out www.pagemaps.com for actual sketches to help get your ideas rolling. Becky Fleck includes double paged sketches each month in her newsletter. And of course there are TONS of Becky Higgins sketches that are all two pagers. (See www.creatingkeepsakes.com to find recent ones.) If anyone has other 2 pager inspiration sites or ideas, please post them in the comments here. I'm sure everyone will appreciate it! I'll keep this open until next Wednesday. Then I'll draw a winner for the RAK that night.
Can't wait to see what you come up with!!!!!
October 19, 2008
Ten Tips to Two Pagers!
Hi all! It's Nicole S here and this week Lorie and I are hijacking the SC blog. :) Lorie has some really cool stuff to share later in the week, but first I thought we'd talk two pagers.
Now wait.... don't go clicking away! Not yet. Hear me out... please!!! I thought this might be a fun topic and challenge since it seems like there has been some chatter about single vs. double page layouts on the boards lately. And while I'm NO expert...really!....I do occasionally scrap 2 page layouts. Especially for events/holidays/etc when I have more than just 2-4 photos to include. But it seems like many of us have a love-hate relationship with double paged spreads for some reason. Is it just too much space? The shape? The design? The number of photos? All of the above? :) Whatever it may be...I'm challenging you. But that's for tomorrow. Today, I thought I'd share some two pagers and do a little top 10 list thing of tips/tricks to making them work. Here goes....
Tip #1: Think of the two pages as ONE single design. Picture it as one large 24x12 canvas (or 17x11).
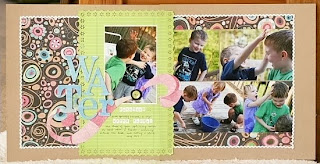
Tip #2: Shrink down the canvas if you need to. In other words...you don't need to use every inch of it! I love this page by Kelly Noel. See how she sort of has a page within the 2 pages by cropping in her canvas so to speak and leaving a large white border.

Tip #3: Let photos and papers overlap across the page break to unify the two pages. (Just be careful to not crop faces!!!) :)
Tip#4: Scale is important. Your canvas is larger, so your title, embellishments, etc should be a little larger or carry more "weight" too. You don't want a teeny title to get lost.
Tip #5: Use photo blocks if you feel like your photos are getting lost on the page. I love to do this on two pagers. You can even put the bulk of the photos on one side of the spread and leave the other side relatively open.

Tip #6: Repeat patterns, embellishments, etc through both sides of the layout to make them cohesive and draw the eye through the spread. I love how April did this with the numbers on each photo across the two pages.

Tip #7: If you are a 12x12 scrapper, but 24x12 scares the you know what out of you try something a little smaller. Like a double pager using 8.5x11 instead! Switch it up!
Tip#8: Make a clear focal point. Your eyes need a nice, comfy place to set on at first glance. Especially on a two pager! Then the other details can draw them through the design. Here I highlighted one photo to stand out from the rest.

Tip #9: When dealing with a bunch of photos for a two pager, consider cropping them all to the same size or even similar sizes (all 4inches wide for example). This makes it easy to put them in rows or columns or photo blocks.
Tip #10: Get creative and have fun! The larger canvas of a 2 pager gives you lots of options for unique and eyecatching designs and playful elements.
And that's it. Not too hard, right? I know I may not have you all convinced, but tomorrow I shall issue a challenge! Maybe the possibility of some Studio Calico cash will help motivate you! ;) Thanks for reading!
October 18, 2008
Let's do something.
There's been a lot talk of our favorite Etsy sellers on the boards but have you ever looked to Etsy for inspiration?
The front page of Etsy looks like a big sketch to me. I can see several ideas for layouts just from that. I also like to pull inspiration not only from the vast artwork of individual sellers but also textures from such things as handmade jewelery or a knitted scarf. My Dare this week was inspired by the frontpage of Etsy.
The front page of Etsy looks like a big sketch to me. I can see several ideas for layouts just from that. I also like to pull inspiration not only from the vast artwork of individual sellers but also textures from such things as handmade jewelery or a knitted scarf. My Dare this week was inspired by the frontpage of Etsy.
So on our last day of being guest bloggers for Studio Calico, Joy and I want to throw out a simple challenge to you. Earlier this week, Joy posted a beautiful photograph from Flickr. Make a layout using either Etsy or Flickr as your inspiration and we'll give away some Studio Calico bucks good towards your next kit purchase.
Post it to the SC gallery and be sure to let us know where your inspiration came from. You can then post it here on the blog. Joy and I will choose a winner in a week.
Be sure to have fun with this and not put too much pressure on yourself. When surfing these sights, go with the first thing that makes you want to drop everything and scrap. Make something quick and simple or go as detailed as you like. The point of this inspiration week is for you to get out those kits and make something. Scrapbooking is fun. Let's not forget that! I know SC kits are packaged so lovely in the that great brown bag and box but they shine even more when they are used by you! So let's carve out some time to do something creative this weekend. We can't wait to see what inspired you.
Have a great weekend and thanks for hanging out with us this week!
Tina and Joy
*********************************************
While we're discussing etsy, we might as well announce the winner of the Paper Pixie giveaway from Sneak Night.
Here are your random numbers:
38
Timestamp: 2008-10-18 18:11:26 UTC
That makes Stephanie P our winner
Anonymous said...
I love green!!! Can't wait until reveal....it's just too long to wait!!!Stephanie P
October 13, 2008 11:08 PM
(I love green, too!)
Please send an email to info@studiocalico.com and we'll get your RAK mailed out!!!
October 15, 2008
You Shine
Scrappyfran.
You shine.
Your Studio Calico layouts are stunning.
Here are a few of my favs....

You shine.
Your Studio Calico layouts are stunning.
Here are a few of my favs....


You can view the rest of Scrappyfran's layouts here.
Thanks for sharring your lovely creations with us!
Tina
*********************************************
akaliz, YOU shine!!
I love your use of bright colors, and your altered projects and mini books are JUST my style! Thanks for inspiring us with your work.
Here are a few of my favorites:
You can see more of akaliz's work HERE
Thanks for being an inspiration!
::joy::
October 14, 2008
my winner...
is Erica Hetwer!!!
Erica, please shoot me an email via Studio Calico with your addy and i'll get together a goody box for you!! thanks to everyone for their links/suggestions...i have lots to look at now!!
=)
Erica, please shoot me an email via Studio Calico with your addy and i'll get together a goody box for you!! thanks to everyone for their links/suggestions...i have lots to look at now!!
=)
Inspired by:

photo by Lili Vieira de Carvalho
When our eyes see our hands doing the work of our hearts, the circle of Creation is completed inside us, the doors of our souls fly open, and love steps forth to heal everything in sight. ::michael bridge::
October 12, 2008
To Inspire
Why hello there.
This week Joy and I are taking over the Studio Blog.
Our mission: to fill your week with inspirational challenges, photos, scrappers and websites.
Let's begin with a challenge, shall we?
This week on the Dares blog, the ladies have decided to challenge your scrap minds with the use of color. Take the Dare as you wish. I personally have chosen a color that I do not
often use and find particularly hard to scrap and that's the color red.
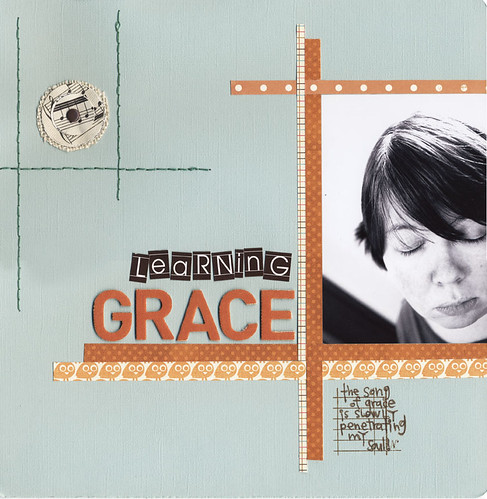
Here's my interpretation of the Dare:
Here's my interpretation of the Dare:
Most paper peices are from past Studio Calico kits. A great way to use up that stash!
Oh and there is a little incentive.......we're giving away an October Studio Calico kit!
Please post your color Dare in the member gallery and link it to the Dares blog.
We'll pick a winner on Friday, the 17th.
Hope to see you tonight!
You didn't forget did you? :)
Tina
Don't forget to post to win this RAK. Just tell us your favorite color for a chance to win this fabulous giveaway from The Paper Pixie.

******
This is Joy. Tina told me that the Dare was about color, and I immediately thought of this photo with this color combo by the FABU Elsie Flannigan.
I love the colors in this photo, so different and it immediately makes think of fall.
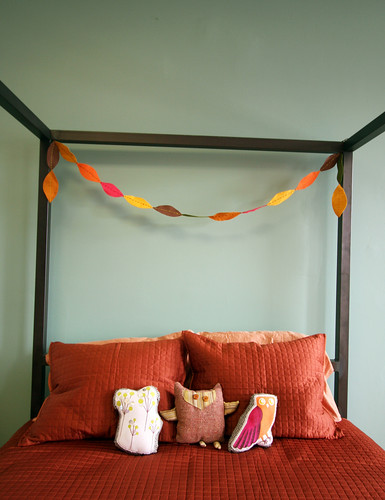
Here's the layout it inspired.
help me...i'm willing to bribe you.
i LOVE altered items.
or projects that use scrappy stuff in cool ways.
but i really struggle with ideas for them.
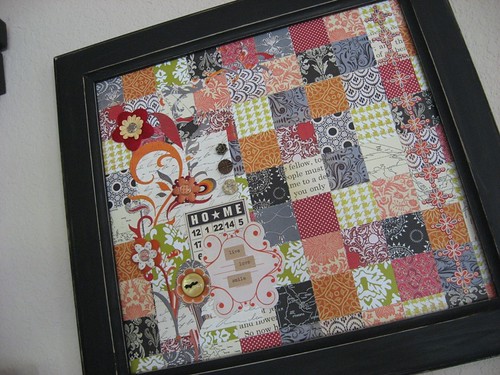
i mean, look at what our fabulous Nicole Samuels did with a tree from Target and a set of 3-D Making Memories stickers!! do you know how awesome this would look with my vintage Halloween collection?! and one of our dear members, akaliz, made lemonade from lemons with this frame she picked up at Goodwill...how do people think of this stuff?!

or projects that use scrappy stuff in cool ways.
but i really struggle with ideas for them.
i mean, look at what our fabulous Nicole Samuels did with a tree from Target and a set of 3-D Making Memories stickers!! do you know how awesome this would look with my vintage Halloween collection?!
 and one of our dear members, akaliz, made lemonade from lemons with this frame she picked up at Goodwill...how do people think of this stuff?!
i love this kind of stuff...but my brain just does not think that way, lol.
so if you have a link to something cool that shows scrap supplies being used for something other than pages, cards or mini-albums, could you link me up here??
oh...and the bribe.
my RAK stash has been growing exponentially...so i would love to share it with a fellow SC'er. along with scrappy stuff, i'll throw in some vintage trim and paper goodies...just hook a sister up!!
=)
October 10, 2008
no more excuses...
show me the paint!!
i am kind of known as the 'paint freak' here at SC, and it's a title i'm ok with, lol. after posting my 'choose your path' mini earlier this week, i received several emails asking how to achieve the whole 'how-to-make-the-painted-chipboard-tear-without-destroying-it' look...so here goes.
first, gather a few goodies. chipboard, foam paint brush (i buy mine in bulk at Michael's when they are on sale 20/$1...time to stock up!), paint (i prefer Making Memories...it has less water in it which makes it dry a bit faster and go on thicker. i also have a ton of 'not Making Memories' acrylic paint in my stash that i use consistently...i just usually have to do more than one layer with it.), and a sanding file. (i have all but used my Basic Grey set to the bone and am trying desparately to find a new one, but i also use sandpaper from Mike's stash in a pinch.) one comment i hear alot from friends is that they don't like to use paint because they always put too much on and then don't like it. i hear you. the best advice i can give is to USE A LIGHT HAND...i squirt a plop of paint onto a scrap piece of paper and only dip the angled edge of the foam brush into the paint. THEN, i drag it across the scrap paper to get rid of most of the paint...you can always go back and add another layer, but taking away a layer doesn't work quite as well, lol.
 ok, then paint the chipboard. ( i forgot to take a pic of this step, but i think that's pretty easy, lol) if i am going to distress the paint after i apply it, i make sure the chipboard is completely covered with the paint. if i don't plan on doing this, i use an even LIGHTER hand and swipe just a few times to give it that sparse look. then you wait. :)
 not very long...see how the paint on this piece isn't quite dry?? that's when you grab your distresser and go to town.
 i place the chipboard flat on my desk and then use the file at a very shallow angle...this one bends, which is nice, so i apply pressure to make it lie semi-flat against the painted chipboard. then i firmly drag it toward myself...see how the edges peel? that is actually the top layer of chipboard coming off...which is what you want.
 once i have a free edge, i pull with a fingernail until i like how it looks.
 cool, huh?

then to prevent further ripping, i sand the ripped edges after they are completely dry. it softens the look a bit as well.
 if you don't have a BG file like this one, you can do the same exact thing with a piece of sandpaper...always keep some handy!
 see??
see??
 one other thing you can do to distress your painted chipboard is to wait for it to dry completely and THEN sand. it won't rip this way...but you can see that it will lighten the color of the paint a bit. i always sand the edges of my chipboard too...
 so when you wait until it's completely dry and then sand on top of it, use the file almost flat against the chipboard. this kind of distresses the entire thing slightly, instead of a distinct chunk, lol.

you can obviously do as much or as little as you like...just try it. it's a fun way to change up the way your materials look a bit...and you'd be hard pressed to find a more cost effective way to add a little something to your projects. and the choices??!! infinite!!
i am kind of known as the 'paint freak' here at SC, and it's a title i'm ok with, lol. after posting my 'choose your path' mini earlier this week, i received several emails asking how to achieve the whole 'how-to-make-the-painted-chipboard-tear-without-destroying-it' look...so here goes.
first, gather a few goodies. chipboard, foam paint brush (i buy mine in bulk at Michael's when they are on sale 20/$1...time to stock up!), paint (i prefer Making Memories...it has less water in it which makes it dry a bit faster and go on thicker. i also have a ton of 'not Making Memories' acrylic paint in my stash that i use consistently...i just usually have to do more than one layer with it.), and a sanding file. (i have all but used my Basic Grey set to the bone and am trying desparately to find a new one, but i also use sandpaper from Mike's stash in a pinch.)
 one comment i hear alot from friends is that they don't like to use paint because they always put too much on and then don't like it. i hear you. the best advice i can give is to USE A LIGHT HAND...i squirt a plop of paint onto a scrap piece of paper and only dip the angled edge of the foam brush into the paint. THEN, i drag it across the scrap paper to get rid of most of the paint...you can always go back and add another layer, but taking away a layer doesn't work quite as well, lol.
 ok, then paint the chipboard. ( i forgot to take a pic of this step, but i think that's pretty easy, lol) if i am going to distress the paint after i apply it, i make sure the chipboard is completely covered with the paint. if i don't plan on doing this, i use an even LIGHTER hand and swipe just a few times to give it that sparse look. then you wait. :)
 not very long...see how the paint on this piece isn't quite dry?? that's when you grab your distresser and go to town.
 i place the chipboard flat on my desk and then use the file at a very shallow angle...this one bends, which is nice, so i apply pressure to make it lie semi-flat against the painted chipboard. then i firmly drag it toward myself...see how the edges peel? that is actually the top layer of chipboard coming off...which is what you want.
 once i have a free edge, i pull with a fingernail until i like how it looks.
 cool, huh?
then to prevent further ripping, i sand the ripped edges after they are completely dry. it softens the look a bit as well.
 if you don't have a BG file like this one, you can do the same exact thing with a piece of sandpaper...always keep some handy!
 see??
see?? one other thing you can do to distress your painted chipboard is to wait for it to dry completely and THEN sand. it won't rip this way...but you can see that it will lighten the color of the paint a bit. i always sand the edges of my chipboard too...
 so when you wait until it's completely dry and then sand on top of it, use the file almost flat against the chipboard. this kind of distresses the entire thing slightly, instead of a distinct chunk, lol.
you can obviously do as much or as little as you like...just try it. it's a fun way to change up the way your materials look a bit...and you'd be hard pressed to find a more cost effective way to add a little something to your projects. and the choices??!! infinite!!
that's it my friends...no more excuses!!
:)
Subscribe to:
Posts (Atom)


