November 30, 2008

Odds and Ends = Ornaments

I'm not one of those folks that can just look at a bunch of supplies and immediately have a creative idea for a project or layout. I've seen April and Scarlet do this several times when they are working on their monthly gallery contributions and it always blows my mind. They will lay out a bunch of stuff and then in about 30 min, there is this wonderful and creative layout. No sir, not me! I usually have to have some sort of plan or idea before I start.....but not today. I challenged myself to be more spontaneous and create on the fly.


I knew that I wanted to make some ornaments for our tree this year, a new tradition that I wanted to start. I'd played around with several planned out ideas and let's just say, they were not what I had in mind. I was sitting at my desk yesterday and decided to pull out some odds and ends and see what I could do with them. After all, I've watched the pros do it...maybe I could make it work too!


Here is what I started with:


April gave me a container of 7 gypsies clear buttons the other day and we talked about covering one side with paper and making some sort of design...so that is where I started. I laid them out on the October Afternoon paper that was my favorite from the Nutcracker add-on. After laying them out several different ways, I decided on this one:

I cut the paper into strips and then used Zip Dry to attach the buttons. Once the glue dried, I used my Basic Grey files to sand off the excess paper. Once I got all of the edges clean, used the Zip Dry again to glue them together. I used a little white thread in the top button to attach the ornament hanger.

April also gave me a little mini album from a few months ago. Instead of making it into an album, I took it apart and used a couple of the pages to make these little hanging ornaments. On the first one, I used MM paper and glued it to the backside. Then, I took my BG files and cleaned up the edges. I used a hole punch around the edges and then threaded the trim through each hole. For the final touch, I used some little chipboard pieces and wrote Joy on it to put in the middle. On the second one, I found some scraps from a make-it-take-it from CHA in July. It was a die cut from the Pink Paislee booth. I put it in the middle of the page and then added another one of those little pieces of chipboard with Love on it. I finished this one off with a piece of velvet ribbon. Take a look:

I found myself wishing for some glitter, something that surprised me, I never use glitter. Maybe I'll branch out a little and try some before we get the tree up next weekend. Well, these were nothing fancy, but just a little exercise to prove to myself that I could just sit down and make something without a plan. I hope that they inspire you to do the same!


November 28, 2008

Giveaway Winner....

I entered numbers 1-292 into random.org and this is what I got:

Here are your random numbers:

252 

Timestamp: 2008-11-28 06:03:39 UTC


which makes this lucky lady the winner:
Leigh said...

It's a toss up between my mom's stuffing or lemon meringue pie. Yum!


Thanks for sharing your favorite dishes, now I'm hungry :)

Leigh, please send an email to info@studiocalico.com letting us know your address and if you are a subscriber. Thanks!

November 27, 2008

I am thankful....

have you ever had so many things to be thankful for that you just don't know where to begin? That is where I am today, this day in America where we sit down and give thanks for the blessings in our lives. Let me outline just a few:

I am thankful for my wonderful husband. We've been together for 16 years and I grow to love him more and more every day. He is my best friend and we've been together through thick and thin. It warms my heart to see him with our daughter, he loves her with all of his heart and would do anything for her. He is a wonderful provider and he gives me strength. He is my rock.

I am thankful for my beautiful daughter. We tried for so many years to have a child and then to adopt, I had almost given up when we got the call that she was going to be ours. From the moment our eyes met, I knew that I would lay down my life for her and that I would love her forever. She has blossomed this year, growing into a sweet, funny, energetic little toddler. Everyday is something new and exciting. When I look into those blue eyes now, I am overwhelmed by the emotion, the love that I feel. She is the light of my world.

I am thankful for my best friend April. She is has such a good heart and is one of the best people that I have ever met. She is such a good Christian example for me and makes me want to be a better person. I that she is so creative, but not only that....she brings out the creativity in others. She encourages others to unlock their hidden potential and reach for the stars. She is my inspiration.

I am thankful for my good friend Scarlet. She is a wonderful mother and loves her kids so much that she is willing to make sacrifices for them. She is kind and works so hard to provide for herself and her children. She really cares about our environment and works very hard to instill that into her kids and the people around her. Some of us are not as dedicated as she is, but she is patient with us. She works even harder to make up for us slackers. She is my example.

I am thankful for our Design Team. I have not met all of them in person, but I feel like I have known them forever! They are witty, charming and amazingly talented! They make Studio Calico THE Place to Be!! Each one brings something different to the table and inspires me in a different way. It seems that many of you feel the same way, just from reading your posts about why you came to Studio Calico. They are my sisters.

I am thankful for Studio Calico. It has opened my eyes to a whole new world of creativity and fulfillment in art. Not only that, I have been blessed to meet all of you talented ladies through the message boards and blogs that I am now addicted to. I feel like I am a part of your family and you are a part of mine. Studio Calico is my outlet.

Well, that is enough introspection for today. I hope that you all have a chance to sit down and count your blessings today. I'll be blogging over the next couple of days about shopping on "Black Friday" and making homemade Christmas ornaments. For those of you in the US, enjoy your turkey day! I hope that you will all be here with us tonight for reveal at 12:00 EST!!

November 26, 2008

Giveaway!!!


Post here for a chance to win this prize pack from Sassafras.

Just tell us what is your favorite Thanksgiving dish (or what is your favorite dish in general). We will draw after Reveal tomorrow night.

Holiday Photos

With the Christmas holiday approaching so quickly (less than a month away already...can you believe that?!), I thought it would be fun to share some holiday photo tips.

**Disclaimer: I'm not a "professional"...just sharing my own personal tips and tricks for capturing fun photos. :)**

  • Find a "real" Santa! Seriously, a mall Santa with a fake beard doesn't create the best photo. lol. Every town has a "real" Santa somewhere...do some searching, you'll be so glad you did!
  • Get IN the photos! I'm so bad about this myself as I'm always the one taking them, but looking back through our photos over the past few years I've realized that I am hardly in any of them! Do I love this picture of myself? Not at all, but I know my boys will appreciate these photos in the years to come and I will too.

  • Take a photo of your Christmas loot. No, Christmas is not all about the presents ;) , but it is pretty cool to see all of the goodies stacked up in front of the lit tree.

  • Be ready! This shot was totally candid...candids are almost always my favorite photos. Have your camera handy at all times!
  • Get a group shot! You'll cherish these in the years to come. Also, take photos of things other than just your children...don't be afraid to bring your camera to an adult shindig too. :)

  • Take a photo of the kids playing with/wearing their gift. Great-Grandma didn't get to see the girls opening up their new PJs, but wouldn't it be fun to make a personalized thank you card with a photo like this?
    I hope you enjoyed these photo tips...I think the most important thing to remember is that being in the moment is more important than capturing the "perfect" photo. Enjoy! :)


November 25, 2008

Sneaky Peekies :)

Have you SEEN all the amazing sneaks the DT girls have been posting on their blogs? The December kit has to be one of my favorite SC kits ever. I know you will love it too. I thought it might be fun to see all the sneaks here in one place. I'm always so amazed at how differently each designer works the kits. Enjoy!


Oooooh, now I really I can't wait to see the full version of all these projects! Only 2 more days until the December reveal!

November 23, 2008

countdown to Studio Calico Reveal Night


If you'd like to add this to your blog, feel free! Or grab the one from my blog. Just click on options and follow the steps!

November 21, 2008

a visit from troop 114


Today, Studio Calico had the pleasure of hosting Girl Scout Troop 114 (From L to R: Darby, Cheyenne, Carrie, Katie, Logan, Meghan, Mattie; In front: [I'm drawing a blank] & Sarah). I knew I'd forget someone's name.
This delightful bunch is working on their silver badge and needed to talk to women in business. I was so thankful their troop leader thought of us!
When they arrived, I gave them the tour of our 4 room office and explained what happens each month from the time product arrives until it is shipped out. They were very prepared and came with a list of questions such as:


  • What are the challenges being in business for yourself?

  • What is most rewarding about owning your own business?

  • Why did you decide to start this business?

  • What advice would you give someone who is starting their own business?

These girls are intelligent, cute, and on the right track for success. They're also very interested in scrapbooking so when I'm ready to retire, I might have someone to buy us out :)

If you see any of them on the message board be sure to give them a warm welcome!

November 20, 2008

have yourself a vintagey-glittery Christmas

Just a few of my favorite things:


(click on mosaic to make it bigger).

all of these items are from Bayberry Cove except for the light reflectors and the white feather tree.

Do you like your Christmas to have a vintage flavor? Or do you prefer more modern decor?
I know that Nik Harper collects vintage ornaments, and I collect anything that is glittery and old timey. Even if it is reproduction.

Share your favorite vintage Christmas touches with me. Do you have special ornaments or other mementos that have been handed down through the years? Or do you go thrifting and junking like I do to find your treats??

Have a beautiful day, everyone!
xo

November 19, 2008

The Holiday Buzz...

Yes, people, it's that time of year again. The older I get, the faster it comes around...is that some sort of weird scientific law? I'm typically one of those people who gets a little bit of the doldrums around the holidays, while my kids and husband get overly excited. Quite surprisingly, when the subject came up with my husband the other night, HE is feeling rather grinchy and I'M the one who is getting into the spirit! Imagine that, holiday miracles are happening already!! :)

Today's QOTD on the message board is all about color schemes in holiday decorating. I'm loving your answers and hope you'll chime in if you haven't. In case you need to feel a little inspiration, I have a few links and a few pictures for you!


I think there's a little something for everyone in these links, maybe even some scrap page inspiration...remember, holiday miracles!

Pink Paislee Winner!!!

The winner of this prize pack.....

was chosen by this boy:

I printed off numbers 1-428 (courtesy of Microsoft Excel) and he highlighted one at random

He highlighted 277, which makes her the winner:

Mel said...

A wide angle lens for my Rebel, a set of the label templates from Spellbinders, a Studio Calico subscription and an Itunes gift card.

But, I'll probably get a blender....sigh.


Send us an email with your address to info@studiocalico.com and we'll send it out right away!

November 16, 2008

scrappy christmas gift ideas...from the SC gallery!

well, the holidays are fast approaching and if you want to make some of your gifts this year, you better get cracking. (of course, if you're a procrastinator like me, you're going to be busy the week before christmas. lol). maybe you're in need of some inspiration - i sure was! what better place to look than in the SC gallery?


i loved this shadow box project when i saw it on ali edwards' blog, and i love hannal's version of it. this is SUCH a great gift idea - and even for yourself! this is something i think i'm just going to have to give a try myself :)


as soon as i saw this butterfly collage by Jaquie, i just had to add it to my favorites. it's just so gorgeous! there are so many beautiful details, and it would make a lovely gift for someone!


this altered frame by akaliz is gorgeous!!!


i also love this canvas by her! both projects has such amazing details on them!


these clear ornaments/frame by Nichoda are just wonderful! what a lovely keepsake that would make a great gift!

this next one is from a past DT gallery:

i looooooved this board that tina made with the looking glass kit! it's so clever and it would make an awesome gift for someone, too!

hope these ideas get your started :)

Gallery Beauties

I've been watching the gorgeous projects start to go up in the Fountain Square gallery and I have to say that you all are amazing! Here are some projects that definitely caught my eye...

These altered letters by LAH924 are so pretty! I'm really non-layout challenged (heee!), so I always appreciate these kinds of projects....

Wow! This layout by Laura Fiore is so creative. I adore the way she stamped the background/journaling with the Noah stamps...


The photo in Scrapitgal's layout was the first thing to draw me in (such a wonderful photo!), but there are some very cool details on this layout too.
I hope more of you will upload your Fountain Square layouts soon. I know I love seeing all the fabulous things you all do with the SC kits.

November 14, 2008

Hometown Layout Challenge

Lorie is away visiting her parents, so I am posting this in her absence. Please link up your layouts from the Hometown Challenge and Lorie will pick 3, yes 3 winners to receive a previous add-on from Studio Calico.
I do hope you took the time to do this challenge!
You will have until Monday morning to post a comment with a link to your layout. Winners to be chosen shortly thereafter!

November 13, 2008

Low-light photo fixes!

It's one of the trickiest photo-taking situations - shooting in low light. Yet, we all have to do it sometimes. Today, Kelly and I have some tips on taking photos in low light.

First, these are the main things you can do. Some of you may know of a few of these tips, some of you may not, so I'll just go over them all:
- Use a tripod. This allows for your camera to sit still. Using a remote to trigger your shutter is even better, since you will avoid the risk of slight camera shake when you hit the shutter.

- Shoot wide open. This means that you are shooting with your aperture (the f-stop) set at the lowest possible number. On some cameras, this is f3.5. On others, it's as low as f2.8, f1.8, f1.4, even f1.2! This is why a lot of people swear by the 50mm f1.8 or f1.4 lens! Of course, you must remember, that the lower the f-stop, the more shallow the depth of field, which means that less of your image will be in focus. This can allow you to play with some fun effects, however, you must keep this in mind when you are trying to shoot in a situation when you need a lot of your image to be in focus (i.e. group shots). in those situations, you just might have to use the dreaded flash.

- Watch your shutter speed! Your shutter speed should not be lower than the inverse of the focal length of your lens (if you're shooting with a 50mm lens, then your shutter speed should not be lower than 1/50). If it does get lower than that, use a tripod or another steady surface! This will allow you to take the crispest photos possible. Of course, you will come across a situation where you will have to shoot at a lower shutter speed without a tripod...in that case, hold your breath and hope for the best!

- Bump up your ISO. On most cameras, this will go as high as 1600. On some cameras, you can set it up to 3200, even 6400. This is the digital equivalent to film speed/sensitivity. Just keep in mind that the higher your ISO, the more grain your photo will have. If this bothers you, you might want to look into a noise-reduction software or plug-in such as Noiseware to reduce the noise while you are editing your photos.

If all else fails - use flash! External flashes will give you the best results, of course. Bouncing the light and using a diffuser will light your subject without being super harsh.

If you don't have an external, you can resort to your pop-up flash. I like to set my flash exposure to about -0.3 (you can usually set this by looking in your in-camera settings menu. Consult your manual for details). This allows your flash to be a little bit weaker. Sometimes, when I shoot with a normal flash, my subjects get really blown out. This helps with that a little bit. Remember to not get *too* close to your subject, otherwise they will end up being blown out. You can also try attaching a piece of tissue to your flash as a DIY diffuser. Gary Fong also sells diffusers for pop-up flashes. These allow the light to be a bit softer.

Another trick to take better low-light photos is to adjust the white balance. This customizes the colors and the look of the white in your photos based on the situation you are shooting in. Have you noticed that your photos turn orange when you're shooting indoors with artificial light? This is because your white balance is off. Your camera should have a variety of presets for several situations. If you're inside and shooting in incandescent light, use the "tungsten" setting, which is usually represented by a lightbulb icon. If you are outside on a cloudy day, and notice that your photos have a blue-ish tint, set your white balance to "cloudy" - usually represented by a cloud icon. Check your camera manual for specifics.

Sometimes the presets still don't fix my color issues, however. In that case, I use custom white balance. It's a bit tricky to explain how to set this, so if you want to try using it, I suggest that you consult your camera manual. For best results, use a grey card to get an exact reading of the lighting situation. The "white" used to analyze white balance isn't a true white - it's more of a shade of grey. By using a grey card, you will get a more accurate reading of the lighting situation. However, you can just use a white object in a pinch. I almost always end up using a napkin, since a lot of my indoor photos end up being taken at restaurants. This will cause your pictures to have a slight blue-ish tint, but it's much easier to fix afterward than if you have a super-orange photo.

If it comes down to it, you can also set your camera to underexpose your image slightly. It is almost impossible to save a blown-out, overexposed photo, but you can salvage slightly underexposed pictures with photo-editing software.

Kelly has a couple of tricks you can play around with:

Sometimes, especially in low light situations, photos turn out darker than you'd like or the color is not true to life. There are two easy fixes in Photoshop elements that bring new life to your low light photos!

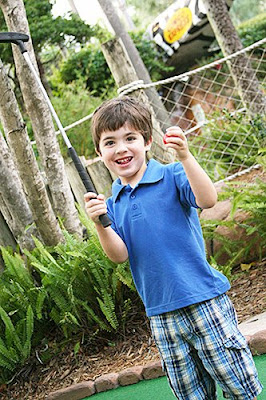
The first is using the Screen layer mode in PSE. Take this photo here...it was getting dark outside when I shot this, but I knew I didn't want to resort to using my flash yet. I had already used a lot of the tips that Caroline gave...high ISO, slow shutter speed...but if I would have used a slower shutter speed than this, my photo would have been likely very blurry. Knowing that I could use the Screen layer in PSE to brighten it up, I settled for a underexposed photo.


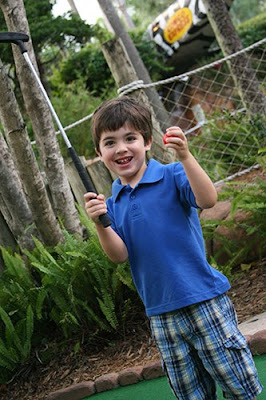
To correct this, first create a new layer in your layers palette. Then in the layers palette, you'll see a drop down menu. Change the mode to "Screen" and adjust the opacity to your liking by sliding the slider either left or right. See how such a simple fix improved this photo dramatically?


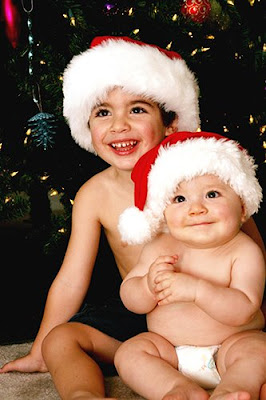
A lot of times if your low light photos will tend to have a yellow tint to them. For example, this photo...severely underexposed and definitely has an strange color thing going on....


To fix this or at least improve it, you'll first have to use the Screen method from above (sometimes 2 times if your photos is this dark!). Then, go to Enhance in the toolbar and select Adjust Lighting

hope these tips help you out! :)
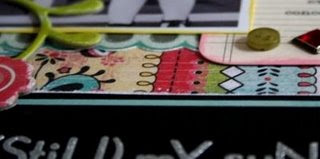