Thanks to all those who asked a photography question - I'll be answering some of them in a bit. I thought I'd share some tricks and tips about post-processing photos in Photoshop first.
Converting to Black & White

I love black-and-white photography. There's something so pure and soulful about a B&W photo. I also love that there are at least five ways to convert a photo into B&W using Photoshop (and at least four using PSE that I know of, but since I don't have a working version of PSE to reference, I'll just talk about Photoshop. Most of these methods are probably performed in PSE much the same way).
Grayscale
Grayscale is probably one of the most common ways to convert a photo to B&W in Photoshop or PSE. This is done simply by changing the Color Mode. (Image>Mode>Grayscale)
Desaturate
This is exactly what is - you're desaturating the photo of any color. There are two ways you can do this: Image>Adjustments>Desaturate or Image>Adjustments>Hue/Saturation and move the Saturation slider all the way to the left.
Channel Mixer
This is a way of using the Red Green and Blue channels to affect how the blacks and whites look once converted to Monochrome. Image>Adjustments>Channel Mixer and check the Monochrome box on the bottom. Move the Red slider to 33, the Green slider to 33 and the Blue to 43, and then play around with the sliders from there.
Gradient Map
Image>Adjustments>Gradient Map, making sure the gradient is black to white, left to right. To make things interesting, you can change your blacks to a teeny bit of gray and your whites to just shy of white for more subtle differences.
Black and White
In CS4, which is what I'm working with, there is a Black & White option in Image>Adjustments. This seems to function like a combo of Desaturation and Channel Mixer, but with more channel options.
I use the Gradient Map method almost exclusively with slight tweaking in Levels and Curves if needed. Gradient Map always seems truer to the blacks and whites with a bit more depth where the other methods seem a bit more flat. In any conversion, I always convert AFTER I've completed all my color edits and saved the color file. If I only want the B&W version, then I'll convert first and then edit.
If you want to see some examples between the first four methods, check out this post from my personal blog from a while back.
Some of the other most common things I do to my photos are Levels and Curves, Smart Sharpen (CS3 & CS4), Vibrance (CS4) and some Dodge and Burn when I think it needs it. A "defog" can also be done on some photos for some added crispness and dimension. You do a defog using the Unsharp Mask option (Filter>Sharpen>Unsharp Mask) and set the Amount to 60 and the Radius to 20, leaving the Threshold at 0. You can move the Amount and Threshold amounts around for more or less drama, or, if you do the defog in a new layer, you can change the opacity to suit your tastes.
To lighten photos, there are a few ways of doing this.
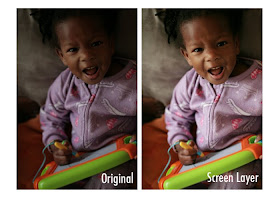
Screen Layer
One of the easiest things to do is a Screen Layer by Layer>Duplicate Layer>OK. Then in the Layers dialog box, change the layer from "Normal" to "Screen" by scrolling down the drop-down menu. Then you can change the opacity to adjust the lightness. To flatten your layers after making this change, to Layer>Flatten Image.

Levels and Curves
Levels and Curves are two different ways of manipulating the lights, darks and midtones in a color or B&W image. I don't use any particular settings when adjusting these things, I just move the sliders around until I see the changes I'm looking for. And you can use these two independent of one another, meaning you don't have to do a Levels and then Curves. Sometimes just one or the other will do the trick. The best thing to do with these two essentials (well, they're essential tools in my post-processing box) is to play around with them and experiment until you know what they can do and what is pleasing to your eye.
So now that your eyes are glazed over and you're ready to defog your brain, let's get into those questions, shall we?
Waleska wanted to know about resizing images for the web. And here is what I do, which I learned from a photography magazine. Bigger is not better when it comes to posting photos on the web. To resize your photos just for posting to a blog or other website, go to Image>Image Size. In the dialog box, set the Resolution to 72 and the largest pixel dimension to 600. Then - and here's the trick to get them nice and crisp - select "Bicubic Sharper" from the bottom drop-down menu. Not only will resizing your images this way cut down the time it takes to upload them to the web, but they will look a TON better once they're there.
Houston wanted to know about lens filters. The only filters I use are UV filters and Polarizing filters. You should have at least a UV filter on your lenses at all times for protection. A polarizing filter is good for conditions with glare and reflection (through glass or water), much the same as polarizing lenses on sunglasses. A UV filter will not affect your image, but a polarizing filter will. Color filters have their purposes in both color and B&W photography, but it's not something I've experimented with. There are also color filters for flashes that give flashed images either a cooling or warming result, but, again, I've not played around with that too much.
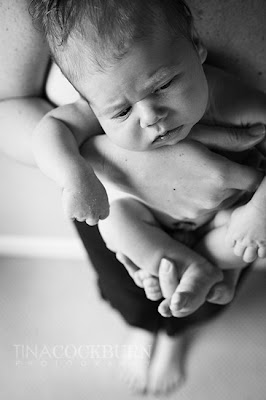
1scrappycat asked which lens I use the most. That would be my workhorse, the 24-70 2.8L by Canon. It weighs a ton and costs a fortune but it rarely leaves my camera. For photographing newborns or groups that don't contain fast-moving toddlers, I will use my 50mm 1.8 or my 85mm 1.8 since these are the best for portraits. But in my everyday life and with most clients, it's the 24-70. In fact, that B&W photo of the tiny baby up above was taken using the 24-70 the day after I got it (and realized some wrist support would be needed - seriously heavy when attached to my 5D).
Crystal was looking for some composition tips. Well, there are so many things that make a photo great. Sure, composition is one of them, but lighting, camera angle, your subject and your perspective are equally important and can have a significant affect on the feel of a photo. Again, take that baby photo above. There are so many ways I could have taken that photo, but what I wanted was a different perspective. I stood on a step stool so that my vantage point would be from above, and I shot downward, getting the baby and his mother's feet in the shot. And if you notice, his face is on the top line of the (imaginary) thirds grid.
So try these things when playing around with composition. Using a (patient) person or an object, take photos of it from different angles and perspectives. Tilt your camera just a tad to the left or right. Try shooting with the subject along different lines and intersections of the thirds grid. Play with lighting by limiting the amount of light on your subject or by playing with backlighting. Stand above, below, in front of and behind your subject. Play around with all of this and HAVE FUN with it. Then look at your photos and pay attention to which angles, perspectives, lighting and tilts appeal most to YOU.
And here's another great link about composition.
So, my little chickadees, that's all the time I have for today. But please don't despair if I didn't get to your question. Visit the Photography board in the SC Forums and ask away.
Good night and have a lovely weekend! Joy will be back tomorrow with some more inspiration and scrappy fun!

Tina what camera do you use? im thinking of getting a canon rebel xti..... what would be a good lense to start off with?
ReplyDeleteThank you so much for all the valuable info on editing pics - I have a new program and some of the vocabulary was confusing to me, so it really helped me to have it all explained!!
ReplyDeleteThis comment has been removed by the author.
ReplyDeleteMany thanks for this, I am always looking for the b&w holy grail!
ReplyDeleteWhat works best for me is the Gradient Map too.
If am I still not happy with with the result, I use curves. Got a great tip from Tara Whitney's blog: use Curves and move the controls until the curve looks like an "S". This adds more contrast to the photo in a really nice way!