Today I am going to show you exactly how to run one of my actions. If you haven't used actions before, you will be surprised at how easy and simple it really is! (This tutorial is for running actions in Photoshop and not Photoshop Elements.... but I can do a tutorial for Elements in the future.)
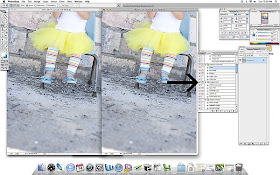
Here is a screenshot of my computer with Photoshop CS2 open. I opened up the image that I wanted to edit and I duplicated the image just so you can see the original SOOC photo next the one we are editing. This will help you to see exactly how the action has changed the image.
The arrow is pointing to the actions palette. If you don't already have it open, you would go to Window, Actions and then it will open up. Next to it, to the right, is the layers palette. This is another one that you will need to open. If it isn't open, simply go to Window, Layers and it will open.
In the Actions palette I have selected or highlighted the action that I want to run or apply to my image. Once I have it selected I will click on the arrow at the bottom of the palette. If you hover over it, it will say "play selection." Here I have selected the Urban Action in my Color MIX Action set.

Below is a screenshot that was taken right after I ran the action. You can see that the image has changed quite a bit as compared to the original. The arrow is pointing to a layer that is above the background layer in the layers palette. A lot of actions (including some of mine) will create a duplicate layer to which all of the adjustments will be made. If you were to simply delete this layer at this point, you would be back to your original image. This is to allow you the option of adjusting the intensity of the effect.
Most of the time I do not leave the intensity of the effect at 100%. Instead I will decrease the intensity until it is to my liking, and here is how to do that. The arrow is pointing to the opacity slider that is located in the layers palette. It is important to make sure you have the layer you are wanting to adjust selected. Then you will click on the little arrow that is to the right of the opacity window and a slider bar will appear. You can move the point on the slider up or down until you reach your desired result. Here I have selected an opacity of 76%.
At this point you can go ahead and flatten your image by going to Layer, Flatten Image and you are done! Or, if you want you can play another action to create a different effect. Here I selected the Yellow Vintage action in my Vintage Action Set and I hit play. You can see in the screenshot below how I got a completely different look by running this action after I ran the other one.
So, that's all there is to it! Pretty simple right? If you haven't already tried actions, just be careful because they can be addicting!! :)


I'd love to see this action for Photoshop Elements if you could post it!
ReplyDeleteI'd love to have some PSE actions and tutorials. I love the effects I see but not everyone has a need for the full blown PS. Thanks!
ReplyDeleteI have elements 6. I would love to know if my ps is compatible with your actions.
ReplyDelete