
 Hi! Tina here. I'm going to give you a few techniques on how to create unique backgrounds using paints and mists. So prep your work area with some scratch paper and get ready to get your fingers tips dirty. :)
  Get out your paints, mists, a cheap paint brush, a foam brush, a hard plastic card (like an old gift card), a circle and star punch, some stamps and ink.
I sometimes use my plastic circle template but found making your own with all the same size circles makes the painting go faster.

 Choose your paint color and grab your stiff paint brush (I usually get the cheapest ones from Micheals)
 Painting in a circular motion, fill in the circles but don't load your brush with more paint until it becomes faint. Usually by the 3rd or 4th circle. Having different tones of blue makes it more interesting.
 Let it dry before moving onto the next step.
 After the paint has completely dried, place the template over your paper and trace circles using a pencil. This defines your circles and adds more depth.
 Let's keep going....grab some stamps and ink. With your template placed over your painted circles, stamp your image.
 Here's an example used on an older layout.
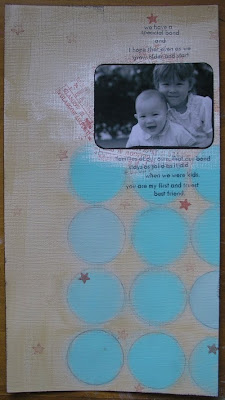
 Try this technique with a different shape template. Stars are really fun.
I showed this paint technique last year but thought I would add a little twist.
Take your plastic card, a foam brush and a few colors of paint.
 Start with your first color and apply a layer of paint to the edge of the card.
 Place the card on your paper and drag it down.
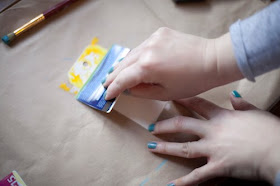
 Without cleaning off the card, add another paint color. Repeat dragging.
 I applied this technique to my most recent layout.
This last technique was inspired by 2 things.
First, I happen to accidentally splatter some mist when I was trying to unclog the sprayer.
Second, I came upon a photo on Tumblr that had a similar effect but was done with water color paint.

 Uncap your mists and shake onto paper. This will add droplets of mist. Add several colors.
 After adding your desired amount of mist splatter, take a paper towel and blot it dry.
 I added a typed message and a bird (using the MS punch). I can't wait to try this on an actual layout.
Thanks for hanging out with Stephanie and I this week.
I hope that you will give one of these techniques a try.
Practicing on little tags is something I recommend before applying them to a layout.
Remember, have fun and make it your own!
i love the bird stamp on there too. fun techniques!
ReplyDeleteI want to try every one of these ideas!!! Thanks for the inspiration.
ReplyDeleteoooh so fun! I have to try this!:)
ReplyDeletethese techniques are delightful! I can't wait to try it out!
ReplyDeleteI LOVED seeing this!
ReplyDeletethanks so much for sharing! love these!
ReplyDeleteThis is really lovely!
ReplyDeleteI will try to do the same and thank you for these great ideas!
g.
these are too cool - you make me want to break out the paint!
ReplyDeleteGreat tutorial! Good thinking on trying it out on a tag- I have way too many of those, so it is a perfect excuse to use them. Plus, it makes for a pretty laundry line of inspiration!
ReplyDeleteFANTASTIC!
ReplyDeleteThese are AWESOME. Thanks for showing us :)
ReplyDeleteyou are so talented! thanks for sharing those awesome techniques tina!
ReplyDeletePaint is my favorite medium and I love these techniques! So fun and versatile!!
ReplyDeleteQuestion .... where do you buy these white tags? I am only finding them at Office Depot in quantities of 1000!!
ReplyDeleteThanks!
Love your techniques, Tina! The results are just fabulous.
ReplyDeleteMarisa, I've had these tags forever, I think I got these at my local rubber stamp store. I would try Etsy.
ReplyDeletei love the card dragging technique, i've tried it a few times, don't get quite the same look as you do, but love it nonetheless. i think i put too much paint on :)
ReplyDeletewill definitely try these! Thanks!!
ReplyDeleteCan't wait to try this, great tut!
ReplyDeletei totally love all of these ideas. gonna have to try this sometime soon!
ReplyDeleteand i think i'll post it in my {things i love} thursday post tomorrow!
Thank you, I'll try some of these ideas on and with fabric.
ReplyDeletetotally love this..thanks for sharing!
ReplyDeleteFabulous ideas. TY
ReplyDeleteGreat and clear tutorial.
ReplyDeleteThat was a fun tutorial! Thanks!
ReplyDeleteLooks like these are amazing
ReplyDeleteoil painting on canvas
These look so fun! I'm definitely going to try them out! Thanks so much for sharing! xo
ReplyDeleteFrom "Paint Effects Tutorial" i have find a lot of valuable material its helpful for plastic card designers.
ReplyDeletePlastic Business Cards
Plastic Card printing
a few days ago, i buy a acer aspire one 9-cell battery ,long battery life,can last 9-10 hours ,its perfect,suggest you:
ReplyDelete