
 Start by printing out the word you'd like to include on your project, in the font and font size that will work best. (I used 'amelie' font at 150 pts).
Gently tape the corners of the paper down over the cardstock that you'd like to stitch onto.

Use a paper piercer to pierce holes along the printed word, at even intervals (keep in mind tht your interval hole length will dictate your stitch length). I like to use a craft mat under my cardstock while I'm piercing holes.


Once entire word is "pierced" gently pull up template paper to reveal stitching pattern on cardstock.

Using a large embroidery needle, and embroidery floss, start to stitch word using a backstitch stitching technique. Secure end of floss to backside of cardstock using a small piece of tape. Then make first stitch, and bring needle back up through second side of second stitch.
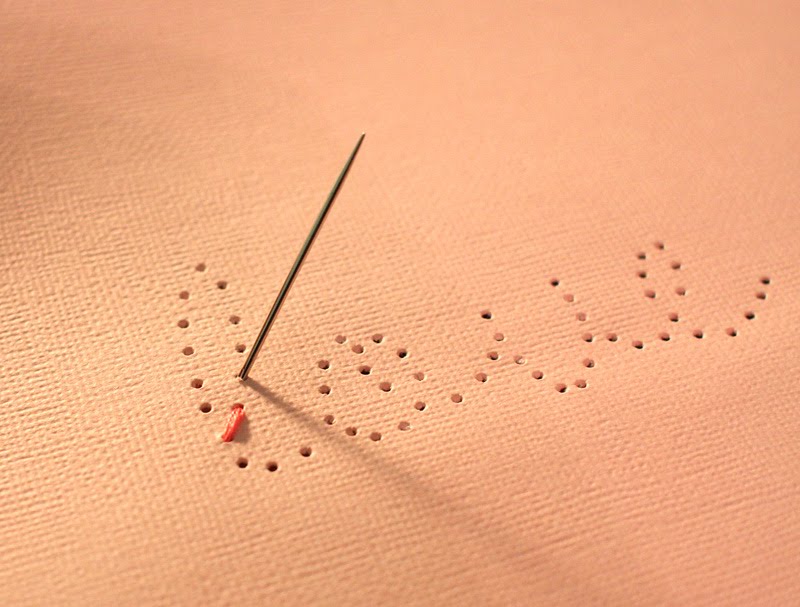
"Backstitch" by threading needle and floss BACK THROUGH previous hole as shown.

Continue on along word, and stitching holes.

Until entire word is stitched! Secure end of floss to backside of other end of word using a small piece of tape.

Trim your stitched word from your cardstock anyway that you like and include it on a card or layout!
 :)
:)
Great tutorial Susan! I'll try it this week!
ReplyDeletejust started sewing on my LO's last month thanks for the idea
ReplyDeletewhat a great idea! I would never have thought of doing it that way. Thank you for sharing!
ReplyDeleteso cute susan! thanks for sharing :)
ReplyDeletebeautiful card! great tutorial too. :)
ReplyDeleteOooh thanks for sharing! I've always been really bad at hand-stitching and this was perfect for me!
ReplyDeleteso easy!! thanks susan, and a stunning card :0)
ReplyDeletewow! wonderful! I love it... ;-))
ReplyDeletepolepole del CircoloVizioso
Absolutely wonderful! I will try this at my next project! :)
ReplyDeleteJust a quick note to let you know that a link to this post will be placed on CraftCrave today [09 May 02:00pm GMT]. Thanks, Maria
ReplyDeletethis is gorgeous, susan!
ReplyDeleteThis tutorial has made this technique seem so doable for the first time (for me)!
ReplyDeleteI am so excited to try it out!
Thank you!
So beautiful!! I need to try that!
ReplyDeleteThis is awesome and seems so easy! Thanks so much for sharing! Now if I could just find that beautiful font!
ReplyDeletelovely!!! I´ll feature on my blog
ReplyDeletehope you dont mind
hugs from Brazil