Hey everyone! Susan here today with a tutorial on my photo resizing process.

Then change the new file's parameters to "INCHES" in the drop down box next to the input fields. Type in 6 for the width inches, and 4 for the height inches. MAKE SURE that you select "WHITE" from the drop down box for BACKGROUND CONTENTS (this is what will make the nice white borders around your mini pics). ALSO make sure that you type in 300 for RESOLUTION (this means the image will be at 300 DPI).

You now have a blank white 4x6 print.


A few of you mentioned that you'd like to know how to easily resize your photos to non-standard sizes for printing and use on layouts and projects. I frequently like to use what I call "mini-pics" on layouts as the supporting photos to my one main photo. OR - I'll just use a lot of mini pics to create one big photo collage page - as I did in this layout from the Summer Camp gallery last month.
The easiest (and probably cheapest) way to print these mini-pics is by getting a few pics onto one standard sized 4x6 print, and then having it printed at your regular photo printing lab/place.
For this tutorial I will show you how to crop and resize 2 seperate images to fit onto a 4x6 image. You can also apply these same principles to a 8x10 or 5x7 (like I did here) image if desired. >> I'm going to use a PC and Photoshop Elements 7.0 for my sample screenprints, since that seems to be what a majority of people use.
Start by opening up Photoshop and creating a blank 4x6 image. Go to FILE > NEW > BLANK FILE.

Then change the new file's parameters to "INCHES" in the drop down box next to the input fields. Type in 6 for the width inches, and 4 for the height inches. MAKE SURE that you select "WHITE" from the drop down box for BACKGROUND CONTENTS (this is what will make the nice white borders around your mini pics). ALSO make sure that you type in 300 for RESOLUTION (this means the image will be at 300 DPI).

You now have a blank white 4x6 print.

Open up the first photo in photoshop, that you want to make a mini-print out of, and select the crop tool. AT THE TOP of the screen, be sure to TYPE IN 300 next to 'Resolution'. If you know exactly what you'd like to crop your image to, input those parameters as well. Otherwise leave them blank, as I did, and we'll use the transform tool later on to adjust your image size to scale.

Drag the dotted line crop tool box around your image as you'd like it cropped. Once you have the box as you'd like, RIGHT click (on a PC) and select CROP.

Then (on a PC) hit "CONTROL + A" to select the entirety of your cropped image, and then "CONTROL + C" to copy your image.

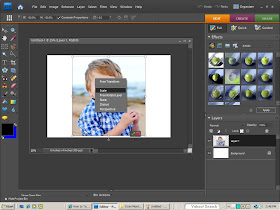
Switch to your blank 4x6 white image and hit "CONTROL + V" to paste your cropped photo onto the white 4x6. Then hit "CONTROL + T" to use the transform tool to change the size of your image.

You want to make sure that you are keeping the correct scale dimensions on your cropped image when you use the transform tool - so in Photoshop Elements, you need to RIGHT CLICK on your photo and select SCALE to in order for the transform tool to keep the correct perspective dimensions.

Once the image is "transformed" to the size you'd like, click the green arrow on the photo. (If you change your mind on transforming or would like to start over simply click the red circle with the bar through it.)

Then use the "MOVE" tool - the four arrowed button in the upper left corner of your tool bar, to move your image to one side of the 4x6 print, to make room for a second mini-pic.

Open up your second image and repeat the process cropping, cutting & pasting, & transforming to add your second mini-pic to the 4x6 print.


Once your second mini-pic is in place, you'll need to flatten all of the layers that you created to prepare the 4x6 for printing. Go to LAYER > FLATTEN IMAGE to do this, and then save your 4x6.

You now have a 4x6 image ready to print that will yield you two mini-pics (with white borders if you want them!).


You now have a 4x6 image ready to print that will yield you two mini-pics (with white borders if you want them!).


Great info on resizing...thanks...I have transferred all my updates of your blog from email updates to following on my own blog...makes for quicker and easier view and frees up my email in box.........
ReplyDeleteHave a creative day.
WoW--thanks for this!! I usually just do a picture package in PSE, but I've been wondering how to do this any size I want on a 4x6!
ReplyDeletetkx for the tips! loved it
ReplyDeleteThanks so much for this! I have been trying to figure it out for awhile without success. I often wish to include smaller photos that don't crop down very well from a 4x6.
ReplyDeleteWhat a great idea. I was wondering how to do that and i like how you saved room for the white borders.
ReplyDeletethanks for this...I am new to PSE and was wondering how to do this. L
ReplyDeletethank you, thank you, thank you!!! I knew how to resize but it would never be the same scale. I never knew about selecting the scale button. Thanks!!
ReplyDeletesusan...you're my hero.
ReplyDeleteOMGosh! Thank you! Thank you! Thank you! Off to go try this! (I actually want to try this as a way to design a photo collage for a wall).
ReplyDeleteThank you, thank you, thank you!
ReplyDeleteThank you ffor sharing
ReplyDelete