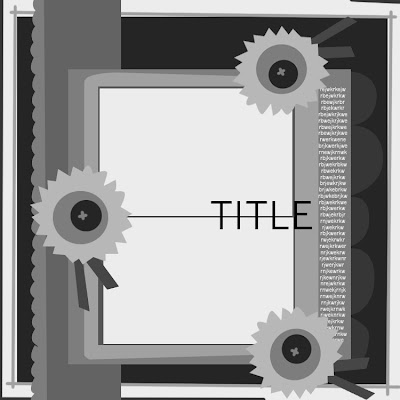
I've been waiting all month to share this sketch with you based on Stephanie Howell's "How" layout. It's super easy with 2 4x6 photos stacked along with lots of patterned paper and she even gives you a way to use doilies or other circular embellishments, like flowers.
Notice how she layers the patterned paper behind the photos. Lots of layers and even a strip with a decorative edge using a border punch. The title sits on top of the photos and the journaling is in a thin strip that runs vertically, visually connecting the photos.
Great layout and I can't wait to see your take on it!
Simply link your layout here by Saturday. Winners will be drawn Sunday for 2 $5 gift cards. It's that easy!
February 28, 2010
Sunday Sketch Winners
by Astrid
by Abbey
Thanks again for playing along! Again, these sketches are receiving amazing results and we'll continue to give randomly pick 2 winners each week. Stay tuned for the next sketch posting in just minutes.....
If you're a winner, please send an email to info@studiocalico.com copy and paste the following information, adding your details. Emails without this information will not receive a prize.
- Name
- Address
- Contest: Sunday Sketch
- Prize: $5 gift card
Layout of the Week
The layout of the week is brought to you by Rita Oliverio (rmoliverio).
Each week, the layout in the gallery is linked, so you can add it to your favorites easily.
This layout has been added to your favorites more than any other layout in the SC community gallery for the week of 2/21-2/27.
Congratulations Rita! Because of this you have won a $10 gift card to be used on any new purchase at Studio Calico.
Want a chance to win next week? Be sure to upload your projects to the SC gallery, and support your community by adding special projects that catch your eye into your favorites! It could be YOU next week!
Please note, winners are not allowed to win more than once in a four-week period.
Winners are not limited to those using Studio Calico kits.
Baby Layout Inspiration & Challenge Winner
Hello all! Hope you all had a fabulous weekend.
shout out to a few of my favorite baby layouts!
"Introducing Miss Edie" by Ember S. Another sweet baby girl! I LOVE how she layered her title over the rub ons, and those strips of border punched patterned papers are perfect!
(This layout is headed to Scrapbook Trends magazine. Yay!)
"Sweet" by mammascrapper. I adore that she used a photo of herself as a child in this layout.
And because our boys are just as sweet...
"Hello" by simplytam. The yellow with the pop of red. Fabulous. I love the heart banner. The fun stitching. the black and white photo. Love it all.
"Computer Time" by Saracicle. I love her use of Whodunit here... and the sequence of photos. The title is an eye catcher, too! Such a sweet little man. :)
And now.. for the winner of the "baby colors" challenge..
Please shoot me an email at kimmithylaine@aol.com with your email address so I can get your gift card code sent out to you! :)
Thanks to everyone who participated! I enjoyed browsing through all of your wonderful layouts! :)
Have a great week!
Kimmi
February 27, 2010
Yo-Yo Flowers Tutorial
Quite a few of the Design Team made the project kit add on this month. I know when midnight rolls around we are going to see a few different takes on the fabric flower.
I love making fabric flowers, and one of my favorite quick and easy ones is the yo-yo flower! For one thing, its called a yo-yo flower, that totally makes me smile and think of Eazy-E. When you make it without a hem, it is a quick and easy embellishment to any project.
Here's my process:
1) Find a circle for a template. This is a random chipboard circle that I had lying around, but I've used all sorts of things in the past including a punch like this. The finished flower will be 1/2 the radius of the beginning circle.
2) Either trace the circle or just cut out around the circle template. I chose to trace the circle.
3) Cut out your circle! I love my cutterbee scissors, but I've also used these Tim Holtz scissors with excellent results.
4) String a needle with embroidery floss or bakers twine with a knot in the end. Sew a running stitch around the outside edge of your circle, leaving approximately 1/8th inch of fabric. Gathering fabric as you go.
You don't need to make a hem like you would on a quilt yo-yo, because we will be covering up the middle of our yo-yo.
5) In the end you will have a little drawstring bag.
6) Turn your bag into a flower with the gathered part in the center. Leave the floss and needle in place if you are sewing on a button. If not, tie off your floss.
7) Sew a button into the middle of your yo-yo, and voila, a yo-yo flower!!!
Here is my completed banner project for our new baby's room. There is a yo-yo flower between each flag. I used the Patchwork add-on along with papers from the other kits for the mini banner and letters. I used lime twine for the mini banner. I also added a spray of Lemon Mist on each of the flags.
Here are a couple of other uses for yo-yo flowers.
Challenge Reminder
Just wanted to pop in and remind you all of the challenge that is due today! :) Make sure to link your layout to this post for a chance to win a $5 Studio Calico gift card.
And.. I also wanted to share the full image of my "baby colors" layout that I created for this challenge. Here, I used lots of Anthology. This line is perfect for just about anything, including babies.
And since my new nephew is such a cutie, I wanted to share the photo featured in this layout...
February 26, 2010
Reveal Night Giveaways!!!
Imagine that!
2 fabulous giveaways from Basic Grey. It doesn't get much better than this!!!
Just leave a comment here stating which is your favorite:
- Green at Heart
- Kioshi
Oh, and no cheating...you HAVE to pick. If you say, "both" and your name is drawn, we won't count it. Sorry. Someone's gotta lay down the law around here ;)
Winners will be chosen on Sunday, 2/28
February 25, 2010
Behind the Scenes - a baby book
I have quite a few friends that are pregnant or have just had their babies. My friend had little Jada in November, and when I saw the colors of the last kit, I knew I had to make a baby girl book.
When I make a mini book I think of a few things:
On the opening page I included the vital statistics of Jada as a newborn. There is also room for a newborn photo of her.
In the following pages I followed a simple pattern that was easy to duplicate and relatively flat, I also left room with the awesome SC stamp for Jada's mom to fill in some of the things that happened during that month.
At the back of the brag book there is plenty of room for extra photos that the family might want to include and carry around with them.
Let me know if you try one of these quick and easy brag books for anyone in your life. I'd love to see them.
This would be a perfect purse accessory for a new mom, or a doting auntie, or especially a gramma who wants to show off all those wonderful grandkids!
When I make a mini book I think of a few things:
- What is the subject matter?
- Who is the book for? A scrapbooker, a non-scrapper, a grandma, a new mom?
- How much handling is the book going to get?
On the opening page I included the vital statistics of Jada as a newborn. There is also room for a newborn photo of her.
In the following pages I followed a simple pattern that was easy to duplicate and relatively flat, I also left room with the awesome SC stamp for Jada's mom to fill in some of the things that happened during that month.
At the back of the brag book there is plenty of room for extra photos that the family might want to include and carry around with them.
Let me know if you try one of these quick and easy brag books for anyone in your life. I'd love to see them.
This would be a perfect purse accessory for a new mom, or a doting auntie, or especially a gramma who wants to show off all those wonderful grandkids!
February 24, 2010
Playing with Gesso and Mist
Hey everyone!
I prettified this canvas real quick for Valentine's Day and thought I'd share some photos and words with you :)
You will need.
6x8 Canvas Panel - I got mine from the art supplies store, super cheap. Less than $2.
Gesso
Orange Mist
Hydrangea Mist
Lime Mist
Dark Cornflower Blue Mist
Kraft cardstock - I used scraps. I'm sure you have some lying around.
Heart Stamp, Maya Road Pins and OA Red polka dot paper from WhoDunIt.
Making Memories - Paper Shreds Findings, Martha Stewart - Die Cut Lace tag, American Crafts - Letterbox Frame, Hambly - Stitches Rub On and Basic Grey - Origins Micro Monogram Stickers from Baker's Dozens and its Add On Kits.
Stazon - Timber Brown.
A teeny bit of yellow colored cardstock.
Martha Stewart - Classic butterfly Punch.
Versamark Ink
Red Embossing Powder.
Sable Brown Paint
I started with a blank canvas.
Then sprayed Orange mist all over it. The color will be pretty intense at this point. Don't worry about it, we will tame it down with gesso.
Waited 10 minutes, then slapped some gesso on it and went to town. You can use plastic knife (think McDonald's pancakes breakfast LOL) or like me, just use your fingers. You can see that most of the orange is now gone. I like to scrape the gesso thin at places so you can see the orange-ish underneath. Don't worry about getting it perfect, that's the whole point of using your fingers/ plastic knife.
Close up. I also sprayed a little Hydrangea mist, very little, from afar, as I just wanted little droplets of the blue on there. You can now use heat-gun if you want. I just left mine to dry while I made dinner for the girls.
When it's dried up, I sprayed some Lemon mist and (again) Orange mist, randomly and used heat gun on the whole canvas. Making sure I keep it moving to avoid bubbling up of the gesso. I sometime do that on purpose, but not this time.
Stamped and embossed the heart three times on kraft cardstock. Adhered to canvas panel.
Stazon-ed the Origins Micro Monogram Stickers to change their color.
Misted the Martha Steward Die Cut Lace tag - Dark Cornflower blue, arranged the letters to my liking. Punched two butterflies from the red polka dot paper and yellow cardstock, painted the AC letterbox frame - Sable Brown.
I also applied some Hambly stitches rub on on the hearts and scattered some cut up words from Making Memories Paper Shreds.
I promise you, it looks harder than it really is. Give it a try, you'll be glad you did. It's so much fun!
Let me know if you have any questions. I will be glad to help!
I prettified this canvas real quick for Valentine's Day and thought I'd share some photos and words with you :)
You will need.
6x8 Canvas Panel - I got mine from the art supplies store, super cheap. Less than $2.
Gesso
Orange Mist
Hydrangea Mist
Lime Mist
Dark Cornflower Blue Mist
Kraft cardstock - I used scraps. I'm sure you have some lying around.
Heart Stamp, Maya Road Pins and OA Red polka dot paper from WhoDunIt.
Making Memories - Paper Shreds Findings, Martha Stewart - Die Cut Lace tag, American Crafts - Letterbox Frame, Hambly - Stitches Rub On and Basic Grey - Origins Micro Monogram Stickers from Baker's Dozens and its Add On Kits.
Stazon - Timber Brown.
A teeny bit of yellow colored cardstock.
Martha Stewart - Classic butterfly Punch.
Versamark Ink
Red Embossing Powder.
Sable Brown Paint
I started with a blank canvas.
Then sprayed Orange mist all over it. The color will be pretty intense at this point. Don't worry about it, we will tame it down with gesso.
Waited 10 minutes, then slapped some gesso on it and went to town. You can use plastic knife (think McDonald's pancakes breakfast LOL) or like me, just use your fingers. You can see that most of the orange is now gone. I like to scrape the gesso thin at places so you can see the orange-ish underneath. Don't worry about getting it perfect, that's the whole point of using your fingers/ plastic knife.
Close up. I also sprayed a little Hydrangea mist, very little, from afar, as I just wanted little droplets of the blue on there. You can now use heat-gun if you want. I just left mine to dry while I made dinner for the girls.
When it's dried up, I sprayed some Lemon mist and (again) Orange mist, randomly and used heat gun on the whole canvas. Making sure I keep it moving to avoid bubbling up of the gesso. I sometime do that on purpose, but not this time.
Stamped and embossed the heart three times on kraft cardstock. Adhered to canvas panel.
Stazon-ed the Origins Micro Monogram Stickers to change their color.
Misted the Martha Steward Die Cut Lace tag - Dark Cornflower blue, arranged the letters to my liking. Punched two butterflies from the red polka dot paper and yellow cardstock, painted the AC letterbox frame - Sable Brown.
I also applied some Hambly stitches rub on on the hearts and scattered some cut up words from Making Memories Paper Shreds.
I promise you, it looks harder than it really is. Give it a try, you'll be glad you did. It's so much fun!
Let me know if you have any questions. I will be glad to help!
February 23, 2010
Esty Inspiration
I don't know about you, but we LOOOOOOVE Etsy around here. There's just something about handmade goodies that makes a body want to craft. Anytime I'm having scrapper's block or just a bad day. I go around and browse around Etsy. It can be a time eater, but its a fun time eater!!!
So right now I'm waiting for baby J to show up and looking for inspiration for our new baby room. I decided I was going to get ghetto and rig up a "registry" at Etsy by just adding only baby things to my favorite items list. I have tons of things on there, but here's a few more inspiring things I found as I was searching around today:
sushi booties
come on...baby toes aren't edible enough? I think every baby needs some sushi booties!
branch decal
There are TONS of vinyl decal shops on etsy, but I just especially loved this sweet branch!
organic bamboo sling
I loved that this was not only eco friendly, but mad stylish as well. I love the colors in this baby sling!
rule posters
Love these graphic posters with rules from the management. There are a bunch more in their shop. A must have for the modern baby!!!
camera teether
We are camera crazy in our house. This adorable teether is high on my list (and its organic too :D)
robot print
There are SO MANY "art prints" on Etsy. I thought this one was particularly adorable.
mom tattoo headband
Every rockin' baby need this :D
grey flowered bib
Only the MOST stylish babies are wearing grey and yellow this season!
personalized print
Again, there are a ton of personalized stuff on Etsy, but I really love the fun quality of this shop's graphics, and the bright yummy colors!
bear hat
And really, I could live with or without this hat, although it IS pretty cute. The photo KILLED me :D Tres Fantastic!
February 22, 2010
Challenge - Use Typical Baby Colors
Our challenge is for you to use typical baby colors in a layout. We wanna see some pinks, blues, greens, and yellows. Pretty simple? (And don't worry, you don't have to focus on babies alone, just show us how you can use those colors in a layout.)
Here's a sneak of a layout that I created using a photo of my brand new baby nephew and some Anthology. The baby blues, greens and yellows in this line are GREAT for this challenge.
Make sure to link your layout to this post by Saturday in the comments section and we will choose a random winner for a $5 Studio Calico gift card.
Subscribe to:
Posts (Atom)