
Here are your random numbers:28
Timestamp: 2008-08-29 22:05:42 UTC
That makes Katherine our winner!!!
Katherine said...
Oooh! I love sneak peeks!! Thank you for the opportunity to win so many wonderful goodies!!
August 26, 2008 1:54 PM
Please email info@studiocalico.com with your address!!!
Happy Labor Day weekend everyone!
August 30, 2008
August 28, 2008
Wow.
I hope you've had a chance to go check out the Iconic gallery because it is quite a show. These gals blow me away each month with their creativity. Really. I love seeing how they all use the same supplies in totally different ways. It was hard to narrow down my favorite from each designer...but after much gallery perusing I did it! Here are Nic's Picks. :)
Jennifer's layout "You 2". I love how she used the AC embellishments together to make a larger design. And the photos...so sweet. Love how they are arranged.

April's "Moose" layout is just too cool. She can work a punch like nobody's business! ;) All those little circles, stitched together, the stamp...love it all!

Scarlet's gallery was so full of eye candy...but this "little book of Big Wishes" was just so darling! Love how she mixed and matched the patterns, colors...perfection!

Caroline's style is so fun and full of life. This one, "Tiney" from her gallery caught my eye right away with the cool photo arrangement and use of that yummy yellow!

Davinie's "You and Me" layout...oh I love this one. The blue and yellow with those photos just jumps out at you. Love the design here and of course the signature Dav stitching.

Jenn's pages always draw me in. She comes up with some awesome designs and this one is one of my favorites. How cool is this page?!

Joy's "Queens of the Castle" page is just perfect. Love her little paper made house, the crowns, everything here!

Kirsty's pages are full of a zest for life. Love how she combines product is such a playful way. "Hazel" caught my eye especially with the subdued colors and vintage feel.

Nicole H's "Quiet Days" is just so beautiful and serene feeling. Love her paint treatment (of course!) and her words of wisdom. :)

Stephanie's "Back When We Were Four". This is so sweet and touching and gorgeous. Love how she adds little doodles and dots to her letters and embellies.

And last, but certainly not least... Tina's "Inspiration is Everywhere" layout sure inspired me. LOVE how she has the falling oranges pieces! :) Gorgeous!

Like I said... gorgeous stuff! :) Can't wait to see what you ALL do with this kit too.
August 27, 2008
Dig out those school photos
You'll need them for tonight! The fabulous Joy Madison has decided that tonight's avatar theme should be...... bad school photos. Ugh. You know the ones. Hopefully you still have them somewhere and didn't burn them all in your teenaged angst. I'm having a hard time deciding on mine for this evening. Should I go with the slighly dazed and confused looking senior portrait? The "why didn't someone stage a hair intervention" sophomore photo? Or the totally 80's, I got the matching hair clip and plastic earrings at Claire's to play up my perm 7th grade shot?


It's a hard decision...come by the message boards tonight to see which of these horrid photos I picked AND more importantly to get your hands on ICONIC...you don't want to miss THAT. (My photo you may want to miss! LOL) I can't wait to see your former self there...big hair and all!
August 26, 2008
September Reveal Night Giveaway

Tomorrow (Wednesday) night at Midnight EST is the launch of our September kit, ICONIC, and three coordinating add-ons.
We are so excited, that we're beginning the celebration early! Post here for a chance to win this clearly fantastic giveaway. Then, make sure to join us on the message board tomorrow night as we count down the hours and minutes until the big reveal!

If you haven't received our monthly email newsletter, you may view it online here. Visit our home page or message board to sign up for the next newsletter, if you haven't already!
The winner of the September Giveaway will be announced on Friday!
August 23, 2008
Back to School Challenge
I have one short week before I send my twins off to Kindergarten. We have full day Kindergarten here and I'm still trying to come to terms with the fact that they will be gone ALL DAY. They are getting to be big kids. Not preschoolers, not toddlers, not babies. When did this happen? I'm still in denial. Seriously.
And while I may not be prepared emotionally for the moment when I see them walking off to their classroom with those big old backpacks on their little backs...sniff sniff... I'm at least prepared with all the physical "stuff" of the back to school season. I've gotten them each a few new clothing items to start the year with and their new backpacks are already filled with the required supplies. So, in honor of all that back to shopping we are all doing I thought I'd post a challenge for this week. Here goes....
1. New duds.
You can't start a new year without a few new items of clothing. Especially that special first day of school outfit that coordinates perfectly with Basic Grey Recess. (ooops...did I say that out loud?) So, the first required part of this challenge is that you use some sort of cloth or fabric or something clothing related on your layout.
2. School Supplies.
I love new school supplies. Fresh packs of crayons, new pencils, fresh erasers, clean notebooks. It just makes you want to start off on the right foot. And nowadays there seems to be a rather long list of things your child needs. For this challenge I'm giving you a list of possible school supplies to use on your layout. You need to use 3 from this list....
crayons
pencils
paint
transparencies
notebook paper
construction paper
staples
brads
white out
scotch tape
reinforcements
paper clips
3. ABC's and 123's.
The last part of the challenge is to incorporate BOTH LETTERS and NUMBERS on your layout somehow. Whether it's in the title, part of the design, in your journaling, whatever... use both prominantly on your layout.
That's it. Not too hard, right? Upload your creations in the gallery and link them to the Back to School Challenge thread by Sept. 2nd. The first day of school for my boys. boohoo. I'll pick a winner and send off a RAK to celebrate. :) Happy scrapping!
August 22, 2008
Studio Calico Recycles

Earlier this week April wrote about how she created a piece of art to help support and bring awareness to a very special cause in our community. To continue that theme, I thought I would share how Studio Calico helps the global community on an environmental level. It may be a small gesture, but it is one that is very important to me.
Each month, our office is flooded with cardboard boxes loaded with scrapbooking goodies. Instead of tossing the empty boxes into the dumpster outside, I take them to the curb on Fridays, to be picked up by the big green truck. I also reuse all of the packaging materials we receive, and I have even been known to upcycle damaged paper bags into giftwrap!


Another way that Studio Calico has embraced environmental awareness is by choosing a printer that has been certified by the Forest Stewardship Council and the Sustainable Forestry Initiative. What this means is that they print on paper purchased from special tree farms and they use recycled papers whenever possible. They also use recyclable inks and toners and water soluble, bio-degradable, and recyclable chemicals and solvents. And to take our printer's commitment a step further... when we put promotional coupons and stamp backers in your kits, not only are they environmentally friendly, but they are also completely reusable!

We also encourage the manufacturers that we work with to reduce the amount of packaging they send to us whenever possible. Some of our partners in this initiative are Sassafras, Hambly, Maya Road, and Jenni Bowlin. Instead of packaging the items we order in quantities of 6 (which is standard in the scrapbooking world), these manufacturers will often send our items unpackaged or in quantities of 100. We truly appreciate their willingness to help us reduce our negative impact on the environment.
For me, the commitment to helping the environment doesn't stop at the office. I am constantly looking for new things to add to my reduce/reuse/recycle routine. On a recent visit to a charming little boutique, I found some cheerful cards by Positively Green. Not only were they cute, but they were printed on recycled paper, they contained encouraging messages, and each one had an environmental tip printed on the back. Here's a sample of what they had to offer (I chose these because I think they accurately express what the Studio Calico community is all about):

If you would like to learn about some small steps you can take to help the environment, here is Positively Green's list of tips. How many of these can you add to your routine?
Now, as promised... the announcement of the winner of last week's Blinkie RAK...
{2H Design}! Congrats, Lauren! Thanks to everyone for showing your Studio Calico pride :)
August 18, 2008
SC in the Community
One of our Studio Calico customers works for a non-profit organization called VSA . VSA arts of Kentucky provides arts education and inclusion programs for children and adults with disabilities throughout the state and offers an under-served population equal opportunity to explore the arts in a way that is fully accessible. Their office is located directly beneath Studio Calico and the employees there are such nice, genuine people. A while back, they sent us some information about an art show to benefit their organization. So, I stepped outside my comfort zone and completed a 12x12" canvas.
 As you can see, the theme is Love Around the World. In my canvas, I wrote "love" in different languages, then added glossy accents to the top. I used a bunch of leftovers from the Studio Calico VIA AIRMAIL kit plus the Patterna stamp set by Fontwerks. I really like how it turned out, but I'm really nervous about it being displayed. It will be shown at the Bowling Green International Festival which always draws a big crowd. I know I've been pubbed before, but I never see anyone look or talk about my work. This is a bit different.....

 Hope this inspires you to be creative especially when it's for a good cause.
 As you can see, the theme is Love Around the World. In my canvas, I wrote "love" in different languages, then added glossy accents to the top. I used a bunch of leftovers from the Studio Calico VIA AIRMAIL kit plus the Patterna stamp set by Fontwerks. I really like how it turned out, but I'm really nervous about it being displayed. It will be shown at the Bowling Green International Festival which always draws a big crowd. I know I've been pubbed before, but I never see anyone look or talk about my work. This is a bit different.....
 Hope this inspires you to be creative especially when it's for a good cause.
August 16, 2008
this is so distressing...
anyone have any idea what these things have in common?? no...they aren't all weapons, lol...they're my favorite distressing tools!!
i am a BIG distresser...if you look at any of my projects, they all have a smidge of distressing somewhere. photos are a favorite thing of mine to distress...don't be afraid!! i'm not sure why i love it...maybe because it seems to give things a vintage-y feel. who knows?! but i have quickly learned that it's important to have the right tool for the job, thus i have acquired these in my stash.
so let's go through a few options...
the scissors are something everyone has, so it's pretty convenient. the sandpaper below is just from a pack i picked up at Home Depot that has different grits (textures/degrees of sanding ability) all in one. the round grey thing with the red center is a Tim Holtz distressing tool that has blades in between where the notches are cut out of the plastic. the pink handled goodies are my file set from Basic Grey. and of course there is always my foam brush for paint.
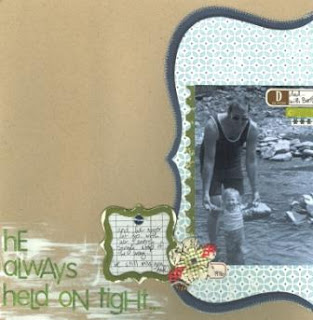 another one from the July gallery...this one a bit more roughed up. i used my Tim Holtz tool around the green paper to help it stand out from the kraft cardstock. if you don't have one of these tools, you can also just use your scissor blades...just open your scissors up and drag the edge of the paper along the cutting edge of the blades. this method (both with the tool and the scissors) makes the edges of the paper you're distressing stand up a bit...it will not make them smooth so that they lay flat like a piece of sandpaper will. and of course, i roughed up the frame after painting it, lol.
 now this...this took me awhile, lol. i used my big BG flat file on the straight edges of this album, but used my smaller files to get into those scallops. then i used the round tiny file to define the holes where the binder rings go...sanded the chipboard flower after painting (lol) and also sanded my alphabet stickers before i laid them down.

so you can see that the possibilities are endless...anything that will lay still can be distressed somehow.
at least that's how i approach things, lol.
 no...they aren't all weapons, lol...they're my favorite distressing tools!!
i am a BIG distresser...if you look at any of my projects, they all have a smidge of distressing somewhere. photos are a favorite thing of mine to distress...don't be afraid!! i'm not sure why i love it...maybe because it seems to give things a vintage-y feel. who knows?! but i have quickly learned that it's important to have the right tool for the job, thus i have acquired these in my stash.
so let's go through a few options...
the scissors are something everyone has, so it's pretty convenient. the sandpaper below is just from a pack i picked up at Home Depot that has different grits (textures/degrees of sanding ability) all in one. the round grey thing with the red center is a Tim Holtz distressing tool that has blades in between where the notches are cut out of the plastic. the pink handled goodies are my file set from Basic Grey. and of course there is always my foam brush for paint.
 i think it's pretty evident that i use the heck out of my BG file set. the big flat files i use to sand down the edges of chipboard...i've found the best way to adhere paper to chipboard is to use your glue stick or tape runner to adhere a piece of paper that is larger than the chipboard, smooth it out and then sand the excess paper off of the edges. i've yet to have a cover/paper lift off of my chipboard using this method...it works like a charm. the smaller tools see their fair share of action as well...i'll explain below.
ok, on this layout from the July gallery, i used sandpaper on the chipboard frame that holds my journaling after i painted it. the frame wasn't sturdy enough to hold in my hand while i used the big BG file, so i just plopped it down on my desk and sanded the top with a remnant scrap of sandpaper. i also added paint underneath the title...it not only helped it stand out, but added another element of distressing.
 another one from the July gallery...this one a bit more roughed up. i used my Tim Holtz tool around the green paper to help it stand out from the kraft cardstock. if you don't have one of these tools, you can also just use your scissor blades...just open your scissors up and drag the edge of the paper along the cutting edge of the blades. this method (both with the tool and the scissors) makes the edges of the paper you're distressing stand up a bit...it will not make them smooth so that they lay flat like a piece of sandpaper will. and of course, i roughed up the frame after painting it, lol.
 now this...this took me awhile, lol. i used my big BG flat file on the straight edges of this album, but used my smaller files to get into those scallops. then i used the round tiny file to define the holes where the binder rings go...sanded the chipboard flower after painting (lol) and also sanded my alphabet stickers before i laid them down.
so you can see that the possibilities are endless...anything that will lay still can be distressed somehow.
at least that's how i approach things, lol.
living on the edge.
(does anyone else immediately think of that AeroSmith song when they hear that phrase, lol??)
edges.
borders.
die-cut papers.
all big trends right now...it seems that it's not often you see a layout that doesn't have some kind of die-cut paper on it, or one where someone used a border punch to jazz up their edges. i'll confess, i'm an addict myself.
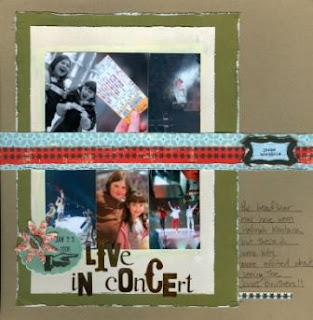
here's a layout i made (yes yes...i love a good 'grid' layout) using lots of fun edges.
 i think it added a bit of interest to the grid...and the scalloped trim finished it off quite nicely. (added a bit of paint to it of course, lol) just an easy way to add a little extra something to your pages...sometimes when you just feel like you're missing that finishing touch, a decorative border just might do the trick. i've been using my 'tools' more and more often...it's fun to pull something out of the drawer that hasn't been used in awhile, dust it off and figure out a way to use it.
check back later for one more post about one of my favorite techniques...wonder if anyone can guess what it might be...
=)
edges.
borders.
die-cut papers.
all big trends right now...it seems that it's not often you see a layout that doesn't have some kind of die-cut paper on it, or one where someone used a border punch to jazz up their edges. i'll confess, i'm an addict myself.
here's a layout i made (yes yes...i love a good 'grid' layout) using lots of fun edges.
 i think it added a bit of interest to the grid...and the scalloped trim finished it off quite nicely. (added a bit of paint to it of course, lol) just an easy way to add a little extra something to your pages...sometimes when you just feel like you're missing that finishing touch, a decorative border just might do the trick. i've been using my 'tools' more and more often...it's fun to pull something out of the drawer that hasn't been used in awhile, dust it off and figure out a way to use it.
check back later for one more post about one of my favorite techniques...wonder if anyone can guess what it might be...
=)
August 14, 2008
Blinkie RAK
Here's the deal, post the newest SC blinkie on your blog. This one here:

Post a comment plus a link to your blog here to win the Studio Calico RAK!!!
Winner will be announced next Friday.
Post a comment plus a link to your blog here to win the Studio Calico RAK!!!
Winner will be announced next Friday.
For intructions for adding blinkies to your blog, click here.
5 that caught my eye.
if you weren't already aware, one of the newest upgrades to the site has been the addition of a 'Favorite Layouts' option to everyone's profile. Whenever you are looking through the gallery and see one you like, all you have to do is click on the layout and near the top there is a link that reads 'Add to Favorites'...and as fast as our gallery moves here at SC, it's an awesome feature!! just thought i'd post about the 5 most recent additions to my favorites list from our members...
This card by Ann-Marie just makes me happy. I love how she backed some parts of the KI lace paper with scraps from the Apple Orchard kit...it's just a simple touch that really makes this card stand out. ErinB's layout often catch my eye, and I just love the simplicity of this one...the lace paper trim adds just a touch of femininity to this layout and the cluster of journaling die-cuts at the bottom doesn't detract from her very cool pics of Big Ben.
 ahhhh...this lovely one from SimplyTam speaks to me, lol. let's see...October Afternoon, check. sweet pic, check. one of my fave Thickers, check. her journaling is great because it's honest...many of us would like to believe that moments like these happen often, but that isn't always the case when you have little ones running about. another reminder to scrap/journal about the not-so-perfect moments...they're just as important as the picture perfect ones.
 now Nichoda really pulled at my heartstrings a bit with this one. first of all, I love that she's such an involved Auntie to her nieces/nephews...they really are very lucky to have her in their lives. Second, the relief you can 'hear' in her journaling is just so touching. add to that some distressed paper and stitching and i'm sold.
 i love when people think outside the box...and the cropping of this photo by ScrapEvangel in conjunction with her journaling to match is a great example of that. the picture is cool to start...but then the unusual cropping just made it jump out at me from the gallery.

This card by Ann-Marie just makes me happy. I love how she backed some parts of the KI lace paper with scraps from the Apple Orchard kit...it's just a simple touch that really makes this card stand out.
 ErinB's layout often catch my eye, and I just love the simplicity of this one...the lace paper trim adds just a touch of femininity to this layout and the cluster of journaling die-cuts at the bottom doesn't detract from her very cool pics of Big Ben.
 ahhhh...this lovely one from SimplyTam speaks to me, lol. let's see...October Afternoon, check. sweet pic, check. one of my fave Thickers, check. her journaling is great because it's honest...many of us would like to believe that moments like these happen often, but that isn't always the case when you have little ones running about. another reminder to scrap/journal about the not-so-perfect moments...they're just as important as the picture perfect ones.
 now Nichoda really pulled at my heartstrings a bit with this one. first of all, I love that she's such an involved Auntie to her nieces/nephews...they really are very lucky to have her in their lives. Second, the relief you can 'hear' in her journaling is just so touching. add to that some distressed paper and stitching and i'm sold.
 i love when people think outside the box...and the cropping of this photo by ScrapEvangel in conjunction with her journaling to match is a great example of that. the picture is cool to start...but then the unusual cropping just made it jump out at me from the gallery.
so make sure to take advantage of the new faves feature...it will make a great strating point when you're having one of those mojo-less days!!
August 13, 2008
be there...tonight at MIDNIGHT EST!!
hey everyone!!
just a quick reminder that TONIGHT IS SNEAK PEEK NIGHT!!
so while you're watching Michael Phelps try for yet another gold medal to add to his collection, sign onto the boards and come chat with us...not much of the kit has been guessed thus far, so there are sure to be some surprises!!
hope to see you there!!
August 8, 2008
Solutions?
One of my biggest problems has always been the individual storage of certain supplies. How do I store alphas so that they look nice, are easy to reach and stay neat? Where do I put all those wood mounted stamps? Where do I put all the acrylic stamps? How about ink? What should I do with that? I finally just made a list of all my "hard to store" items and came up with solutions for each of them. I'm definitely still working on conquering the list, but I'm finally feeling like I have a little more control over my space. For patterned paper and cardstock, the vertical orgaziners from Cropper Hopper have been a life-saver. I previously had all my paper stored in a pull out drawer type organizer that meant I had to pull out the whole stack every time I needed a piece.
 Recently, I found some rectangular baskets for storing sheet type alphas. One for Thickers and one for all others...and the best part? They can sit right on my table within reach. Previously, they'd been stored in a file folder in a file box...not quite as handy, right?
 I have to be honest...I've tried EVERYTHING to house little embellishments like buttons, flowers, brads, glitter...and nothing ever seemed just right for me...until I found that the two tables I bought each had one giant drawer. Before the tables all the small embellishments had been housed in an empty spice rack and a garage organizer--which meant they both had to be up on a shelf. With the little left over drawers from the garage organizer I found that everything fit quite nicely into the big open drawers in the front of my tables. How handy is that?
Obviously, we all have our own solutions. You saw Nik's basket of paint, Stephs mattress spring page holder and some of Dav's storage solutions, too. What I want to know are what are your favorites? Where did you find them, did you make them? What are you still looking for storage solutions to?
Remember that RAK I promised? Well, I've just given you another little surprise snippet above!!! Just upload a picture of your space to the Studio Calico Member Gallery (by Sunday 8/10 at midnight PST) and your name will be 'on my list'.
 For patterned paper and cardstock, the vertical orgaziners from Cropper Hopper have been a life-saver. I previously had all my paper stored in a pull out drawer type organizer that meant I had to pull out the whole stack every time I needed a piece.
 Recently, I found some rectangular baskets for storing sheet type alphas. One for Thickers and one for all others...and the best part? They can sit right on my table within reach. Previously, they'd been stored in a file folder in a file box...not quite as handy, right?
 I have to be honest...I've tried EVERYTHING to house little embellishments like buttons, flowers, brads, glitter...and nothing ever seemed just right for me...until I found that the two tables I bought each had one giant drawer. Before the tables all the small embellishments had been housed in an empty spice rack and a garage organizer--which meant they both had to be up on a shelf. With the little left over drawers from the garage organizer I found that everything fit quite nicely into the big open drawers in the front of my tables. How handy is that?
Obviously, we all have our own solutions. You saw Nik's basket of paint, Stephs mattress spring page holder and some of Dav's storage solutions, too. What I want to know are what are your favorites? Where did you find them, did you make them? What are you still looking for storage solutions to?
Remember that RAK I promised? Well, I've just given you another little surprise snippet above!!! Just upload a picture of your space to the Studio Calico Member Gallery (by Sunday 8/10 at midnight PST) and your name will be 'on my list'.
August 6, 2008
Vintage Style
One of the things that always wows me about the Studio Calico DT girls is their knack for vintage flair. Sadly, I have none, and it makes me all the more appreciative of those who do. When I asked them to send me pictures of their spaces, one thing really seemed to be a theme was the quirky, vintage goodness of their organization. I'm thinking rather than spend a lot of time typing about it, I'll just show you!!
Let's start with a few from Steph, I know none of this beauty will surprise you--she's so clever!!

How about that Nik Harper? You wouldn't be surprised to find this in her space would you?

Finally, let's take a little trip through Dav's storage options. Her space isn't quite done yet, but viewing these little gems makes me know it's going to be marvelous!!

One last quick note, I am LOVING the spaces you're sharing with us, if you aren't quite sure where to post your pictures, go right HERE. Keep them coming!!!
August 4, 2008
Remember When...
 We got to see April and Scarlet's highly inspirational scrap spaces and bits of Scarlet at work? I thought it was so fascinating to get a little 'bird's eye view' of their personal and work space. Maybe it's the nosy part of me coming into play, but I love seeing how other people work, organize and decorate-I'm hoping that some of you enjoy it, too. I've been working on the other dt gals to send me some pictures of their spaces, but I thought for today I'd share bits of mine with you.
When we moved into our house eight years ago, we had one room set up as a formal dining room. When I got back into crafting, I claimed it as my own. Out went the table and chairs and in came some scrap tables, a desk and my computer. It's evolved a bit, new furniture here and there, new solutions, new wall color (from butter yellow to aqua blue), but for the last seven years it's been primarily my office and work space. I love that it's open to other rooms in my home, making it easy for me to work and still be a part of the family!
 Currently when not working on any pages/projects, I have two standing height tables with flip tops that line up together under my magnetic stamp wall and pegboards. When I'm working on say...Studio Calico projects, one table gets pulled out and the top flipped open. Right next to the tables are some drawers and some shelves that hold various supplies (as you can see, I could benefit from an organization fairy).
I also have one of those Ikea Expedit bookshelves that seemingly every scrapper on the planet has--and for good reason, they're handy! I keep all my albums, more supplies, old family albums and some photo gear, books and magazines all stored in it. I also have all my paper and cardstock stashed on top of it (very handy for that).
I have a few more pictures that I'll post in the gallery for you, I didn't want to make this post too long...I mean, after all, I need to include
 a litle RAK info, right?
RAK info? What RAK info? Oh...you mean the RAK that I have for one lucky person. Yes, if you upload and share your space or a portion of your space with us on the message board or in the gallery (say by Sunday August 10th midnight PST), I will put your name in the hat. For what? Well, something I've picked out for you...it might even be featured (not super prominently) in one of these photos...and how about if you think you spot it, email me and you'll get two entries. :)
Subscribe to:
Posts (Atom)


