Showing posts with label design team. Show all posts

September 29, 2010

Fashion Inspired Layout

Happy almost Thursday! :) Kelly N here with my fashion inspired layout. When I saw Kelly P's post yesterday, I was instantly inspired by the ruffle neckline on this shirt. I knew right away I wanted to try something similar on my layout.
Being the Mama to 2 boys, I knew the purple wouldn't work ;), but I thought I could pull off the "ruffle" look without it being too girly. I used my circle punch to punch a bunch of circles from various Elementary papers. Then, I simply layered the punches along the edge of the Window Seat paper from Documentary. Super simple to do and it's a really fun look. To make my fashion inspired page less girly, I added some masculine elements like buttons and an arrow. I added in the Sass banner and border stickers from the En Plein Air add-on along with bits of the Sass paper to finish the layout. Also, using more traditionally masculine colors lends a boy-ish feel to my page.

Don't forget to link your fashion inspired layouts to this thread on the message board! We can't wait to see what you come up with! :)

September 18, 2010

Paper Bow Tutorial

This bow came into being because I needed a 3-D accent. I did a search and learned how to make them from a post on flickr that used magazine pages. Paper is a little different, but these are really fast to make and can add a fun happy look to your pages or cards. OR... you could actually make it for a present topper. :)

You'll need a paper cutter, liquid adhesive and a pair of scissors (optional). Here's a step by step for you:
  1. Cut 4 strips of 12 inch long paper. For this example I cut mine 5/8" wide, but you can experiment with the width.
  2. Cut three of the strips in half at the 6" mark. At this point, you'll chose which side you want showing. I wanted the ruler side of Harper's Ruler to show because I thought the variations would make for a fun bow. Notice how I marked and X at the 3" mark on the ruler side? That will guide where you put the spot of glue, right in the middle.

    3. Now comes the trickiest part of the process. You'll put a dab of the liquid adhesive on the X and then fold the end on the paper backward onto itself.

    Here's what it looks like from the front:
  3. Now you repeat the process with the other end of the same 6" strip.

    Here's what it looks like from the other side:
  4. Now you repeat the same process six (6) times. For the last two times, before you start the process, you'll want to cut about 1/2" to 3/4" off the strip to make the end loop a bit smaller than the first four. You'll have a group that looks like this, aren't they so cute in a row like that? Notice the two on the end are just a bit smaller. It makes it easier to put the bow together.

  5. Now the fun part, assembling the bow. Put a dab of glue in the middle of the first twist.
  6. Then start stacking, adding a dab of glue (this is why I use the Quick Dry Adhesive by Scotch 3M, it really is FAST. The first and second ones will nest nicely, the next four will not nest, they'll start the lift that you see in the end.


  7. The final step involves cutting a small piece of the strip, mine was 2.5" long, gluing the ends together and inserting it into the middle of the bow, attaching with one last dob of liquid adhesive. 
  8. Then you can use the bow in any manner you'd like, on a layout, a card, or another project. The bow will smash when you put your layout in an album, but that just leads to the personality of the project in my opinion. I hope you have fun with this project!


August 26, 2010

Finding Inspiration Inside a Cereal Box?

Well, maybe not INSIDE the box, but certainly the design on the box itself can be a jumping point for your creativity! I thought I'd share one of my layouts from the Summer Camp gallery to prove my point... inspiration can be found everywhere!


The whole idea for this layout was born one morning while I was feeding Will his baby food. And while this is a fun milestone in your baby's development... you moms know that after a while feeding them little spoonful by little spoonful becomes quite the chore! Anyways, I was sitting there in between spoonfuls and glanced over at the back of the Cheerios box... and it hit me. THAT would be a great design for a layout! The big heart... filled with photos... oh my. Perfect. And fun! Here's the box with my little model....forgive the diaper showing because mama didn't bother snapping his romper shut after the last change. oops!
How fun is that box? Now, how did I take that box design and transform it into what you see below?

Well, I was going to do the photo filled heart idea. And I think I may at some time. But it just didn't work with this layout obviously. However I used the same idea in cutting out different squares/rectangles of patterned paper to fill in the heart shape. (This was a super fast technique b/c I didn't measure my paper scraps or cut with a trimmer... I just randomly cut squares and rectangles placing them in the heart as I went.) I also let my heart wander off the edges of my paper like the heart on the box. Finally, to make the heart shape more dominant among the mish mash paper scraps inside, I did some simple handstitching around it.


So, the moral of the story... be on the lookout for inspiration everywhere. Scrapbooking magazines are an obvious starting point, but don't overlook non scrapping mag ads, tv commercials, website design, product packaging, etsy, stationary/cards, etc. And if you're really organized you could create a little scrappy notebook to store all these great bits of inspiration. :)

(On this layout I used bits of the main kit, Summer Camp as well as bits from Footpath and Adirondack. And they are still available... so grab them quickly if you can! The Real Estate punch is also in the shop!)

August 12, 2010

Insider Tips - use stamps for your title

Hello everyone!

I made a special layout for today's insider tips - I couldn't resist using my left over products from my Elk Lake & Adirondack add-ons :) I just LOVED playing with these two add-on kits, not only they match perfectly with my Main Kit, but the colors are exactly what I'm craving for at the moment :)

Here are a layout for my two of my best friends, a special gift for them : Amelie is an excellent cooker and Ben simply ADORES food :)

For this layout I used :

Elk Lake & Adirondack add-ons
Stamps : Tweets, Sewing Machine Set, Months stamps, Noah alphas
Raspberry Maya Mist
Punches : Bubbles border, Double Embossed Dotter Lace border , Photo Labels punch, Royal Butterfly
Foam squares


For my title, I simply combined one of Jenni Bowlin's journaling tags, the Months stamp and Noah alpha stamps to make my title : simply use different fonts, different ink colors, different elements to make a unique and urban background.
Feel free to mount one of the stamps with foam squares in order to add dimension to your layout.


Here I first stamped my label stamps that I got in a previous kit (available soon at the shop) that PERFECTLY matches my Photo Labels punch - could it be even more perfect?! So that means : you need to order that punch and then order the stamp soon available :)


Thank you and I'll share a layout I made inspired by Sasha on Saturday :D
Take care!
c

August 7, 2010

Blended Ink Tutorial

For my August Summer Camp gallery, I made a layout about bread in Switzerland. The journaling block is created using the blending tool by Tim Holtz and a bunch of Distress Inks. It's a pretty easy technique, one that takes a bit of practice, but can be easily mastered in just a few tries. I've put together a video tutorial to help show you how to do the technique on your own projects.


supplies used: blending tool, foam blenders, faded jeans, peeled paint,
and mustard seed distress inks (any distress inks can be used for this project).

Here's a close up of the technique.


I would love to see how you interpret this in your own layouts, it's really fun to see the unique results after each attempt. If you don't own the blending tool yet, it's very reasonable to purchase, and you can use the foam blenders for numerous applications if you stamp it off well.

August 5, 2010

Insider Tips: "The first few days" layout...

Hey everyone! Susan here (again) today... :)

Wanted to share a little bit extra about one of my layouts in the August Summer Camp gallery: "The first few days"...


As mentioned in yesterday's post, I have a ton of newborn photos of my newest son - Noah. This page showcases just a few, in a grouping that I created BEFORE I put together my layout.

To print smaller sized photos that all "fit" together on the page, I first started with a blank (white) 8x10 @ 300 dpi image in photoshop. I then opened up each image that I wanted to use, and cropped it, then copied and pasted it onto my blank 8x10 image.

If needed, I used the transform tool to adjust the size of each image slightly (holding down the shift key while you 'transform' will avoid skewing your image too much in one direction).


After adding all of my images, I had an 8x10 print made at costco. The white background that I used lended itself to the white frames around my mini-pics (I simply trimmed the images with a little extra white space around each).


I hope seeing how I easily fit so many photos onto this page helps you try something similar on a future project!

:)

ps - The Summer Camp kit is STILL AVAILABLE... grab one while you can!

July 24, 2010

ready for a trip to Summer Camp?

Happy Saturday, Studio Calico friends! I hope you've enjoyed our travel week. If you haven't taken our vacations photos challenge yet, you've still got a bit of time. I'm looking forward to looking through the layouts later tonight. =) And remember, the winner gets a $5 gift certificate - I'm thinking that will come in handy for your reveal day shopping!

To finish up our travel theme, I thought I'd pull together the Summer Camp sneaks that our design team has posted. I can't wait for the reveal of this kit - I'm head over heels in love with it. =)


(April Foster)


(Celine Navarro)


(Emily Pitts)


(Jenn Olsen - sneak post 1 & sneak post 2)


(Joy Madison)


(Lisa Truesdell - sneak post 1 & sneak post 2)


(Nicole Harper)


(Nicole Samuels)


(Stephanie Howell)


(Tina Aszmus)


(Waleska Neris)

July 17, 2010

tutorial : building a mini


Hi all!! I'm here tonight with a tutorial on how I made the mini album in my Continental gallery. I've been holding these Fuji Instax Mini pics from our February trip to Kansas City, just waiting until the right kit came along. As soon as I saw this Making Memories packaging in the Magellan add-on, I knew it would make a perfect cover. The packaging had more of a faux suitcase shape, but I opted to trim it down into a rectangle. I then backed the opening in the front with a transparency and added a couple die cuts and Basic Grey studs to the outside.


Next, I spent some time thinking about how I wanted to construct the inside of the album. Since I was dealing with original photos, I wanted them to be protected - but I needed to keep the pages on a fairly small scale so they'd fit within the cover. Once I came across these divided page protectors (we keep them on hand for the boys' baseball and Pokemon cards), I know I could turn it into individual pages.


I began by cutting the page protector with my trimmer - I left one row of pockets intact, cutting about 1/2in beyond the dividing line. I repeated the cut on the other side of the middle row, which left me with two strips of three pockets. I then cut those strips into three pockets each - one divided page protector will give you six mini album pages.


My next step was to cut three pieces of kraft cardstock to 4x5inches. I scored them 1/2in from the edge and then added one to the back side of my album cover. I then used a hole punch to punch two holes through both the kraft cardstock and the cover.


Using the punched cardstock as my guide, I punched each of my page protectors as well as the two remaining pieces of kraft cardstock.


Since I knew the title page would show through the window in the front of the book, I laid it in place inside the album as I worked on it, and made sure to shut the album to see how it all looked before I stuck everything down! Once I'd finished, I wanted to hide the backs of the staples from my tiny attacher and the stitching, so I layered a second piece of kraft cardstock behind it. If you have additional journaling you'd like to add to your book, both the back of the title page and the back page of the album would be perfect - just stamp some journaling lines and write away!


Now came the fun part - working on the pages! I cut kraft cardstock to the same size as my Instax Mini pics and built from there. Each page got a label stamp stamped with pumice stone ink and punched out with my photo label punch, and a mix of products from the kit.


To bind the album, I simply stacked up all of my pages and threaded a length of twine through the two holes. I looped it around three times and then tied it off at the back of the album.


My boys have enjoyed flipping through this album - the size is perfect for little hands!!

June 29, 2010

Tutorial: Saving Your Favorite Splats, Splotches & Swoops For Future Use!

Tools needed:
Camera or Scanner
Paint, Ink, Mist, Tea... Whatever Floats Your Boat
Photo Editing Program
*this tutorial was done in Photoshop CS5 but will be applicable to all the CS versions and most Elements versions

I know that so many of you loved Tina's Paint Tutorial--myself included. I want to piggyback her fabulous tutorial with one that shows you how to keep those fantastic paint splotches for future use. Especially handy when you don't have the time or space to get messy.

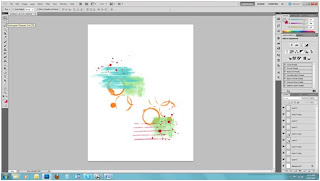
It all starts with making some 'bases'. I took some mist, some paint, a marker and a cup of tea and made my shapes for examples. I tried to keep them simple for the basis of this tutorial. What happens next depends on whether you prefer to photograph your shapes or scan them in. I scanned each of mine individually.

(Scan at 300 dpi in RGB color)

I then opened them up in Photoshop and went to IMAGE>ADJUSTMENTS>DESATURATE. My mist splat now looks like this:

I like to play around with the Brightness/Contrast at this point to make the splat fairly dark and the white pretty bright. To do this IMAGE>ADJUSTMENTS>Brightness/Contrast and move the sliders to your liking. As you can see, it will lessen the fine mist portion considerably, which will make the next step much easier.

Now, make sure that your layer is unlocked. If there is a little lock icon it is locked, in that case you'll want to go to LAYER>NEW>New Layer from Background.

The next step is choosing your Magic Wand Tool (with the setting for 'add to' clicked), and your Tolerance Level. I kept mine fairly low for the purpose of this tutorial--I believe default is 32, but I bumped mine down under 10.
Find a good dark place in your splat and using the Magic Wand Tool, select that portion, you should get your marching ant outline around your selection . When you have a little selection go to SELECT>Similar and you will see more area become surrounded by marching ants. You may need to do this several times.
If you go too far, you will notice your white area becomes selected. You can either Ctrl+Z to go back one step or Ctrl+D to lose the selection and start from the beginning.

Once you have a happy selection going you can go to SELECT>Inverse and then hit your delete key. You are now looking at only your mist splat and perhaps a transparent checkerboard background. This means...You Did It!! The hard part is over.

Sometimes, a good selection is a little harder to come by. That's ok, because you can use the handy eraser tool and do

some touch ups to anything you'd like to get rid of. Case in point, the tea rings--they had a lot of little bits that had soaked into the textured paper, so I used a middle sized round eraser with a hard edge and just erased out the parts I didn't want.

You're probably wondering the best way to save and use these bad boys. I prefer to save them as a .png file--because it will save the transparent background. 300dpi at the original scanned size is the way to go. This way you'll have a nice big image to work with.


Wait...how did I color them in? A simple and very useful trick, really. Down at the bottom of the tool bar where the color palette hangs out there are two boxes, foreground color and background color. If I select a background color and select my layer by hitting the SHIFT+CTRL+DELETE keys it will colorize my selected layer.

Now, when I'm ready to make a layout, I have all these wonderful .png files I can open up and drag onto my canvas. I can layer them, I can color them, I can basically print them onto my background. I can envision using them on tags, on cards, on journaling blocks...all with a few mouse clicks.


If you have any questions, please don't hesitate to ask or email me. I'd love to see you succeed with this technique!

Some helpful hints & reminders:

  • Scan at 300dpi, save at 300dpi in .png format
  • If you're photographing your splotches, import and crop to a large size that still retains quality at 300dpi
  • Also, when photographing your bases, get nice and close with even lighting.
  • You can make your splats/drips/splotches on smooth or textured paper. Paper with texture may be slightly harder to get good selections from, but the reward is a more irregular and natural looking digital.
  • Keep in mind the type of paper/cardstock you print your final design on will have an effect on the look as well.
  • By using different blending modes and opacities (see Emily's tutorial here) you can really vary the look and style of your splats and splotches. You can even use them on your photos for added texture and dimension.