August 31, 2010

Reveal Night Winner!

The winner of the JBS Playdate Collection is........


Sue said...

I would like see Leah Fung be the next guest designer.

August 26, 2010 11:33 AM


Please send an email to info@studiocalico.com with the following information:

  • Name
  • Subscriber: y/n
  • Address
  • Contest: Reveal Night Giveaway
  • Prize: JBS Playdate Collection

Inspiring Minds...want to know!

Just where to draw inspiration from...outside the Scrapbooking arena!

Hello SC Fans and Friends...Kimberly here to share with you a FAVORITE place of mine that I ADORE...and I hope helps inspire you all they way it does me. :)

Have you ever heard of Shopruche?
Well...it is simply one of my most FAVORITE places to shop...and gets my creative juices flowing! :)
Here is a great shirt that I adore...Love the colors, design and over all look that I see. Makes me ready to try something new and fun. I can see using mists...crumpling paper...all kinds of fun things to do and try.


This is what I created from this inspiration. I didn't use mists...but I can definitely be inspired for more fun creations from this shirt. :)


Often times when I want the paper to bend and not crease, I will wet it down and then work it into position and let it dry. This is what I did with the ruffle down the side border.


Have a WONDERFUL week!
xx
Loves,
K

August 30, 2010

Challenge Monday - Collage Inpsiration

It's a popular thing in blogland to hunt down fun images and put them together in a collage for inspiration.  For today's challenge, I surfed around and found one I loved and thought I'd share it as a starting point for a layout, card, or project for the week.


This was found on the Creature Comforts blog, post and photo credits here

When I first look at this collage, there is the obvious inspiration of punched or stamped yellow butterflies and mustard ink on my bike stamp. 

This collage also made me think of fall and family. 

The color palette reminds me of Documentary.


and really makes me want to break into Elementary.

This collage definitely makes me think of the Partly Sunny kit with the browns and yellows, and the water droplets on the bag makes me think of clouds. (I LOVED those corduroy Buzz and Bloom clouds from that kit).


The color palette and the butteflies are representative of the Picket Fence add-on from this kit too. 


Use this collage as inspiration for a project this week.  Be sure to share how it inspired you.  There is a $5 gift certificate to the Studio Calico store in it for you.  Link your layouts to this thread on the message board for your chance to win!  I'll be drawing a winner bright and early Sunday morning.

Davinie

August 28, 2010

CK & Us

For years, most scrapbookers have been inspired in small or large part by Creating Keepsakes magazine. So, when Megan Hoeppner agreed to guest design, we asked her to provide us with an inspiration piece from the magazine from which to work. She chose the September cover layout "Charming Girl" by Maggie Holmes.


So, as you peruse the Back 40 Design Team Gallery, you'll notice a "CK & Me" logo on the first layout in each designers' gallery. Whether the designer was inspired by the butterflies, the title, the mist, or the strips of patterned paper, each of us was inspired. Thanks to Creating Keepsakes for the awesome work they do each issue to provide us with creative design, heartfelt journaling, and tips & tricks to help us express ourselves artistically through this hobby we all love!

Layout of the Week


The layout of the week is brought to you by Kate O'Brien (kateobrien), featuring the Home Front Dollhouse Paper, the Anthology Alpha Stickers, and the Anthology label stickers.
Each week, the layout in the gallery is linked, so you can add it to your favorites easily.


This layout has been added to your favorites more than any other layout in the SC community gallery for the week of 8/22-8/28.

Congratulations Kate! Because of this you have won a $10 gift card to be used on any new purchase at Studio Calico.

Want a chance to win next week? Be sure to upload your projects to the SC gallery, and support your community by adding special projects that catch your eye into your favorites! It could be YOU next week!


Sunday Sketch

This week's sketch is inspired by Joy Madison's layout "Twelve" from the Summer Camp gallery. Her layout incorporates 3 photos and a simple message. Notice how Joy used the block of patterned paper to anchor her design, then she also added some decorative edges using a border punch.


Now it's your turn! Make this sketch your own for a chance to win one of two $5 Studio Calico gift cards. Be sure to upload your layout and link it to this post by Saturday, midnight EST.

Sunday Sketch Winners

by Beth Ann

by ChristyR

Congrats to the 2 sketch winners! Please send an email to info@studiocalico.com with the following information:
  • Name:
  • Contest: Sunday Sketch 8/22
  • Prize: $5 Gift Card

Sunshine Tutorial

Kelly N here with a quick tutorial on this Sunday morning. I love making "homemade" embellishments for my pages. Making your own accents for your pages is creative and fun and can add a lot of personality to your page. Today, I'm going to show you how I made this simple sun accent on my He Shines layout from my Back 40 gallery. This page uses papers from the Main kit plus mostly products from the Free Range add-on. Free Range was definitely my favorite add-on this month. The bright colors were so fun and I looove those JBS buttons!


The first thing you need to make the sun is 2 different sized circle punches. I used the 3 inch punch and a smaller circle punch. Punch a large circle from yellow patterned paper. Punch a smaller circle from a similar pattern and stick it on top of the larger circle.
Next cut small strips (about 1/4" or so) at varying lengths. Use the In Stitches punch to punch some of the strips. After punching the strips, use some baker's twine and a needle to stitch in the holes.
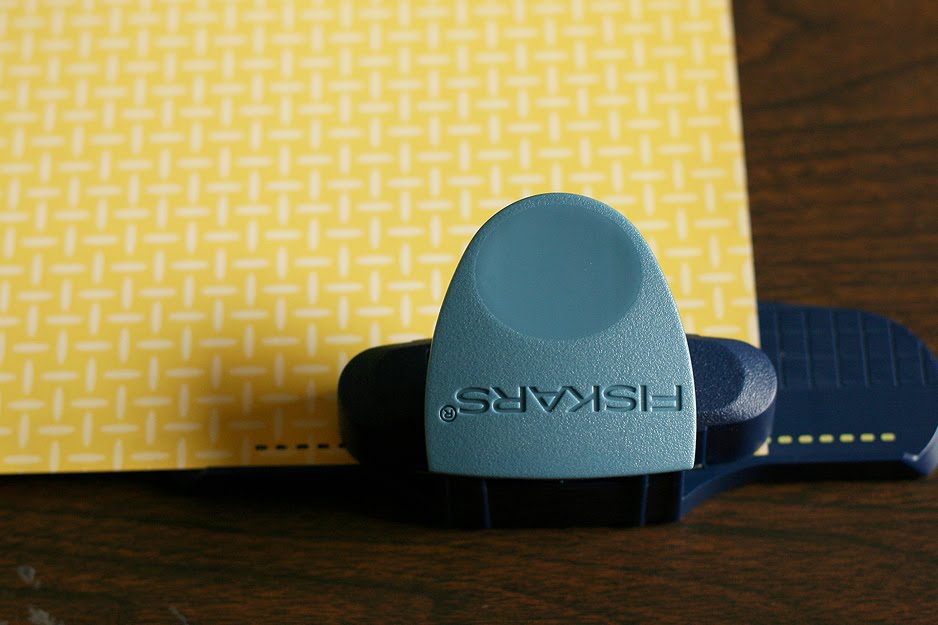
Use American Crafts Foam Tabs to adhere the circles to your layout and arrange and adhere the strips you cut around the sun.
Once you've got your sun in place, adhere 3 chipboard clouds (from the shop...LOVE all of the great pieces in this set...clouds, banner, flowers!) using more Foam Tabs on top of the sun for some detail.
And that's it! Super simple, but with plenty of impact. I hope you'll try making your own page accents. If you do, be sure to upload your layouts to the gallery so we can see! Have a great Sunday!

August 27, 2010

Friday...More on Memorabilia


Thanks for all your great comments and e-mails on my memorabilia post. I by no means have a comprehensive system, but it's working for now (we'll see when we have a second baby - that poor child will probably have no record of its childhood!) I wanted to show you a few more pictures and also a few more ideas for how I memory keep (outside of scrapbooking).

This is the folder I keep all of Charlie's memorabilia in before it either goes in the storage book, gets laminated and goes in the scrapbook, or gets tossed.


This is another snapshot of the storage box, and his itty-bitty newborn diaper. It was fun taking these photos yesterday and going through all the stuff I'd already forgotten was tucked away in there. I also have all the newspapers and magazines from the week he was born (this box is big, so it's the perfect size for all that stuff!)


Something else I do is every night before bed, I write in this book. It's usually something Charlie did during the day, something I'm thinking about. It's easy. And it's a great reference too when I am scrapbooking, say I'm doing a page about when he was 8 months old and I can't remember a detail, I can go back to this book and look back at that point in time.

Lastly, I have all of Charlie's photos developed in wallet size. I don't scrapbook all of them (the ones I do plan on scrapbooking, I usually print in a larger size), but the ones that don't get scrapbooked get put in these baseball card holders. They fit perfect into my album from American Crafts.

I hope this gave you some ideas for things you aren't already doing to save some of your memorabilia...I'd love to hear any ideas for what you do too. Have a great weekend, everyone.

Laura

August 26, 2010

Finding Inspiration Inside a Cereal Box?

Well, maybe not INSIDE the box, but certainly the design on the box itself can be a jumping point for your creativity! I thought I'd share one of my layouts from the Summer Camp gallery to prove my point... inspiration can be found everywhere!


The whole idea for this layout was born one morning while I was feeding Will his baby food. And while this is a fun milestone in your baby's development... you moms know that after a while feeding them little spoonful by little spoonful becomes quite the chore! Anyways, I was sitting there in between spoonfuls and glanced over at the back of the Cheerios box... and it hit me. THAT would be a great design for a layout! The big heart... filled with photos... oh my. Perfect. And fun! Here's the box with my little model....forgive the diaper showing because mama didn't bother snapping his romper shut after the last change. oops!
How fun is that box? Now, how did I take that box design and transform it into what you see below?

Well, I was going to do the photo filled heart idea. And I think I may at some time. But it just didn't work with this layout obviously. However I used the same idea in cutting out different squares/rectangles of patterned paper to fill in the heart shape. (This was a super fast technique b/c I didn't measure my paper scraps or cut with a trimmer... I just randomly cut squares and rectangles placing them in the heart as I went.) I also let my heart wander off the edges of my paper like the heart on the box. Finally, to make the heart shape more dominant among the mish mash paper scraps inside, I did some simple handstitching around it.


So, the moral of the story... be on the lookout for inspiration everywhere. Scrapbooking magazines are an obvious starting point, but don't overlook non scrapping mag ads, tv commercials, website design, product packaging, etsy, stationary/cards, etc. And if you're really organized you could create a little scrappy notebook to store all these great bits of inspiration. :)

(On this layout I used bits of the main kit, Summer Camp as well as bits from Footpath and Adirondack. And they are still available... so grab them quickly if you can! The Real Estate punch is also in the shop!)

Reveal Night Giveaway

Want a chance to win Jenni Bowlin's Playdate collection?

Simply leave a comment here, letting us know who you'd like to see as the next Studio Calico guest designer.

August 25, 2010

Storage Solutions for your Memorabilia

Slightly sentimental? Check!

The memory-keeper’s son. That’s what I call my one year-old, Charlie. I don’t know if someday he’ll appreciate the newborn-size diaper in his memory box, or the hat he wore home from the hospital, but I like to think at least his wife will.

If you are at all sentimental, the memorabilia and photos from your child’s first year of life (and on) can become overwhelming – fast. I also thought some of my nostalgia might fade as my hormones evened out, but if anything the desire to remember my son just the way he was each day has become stronger as I’ve seen how fast he really does change.

Here are some things I’m doing in my life to help me reflect on Charlie, and hopefully someday have him look back on. Or his prom date.

We took 227 video clips the first year of Charlie’s life. Now what? Burn them to CD and stick them in one of these adorable sleeves from Owlbot. I punched holes in my CD sleeve and put it in my three-ring album (these are some other sleeves I had):

Invest in a good laminator. Might seem silly, but it will help those monthly checkup sheets from the doctor or random notes from the babysitter age well.

A large storage box. I figure at the rate I’m going, this will hold enough memorabilia until Charlie turns five. So I bought two. I try to put a tag on each item (for cards, I bundle them together with twine by occasion – all of his first birthday cards are together).

I hope this post gave you some ideas for how to handle the memorabilia in your life! Have a great day.

Laura

August 24, 2010

Tutorial: How to Create Index Prints in Photoshop

I hope a bunch of you are working on Laura's awesome challenge to scrap those tiny index photos. :) I was thinking of giving it a whirl myself, since I've never used such tiny pics on a page, when I realized that I don't have any index prints laying around. At least not any current ones since I now make my own backup DVD's and print at home. So, I decided to figure out if I could do the same index print idea in photoshop without having to order a sheet of them with a CD from my photo lab. And guess what? You can!

I'm going to share some screen shots of what I did using Adobe Bridge. It's very easy. Then I'll describe in just words how to do this in plain old Photoshop. (My version of CS4 lacks the plug in or something to do it, so I can't show you in screen shots. But I can tell you in words!)

Okay... here goes. How to create the index prints (aka contact sheet) in Adobe Bridge:
1. Open Bridge. Along the top menu bar, select "WINDOW", then "WORKSPACE", then "OUTPUT". Then select a file you want to create index prints for. If you want to makes prints of photos in multiple files it's probably easiest to save them all to one file first. This is what your screen will look like at this point.

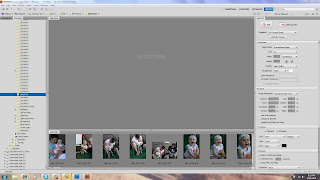
2. Go ahead and select the photos you want to use so that they show up in the large window. Press control when you click to select multiple photos. Then you want to select your output options in the window on the right. You can see what I set mine to. Choose "PDF file" and 5*8 contact sheet in the template menu.

3. Hit "refresh preview" to see what you've created. You'll see that the files you selected in step #2 are now mini index prints set on a A4 sized paper. (8.5x11) That's the default sizing and if you like that....you are good to scroll down to the bottom of the right bar and find that little save button. Just save and print.

4. However, if you'd like to create index print sheets that would fit into the CD/DVD case the files are actually saved on, you need to change a few of the default settings. In the "Document" section in the bar on the right, choose custom for your size and enter 12.2 cm by 12.2 cm for the dimensions. (See my screen shot below). Then go down to the next section in the right side bar called "Layout" and enter 5 in the columns box and 7 in the rows box. Finally, make sure "auto spacing" and "rotate for best fit" are checked. Refresh preview again and viola! (Scroll all the way down to the bottom of the right bar to find that save button and save to print.)

Not too hard, right? :) Now, if you don't have Bridge or you'd rather do this in plain old Photoshop, you do the following:

1. In the "file" menu, select "AUTOMATE" and then "CONTACT SHEET II".

2. A box will pop up. This is where you select your file you want index prints from.

3. Also in this box you need to input your settings for the prints. Choose the size of paper (again, A4 is the default... if you want to fit the print inside the CD jewel box, change this to 12.2 cm x 12.2 cm), the orientation, the resolution (300 dpi is good for print) and the number of prints in each row and column. For the CD jewel box size, set column to 5 and row to 7 again.

4. Click OK and photoshop will go to work!

5. Print.

Hope this was helpful. Let me know if you have questions about this... I just learned it today myself and I'm no photoshop expert...but I will try to help!

August 23, 2010

Challenge - Scrap those Small Photos!


Happy Monday! I hope you'll find the time to participate in this week's challenge because I think it's a fun one...Time to scrap those small photos you have laying around!

It's that time of year again...The most wonderful time, right? School is starting! So take out those small school photos and scrap them. Or, do what I did on the page above and scrap your index prints. I also used index prints on this page (one of my all-time favorite pages I've done for Studio Calico using the Granny's Cupboard kit):

So you have from now until midnight EST next Saturday to post a link to your layout here. I'll pick one participant at random to win a $5 SC gift certificate (who doesn't want one of those?!?)

Have a great week, everyone!

Laura

August 21, 2010

Layout of the Week


The layout of the week is brought to you by Heather Loehr (hloehr), featuring the Summer Camp kit (still available) and the Anthology label stickers. Heather created this layout for the Sketchbook 2 class hosted by Kelly Purkey.
Each week, the layout in the gallery is linked, so you can add it to your favorites easily.


This layout has been added to your favorites more than any other layout in the SC community gallery for the week of 8/15-8/21.

Congratulations Heather! Because of this you have won a $10 gift card to be used on any new purchase at Studio Calico.

Want a chance to win next week? Be sure to upload your projects to the SC gallery, and support your community by adding special projects that catch your eye into your favorites! It could be YOU next week!


Sunday Sketch


Don't you love the inspiration behind this weeks Sunday Sketch? Emily Pitt's layout, "Daily Bread" features a fun distress ink technique that's fun, plus the layout is an easy one to incorporate several photos. Emily used 3 4x3" photos and centered a large title and embellishment above. Notice how the stitched circle anchors the two pieces. Journaling is housed below the photo grouping and a strip of patterned paper finishes off the bottom.

Now it's your turn! Take this sketch and make it your own. Just be sure to link it to this post by Saturday for a chance to win one of 2 gifts cards.

Sunday Sketch Winners

by Rebecca

by Tressa

Congrats to our two winners this week! Please send an email to info@studiocalico.com with the following information:
  • Name
  • Contest: Sunday Sketch 8/15
  • Prize Won: $5 gift card

the sneaks have started!!!


Not long now until you get to feast your eyes on the September kit, Back 40 (a personal favorite of mine)!!!

It's that time...sneaks are starting to show up on DT blogs, and I thought I'd share some.

Emily Pitts shares some glimpses, including the one below, on her blog post HERE.
Here is one by Nicole Harper. See others on THIS post.

I (stephanie) shared a variety of sneaks on this post from last week.

I spied this pretty sneak on Kelly Purkey's blog:


I got super excited when I saw this on Waleska's blog...how awesome do her creations look?


Last but not least, our new team member Kimberly posted a few vibrant peeks in this post, including this one:


Keep your eyes peeled in the coming days, you are sure to see MANY more fabulous sneak peeks!
Happy Saturday...
xo
s

August 20, 2010

member inspiration- gracie

happy friday sc ladies and gentlemen!
i hope that you have something fun planned this weekend...i'm looking forward to hitting up the farmer's market and getting some much needed rest! :)

i wanted to feature a member today, her name is gracie. make sure you click on her name to check out her entire gallery, she's just awesome.

gracie is super involved in the SC community, she participates in every single challenge, and her layouts have been catching my eye again and again lately.

they are soft, lovely, and have an ethereal quality. i admire her ability to use small bits of paper effectively, and her handwriting is so romantic and pretty.

here are some of my favorite layouts gracie has created recently:


see what i mean? sigh. just beautiful.
thanks so much for inspiring me, and the entire SC community, gracie!

xo
s

August 19, 2010

Insider Tips: finding sketches.

when I run out of steam while working with a new kit, I turn to my book of sketches.
I keep a moleskin kraft journal for layout ideas and sketches I find in magazines.
It's really simple and a great way to get you out of a creative slump.
pull out some of your favorite magazines and thumb through them until you find an ad or article with a great layout.
visualize that magazine page as a scrapbook layout.
sketch a few examples on a piece of paper or in a journal.
easy peasy.


happy sketching!
Tina