July 31, 2010

Reveal Night Winners!

And the winners of the My Mind's Eye collection packs go to:

Meadowlark:
Michele said...

That's tough, but I think Meadowlark is my favorite!

July 26, 2010 8:20 AM


So Sophie

isabel scrap said...

i love SO SOPHIE !!!


Please send an email to info@studiocalico.com to claim your prize and include the following information:

  • Name
  • Address
  • Subscriber? y/n
  • Contest: Reveal Night Giveaway 7/28
  • Prize won:

Tutorial: Misting Masks

Hello there! Today I want to show you a few ways to create your own templates/masks for misting. There's many ways to use mist and so many items to use them with... here's a few of my favorite:
On this page from the Continental gallery, I colored the inside of the mini starburst with mists by creating a template using the same stamp.
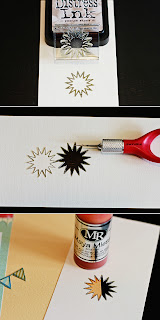
1. Stamp the starburst on a scrap piece of paper
2. With a craft knife cut the inside of the stamp
3. Layer the template on your page and mist with gold
4. When it dries, stamp on top of the image with distressed inks (i used wild honey)
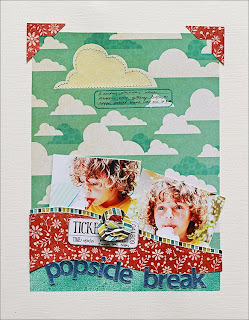
  • Use Patterned Paper
Here, I used the Scattered Clouds paper from Adirondak both as a design element and a tool.
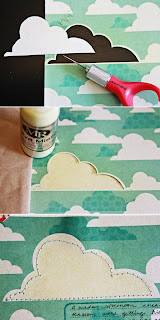

1. With a craft knife cut out one of the clouds (the big one)
2. Layer it on top of the paper (cover the area around it with a paper bag)
3. Mist with buttermilk or cream
4. Sew around it for more definition

  • Use Packaging
This is one of my first (and fave) misting layouts. I made it with Playground. Remember Playground? I still love that kit! Anyway, for the background I used the JBS chipboard buttons packaging from Soda Fountain. I just placed it on top of the blue paper and sprayed with orange mist.

You can also use the negative space by tracing and cutting out the shape. I did that on my class clown layout from the Joyland gallery. There, I used the MME ribbon packaging. Super simple.

  • Use Embellishments
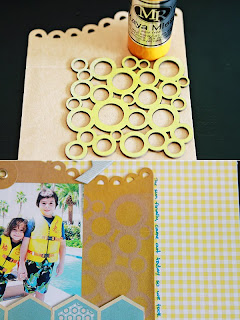
This is an easy one. Just pick any embellishment you like and mist over. Of course, the more interesting the shape (like this bubble chipboard from Granny's Cupboard) the better. Chipboard envelops and buttons work well.
  • Use a Die Cut machine

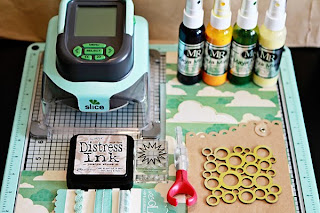
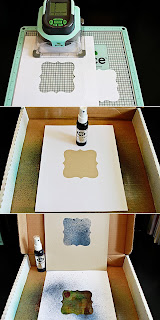
Another fun and easy one (if you have a die cut machine, that is). I love this one the most because of the endless possibilities. You can cut different shapes in different sizes, letters, words, etc. When using my Slice to create a template, I use regular paper (and because I scrap 8.5x11 it works perfect for me).

1. Select and cut out the shape
2. Layer the paper on top of the cardstock or paper your scrapping with
3. Mist


Easy peasy, right? :)

Gallery Favorites: Continental!

My original plan was to post some favorites from the Summer Camp DT gallery today, but when I saw that Continental was still available, I thought it might be fun to take a look back into last month's kit. I always love it when you get your kits and start posting your fabulous layouts in the gallery...here are a few of my faves:

This whimsical page from ibrokeitmommy is so much fun. Love all the borders on the right side of the page mixed with that sweet punched butterfly border...

Don't you love the way kphike managed to fit 6 photos onto one page without it looking too busy? I also like the way she used the Noah stamp set with the black ink onto red paper...great look!

I'm in love with pixiegirl1981's whitewash effect on her background paper here...totally getting myself some white paint to try it out!
Check out the great details on Lynleej1971's layout. Such fun little bits and great layering near her title. I love the way she inked the corrugated letters and she's got me wanting that notebook border punch now!


Both Continental AND Summer Camp are still available. Also, several of the Summer Camp add-ons are available as well...Elk Lake, Adirondack and Footpath! It's the weekend, yesterday was payday....what are you waiting for?? ;)

Have a fun and safe weekend!!

July 30, 2010

Top Ten Favorites: Final Countdown

In the #5 spot is "You & Me Today" by Lisa Dickinson. Love the layering, the texture and the color combo.

#4, "He" by dpayne, is one of my recent personal favorites. The mist, the stitching...I love every single piece of this layout.


The #3 spot is filled by our own Susan Weinroth, with her layout, "A Surprise." She made good use of the crown punch and circle punch.


#2 is another of my favorite layouts - "Dream" by Qingmei. She used a ton of techniques on this one - by using the Hot Air Balloon stamp (my favorite) and all different sizes of circle punches, she really put some thought into this layout.


And finally, our #1 Favorite layout - "Look Out, Ocean" by JustG. Super simple layout, just some kraft, a little ink and a fantastic picture.


That's it for our Top Ten Favorites!

xoxo,
Steph

July 29, 2010

CHA Booth Tour

April here, just popping in while propping my (swollen) feet up to show you what we've been busy with all week. The summer show in Chicago marked our 2nd trade show, and it's been a success in every way. We've gotten the chance to see friends we've made at previous shows, meet new store owners, play with new product and work our hardest to make sure Studio Calico makes it way to a store near you.

So, here's a little walk-through of our booth.

See the little card and mini album on the table. Tina made the mini and yesterday afternoon, it disappeared from the booth. I was in a-g-o-n-y wondering how to break the news to her, but luckily I didn't have to because the person who took it was kind and brave enough to bring it back today. She had accidentally walked off with it and found it when reorganizing her take-home bag. Aren't scrapbookers the best people?

Nicole Harper's layout got a lot of attention at the show. I think it was because of that adorable photo of Allie, but also because Nicole rocked the Window Seat paper. She loves the B side and uses it every chance she can get, so combining it with the Elementary line was a no-brainer.

The layout by Laura in the middle of this panel is spectacular. Several times we were asked where the patterned paper was that her layout was mounted on. But, it wasn't a patterned paper, she had used the new Natalee Stamp Set to stamp a quote across the entire background. It was GORGEOUS.

The tweets and stars were all the rage on this panel. We also included a make-n-take where store owners got to try out the rub-ons. Nothing but positive reviews for how smooth they went on and how great the adhesive is on them.

Side note: who is the pregnant lady that can't get a straight photo?


My favorite display of the show....Mister Huey has lots of gal pals now, just let me warn you now. He's a ladies' man for sure. Underneath each bottle of the mist, we displayed the sprayed colors so customers could see how well they matched the labels and the product line. That was Nicole's idea. They don't call her "brains" for nothing.

Oh and the white mist....super popular!

Watch out for the wood veneer and notions as well because they're going to be featured lots of places.

One last photo, just to show you the star that was misted with Applejack. So cool!

a peek into the Studio Calico booth


Hi SC-ers! This is Lisa, interrupting Kelly and Stephanie for a minute to share some photos of our booth at CHA. The photo above was taken by Stephen Ogden, our amazing graphic designer. The show is always opened with a bagpipe parade - isn't that crazy? So sad I flew in that morning and missed it! We were too busy to get many pics after this one, but Jen found some photos posted at flickr by shopping diva - we hope you enjoy them!

Also, I wanted to say THANK YOU to our members who were at the show and stopped by to do a make and take or say hello - it was awesome to put faces to names, and to get to chat a little. And I hear the SC member dinner was a blast last night - I'm sorry I had to miss it. We love getting to know you all better. We have such a wonderful community here and it was nice to have that support and love at the show.

April, Lorie, Greg, Nik, Emily and Stephen are all still at the show and have another day of make & taking, taking orders and scouting kit contents - here's to one more great day in the booth!!

July 28, 2010

Top Ten Favorites...#5-#10

Ever been curious as to what the most "favorited" layouts of all time are? I'm here to show you numbers 5-10 and Steph will be back on Saturday with the top 5. These layouts have been added to your favorites in the gallery more times than any other layouts. That's a pretty amazing honor, don't you think?! :)
We'll start off with #10 by our very own Waleska! Her fabulous grid design draws you in and who doesn't love a layout made with Yearbook? Definitely an all-time favorite kit!
Paperandglue wowed you with this stunning layout in our #9 spot...she rocked February's Baker's Dozen kit with those sweet punched butterflies.

The fabulous Keisha wins our #8 spot with this gorgeous layout. Her stamping is so subtle but amazing here...
#7 belongs to Chelseavn, who always creates such stunning layouts. What's not to love here...the misting and banners and all the little details are amazing!
Bluestardesign wraps up my part of the countdown in our #6 spot with this beauty. That title with the baker's twine is so creative and fun. Lisa's layouts are always so perfectly done...
Congrats to these five designers for being in our top 10! :) Be sure to check back on Saturday for the top 5!
July 26, 2010

Reveal Night Giveaway

Want a chance to win one of these lines from My Mind's Eye?

Just leave a comment here stating which collection you'd like to win. 2 winners will be randomly chosen on the 28th.

Challenge: Punches

Good morning! I'm here with another challenge for you this week. Since there are some new punches coming this reveal in the shop, I thought a punch challenge would be fun. Punches can be so versatile and fun, for this challenge, we want you to use them creatively. Push yourself to see them in a different way and give new life to your older punches. See how I layered borders here I punched with THIS punch (my new FAVE!)...


Check out how Lisa trimmed the edges off the labels punched from THIS punch to make those sweet little tags...
Use your punches for paper piecing like I did with 2 different sized circle punches on this butterfly here...

Be sure to link to link your layouts on THIS thread by Saturday at midnight EST. I'll draw a winner Sunday morning for a $5 GC to the shop...perfect for your reveal shopping! :)

July 24, 2010

Layout of the Week


The layout of the week is brought to you by Geralyn Sy (qingmei), featuring the Partly Sunny kit, which is still available in the shop.
Each week, the layout in the gallery is linked, so you can add it to your favorites easily.


This layout has been added to your favorites more than any other layout in the SC community gallery for the week of 7/18-7/24.

Congratulations Geralyn! Because of this you have won a $10 gift card to be used on any new purchase at Studio Calico.

Want a chance to win next week? Be sure to upload your projects to the SC gallery, and support your community by adding special projects that catch your eye into your favorites! It could be YOU next week!


Sunday Sketch

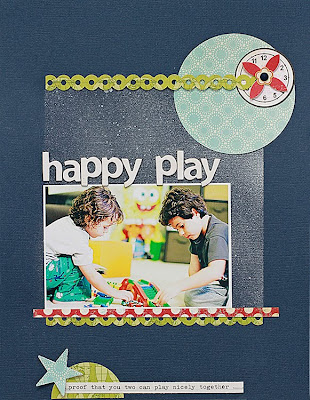
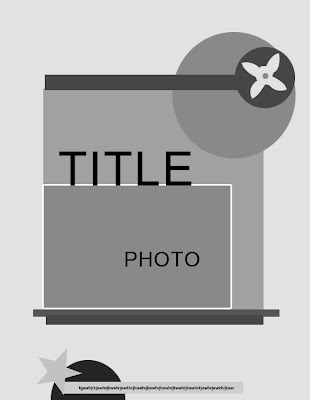
This week's sketch is inspired by Waleska's "Happy Play" layout in the Continental gallery.

Notice how Waleska used a 4x6" photo, but it doesn't appear small on the page. She created a home for it by masking and misting a rectangle with Silver-Plated Maya Mist. Then, she added her photo, title and strips of patterned paper, cut using the donut-chain border punch.


Now it's your turn! Take this sketch and use it as inspiration to create a layout of your own. Upload it, and link it to this post by Saturday for a chance to win one of 2 Studio Calico $5 gift cards. Winners will be randomly drawn on Sunday.

Good luck!

Sunday Sketch Winners

by nati

by sarah

Congrats to the winners of the Sunday Sketch! Please send an email to info@studiocalico.com with the following information:
  • Name
  • Contest: Sunday Sketch 7/18
  • Prize Won: $5 gift card

Tutorial : turn a moleskine into a travel journal


Hello my dearest SC lovers :)

Today, I would like to show you how I turned a plain moleskine journal into a perfect travel journal for my friends!
They went to Cuba last Spring and I wanted to make a travel journal for them : they're going to be able to fill it with as many photos as they want :)

I couldn't resist using my Magellan add-on kit from this month as the Making Memories embellies box is just SO perfect for my travel theme!


I love Moleskine, I've been collectiong them for years and have tons of them full of inspiration, ideas and travel notes : I always have one in my bag, car, bed table and scraproom!

Simply add double-sided tape on the front and back covers of your Moleskine journal.


Try to choose one paper that you really like as you will see it through the window of the cover.


Add papers on the inside covers too.
Try to keep the pocket on the last page too : you will be able to put tickets, notes and tags in there!


Get ready to attach your Moleskine to the Suitcase package.
Put double-sided tape all over the window, so that you know your journal will hold still.


Ta-da! Now let's decorate the cover!


I fell in love with that cute Plane ribbon : it couldn't be more perfect for my album!


Make a pocket with double-sided paper : simply cut a piece of paper (the size doesn't really matter, it just has to fit the back cover), fold the sided and the bottom inside the pocket and glue with double-sided tape.

There you go!
I hope you liked it and I'm looking forward to seeing any Moleskine journal altered into great mini albums :)
Enjoy!
c.