Showing posts with label fabric. Show all posts

August 12, 2010

Insider Tips - use stamps for your title

Hello everyone!

I made a special layout for today's insider tips - I couldn't resist using my left over products from my Elk Lake & Adirondack add-ons :) I just LOVED playing with these two add-on kits, not only they match perfectly with my Main Kit, but the colors are exactly what I'm craving for at the moment :)

Here are a layout for my two of my best friends, a special gift for them : Amelie is an excellent cooker and Ben simply ADORES food :)

For this layout I used :

Elk Lake & Adirondack add-ons
Stamps : Tweets, Sewing Machine Set, Months stamps, Noah alphas
Raspberry Maya Mist
Punches : Bubbles border, Double Embossed Dotter Lace border , Photo Labels punch, Royal Butterfly
Foam squares


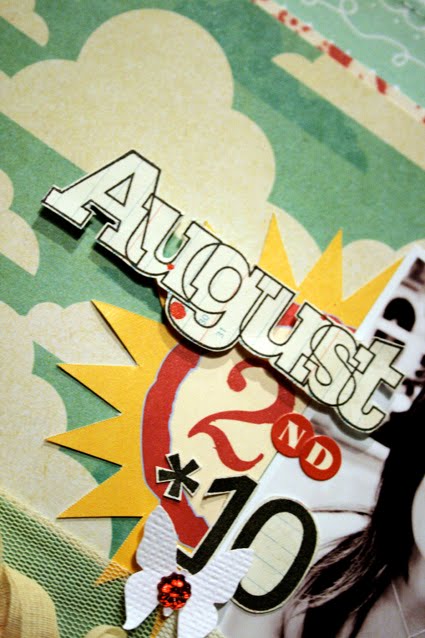
For my title, I simply combined one of Jenni Bowlin's journaling tags, the Months stamp and Noah alpha stamps to make my title : simply use different fonts, different ink colors, different elements to make a unique and urban background.
Feel free to mount one of the stamps with foam squares in order to add dimension to your layout.


Here I first stamped my label stamps that I got in a previous kit (available soon at the shop) that PERFECTLY matches my Photo Labels punch - could it be even more perfect?! So that means : you need to order that punch and then order the stamp soon available :)


Thank you and I'll share a layout I made inspired by Sasha on Saturday :D
Take care!
c

May 30, 2010

Partly Sunny Favorites

I completely forgot that I was supposed to blog yesterday. I'm really sorry. I went hiking in Boulder with the family then we had friends over for swimming and kabobs. It was a delightful day, completely void of any thought that I had a job to do! So I hope that perusal through the Partly Sunny gallery will make up for it. :)

Also I'd like announce the winner of Sasha's rub on challenge, it's Rimna! Please send your information to info@studiocalico.dom stating you're the winner of Sasha's Rub on Challenge for the week of May 24. Congrats! Here's her layout:


And now the DT gallery favorites, through my eyes. I decided to go backward through the gallery this time. So enjoy!

I had a hard time picking a favorite from Waleska's gallery this month, they were all fun and happy, but I think this one won because of the banner. I love how she stamped underneath it and then added the fabric swatches over top. And those faces? How could you not smile at them?

Not Tina's typical style, but it is totally fitting for the topic she journaled about here. I think that's why I love it. Her journaling is absolute joy on paper. Everything on this page has a reason of being there. Love how she chose her title too, it's a fun way to use the strip.
I wanted to pick Airplane Alert for my favorite, just because I loved it in Susan's sneaks, but come on, how can you not laugh and smile at that picture? I thing Susan's happy selection of papers and embellishment perfectly highlight an adorable baby. :)

I love the way Steph W. captures her 6 years with her sweetie. A fun way to look at things that can seem so day to day. I love hwo she used the MM flowers, the perfect little touches to a beautiful layout. And the paint and stamping balance so nicely with the K&Co paper lace, pretty.
Hee hee, Steph H. made this before she knew about twins and I think that's part of the reason this one is my favorite this month. I just LOVE the stamped starbursts around the circles, brilliant, but the journaling is the best part. Well, that and how she turned the 8 into an S. Um, cool.

I love how Sasha took a couple of different papers and used bits and pieces of them to compliment the Jenni Bowlin Coredinations paper. What a fun finishing touch to add the stitching. I love the "Impossible Nothing" she added with the MS punches. Very cool.

By no means is this kind of layout unique. Lots of scrappers have captured whole season on a page before, but the way Nicole S. has designed this one is so beautiful. Her strips of paper between the photos and the center so nice and clean allow the photos to shine.
This one by Nicole H makes me giggle for a couple of reasons. First, I'm at the bottom of the technology latter as far as it comes to phones. And I know when I some day convert as she has, I'll be the EXACT SAME WAY. Secondly, it's green. Could that be any more perfect? I also LOVE the look of the bubbles punched cardstock over the striped MME paper from Front Porch. Lovely.

Bright colors popping against the fun Cosmo Coredinations is one of the things that I loved about this layout, but then I noticed the green stitching and that won me over Maggie!

See how easy it is to bring momentos from your life into your scrapping? I adore how Lisa used the tag from her son's birthday/mother's day trip to a cupcake shop in her layout. It's front and center, but doesn't take away from the fabulous photos. Great way to use that stamp too!

I love how Laura can capture so much in such few supplies. Her stitching and type always pull me in to study. and then she does the cute little heart over the top of the yellow and it just makes me smile.


Yep, I was right. I knew I'd love this one by Kelly. The colors just POP on the dark cardstock and combined with those hilarious pictures of Brady, well this one went into my favorites pile pretty quickly. I love how Kelly used the banner stamp too.
Although she had a bunch of masterful layouts in her gallery this month, I REALLY LIKE Joy's idea. Pre-make a summer fun album and fill it in as you go. What a clever idea for capturing your summer before it slips away. You can tell this is a momma who's good at planning ahead. Since summer officially starts for me this weekend, I'd love to slap something together, now i have a template to copy. :)
Always one for her happy combinations of paper and color, Jenn did not disappoint this month. I love how sh used the cloud paper tucked into all her strips of color to represent a rainbow. Beautiful!

I knew when I saw her sneaks I'd like this layout. I was even more pleasantly surprised! the way Davinie brought in the fabric swatches with the Jillibean flowers from Front Porch makes this layout sing of summer.
Celine's album was so beautifully put together, I really loved how she combined the green/yellow/browns in the kit and made a fun album about her friends.
This alphabet set was the reason I bought Front Porch as my add on this month. I love how April took hers a step up and colored them. It's absolute genius! And what a fun look at her 9 years of marriage, congrats April and Greg!
Finally we come to Mou Saha's gallery. I love Mou's style, probably because we're both inot handwriting your journaling. It always pulls me in on her pages. I love the perspective on this photo, and the planes are just fun.


April 20, 2010

Tuesday Inspiration : Heather Bailey

Hello everyone!
Lately I've been so much inspired by Heather Bailey, her fabric and her photography. It makes me wanna dig into my most colorful papers, fabric and embellishments and scrap!
Heather Bailey has been a very talented designer for years and has a very active blog where you can admire her latest creations fabric related and her amazing photographs.


1. Pop!, 2. Pop Garden & Bijoux!, 3. Pop Garden!, 4. One more month to go..., 5. Another Pear, 6. Marlo Bloom Handbag, 7. Three Pears, 8. Emergency Velvet, 9. Charlotte's Room, 10. Green Apple Pincushion, 11. Skirty 1 Detail, 12. Big Sister Skirty, 13. Shirty 1, 14. Little Sister, 15. Shirty 2, 16. Skirty 2 Detail

I just want to add more fabric to my scrapbooks now, use more flowers, paint my backgrounds in yellow and green, and that reminds me that Spring is finally here!

Feel free to visit Heather Bailey blog for inspiration : you won't be disappointed!

C.

April 14, 2010

Tutorial: Fabric Envelopes!


Hi everyone! Susan here today, with a tutorial on how to make the fabric envelope pictured above. :)

I love to use leftover fabric odds & ends in different ways, and this envelope is one of the easiest ways to make a hand-crafted card even more special...

Start by selecting a fabric that coordinates with your card...


I like to use Fiskars Pinking Shears to trim the edges of the material for my card envelope. I find that the pinking edge holds up much better when leaving a raw edge on the envelope - as is the case here.

These scissors are definitely an "investment" - but trust me, they are well worth the price. They will last you a lifetime if cared for correctly, and are one of my "go-to" sewing tools that I use on a constant basis. (I also love using them to deco-trim the edges of fabric that I incorporate on paper projects like scrapbook pages and cards!)

As an example of size, for my 5x4 inch card here, I trimmed a 7.5x20 inch piece of fabric. >> You want your fabric piece to be slightly wider than your card, and at least 4x as long as your card's width.


Now start to make the iron press/crease marks to guide the shape of your envelope:

Use an iron to fold in the edge of one short end and press to crease. Fold in approx 1 inch.


Continue folding upwards, then press to crease to create main "pocket" portion of the envelope.


Fold leftover top flap down and press with iron to crease along top. (Body of envelope is now formed.)


Machine stitch with 1/4 inch inseam & straight stitch along top of front pocket panel.


Pin sides together to hold in place.


Then machine stitch with approx 1/4 inch inseam & straight stitch each of four sides.


Congratulations, you have a fabric envelope! :)


Take it a step further and choose ribbon or lace or pom pom trim and machine stitch that along the envelopes flap. I choose a scalloped velvet trim.


What's nice about giving someone a card in a fabric envelope, is that the "envelope" can then be reused for years to come!


:)
-Susan

March 24, 2010

Tutorial: Fabric Scraps!

Susan here again today, with a fun little tutorial involving fabric scraps...

My office is a mix of scrapbooking paper products and sewing/fabric goodness. I have boxes and bags of fabric scraps (from past sewing projects) that I can't bear to throw away. Instead, I've found a variety of ways to incorporate the fabric scraps into my paper projects.

This spring card that I made will demonstrate three different fabric scrap techniques...


FABRIC FLOWER:

The first technique is a super simple fabric flower. Start by punching a large circle from cardstock - this circle punch would work great. Next gather a variety of small fabric strips, loop them in half, and adhere around the punched circle. This adhesive in the shop would work well.


After adhering fabric scrap loops around the circle, flip it over.


Punch another circle in the same size, and adhere to the top of your fabric flower base.


Accent the center of your flower with smaller punched circles (from cardstock), or scalloped punched circles, and even with small crocheted flowers and rhinestones. 3D Dots work really well for adding extra dimension in your flower centers!


Here is a peek of the finished scrappy fabric flower on my card! :)


FABRIC RUFFLE:

The second scrappy fabric technique on my card is a fabric ruffle. This is an easy element to add to either a card or a scrapbook page. Start with a strip of fabric that is at least double the length of the card or page that you will be stretching it across. Using a strip that is folded in half lengthwise (like my green gingham strip) will add additional volume to your ruffle.


Lay ruffle strip along your card and start stitching at one end. I start with a straight stitch up until the point where I'd like my first ruffle pleat. Also, I find it easiest to work with my sewing machine needle set to stop in the downward position (if this is an option on your machine).


Then I simply stop stitching where I'd like a ruffle pleat, and raise my foot, fold some fabric inward, lower the foot and continue stitching until the next point that I'd like a ruffle pleat at.


Continue this process across the width of your paper project.


Finished ruffle may need to have a few loose thread and ends trimmed once finished.


STAMPING ON FABRIC:

Stamping is the third and final scrappy fabric technique included on my card. Stamping images directly onto fabric is a great way to get yet another use out of your stamp collection.

I'm using stamps from the sentiment stamp set included in April's first add-on - Skycoaster. This is such a fun add-on, and the stamps are so versatile! (hint hint - you don't want to miss out on it on reveal day!)

Stamping onto fabric is very easy - just stamp as you normally would onto paper, but use fabric instead! A few tips: I've found it's best to iron your fabric before stamping, to make sure that there are no creases - and, Staz On Ink works the best on fabric in my experience.


After your card sentiment (or image) is stamped onto fabric, use a sharp pair of scissors to trim your image. Fray edges as desired. Stamped fabric can be glued or sewn to your paper project.

I also added a tiny bird (stamped and embossed) from the new-to-the-shop "Tweets" stamp set, sitting atop my card greeting. LOVE this stamp set - it's absolutely perfect for spring projects!


My finished card... Hope that you enjoyed my scrappy fabric techniques and that you try one out on a project soon!


:) -Susan