Showing posts with label photoshop. Show all posts

August 24, 2010

Tutorial: How to Create Index Prints in Photoshop

I hope a bunch of you are working on Laura's awesome challenge to scrap those tiny index photos. :) I was thinking of giving it a whirl myself, since I've never used such tiny pics on a page, when I realized that I don't have any index prints laying around. At least not any current ones since I now make my own backup DVD's and print at home. So, I decided to figure out if I could do the same index print idea in photoshop without having to order a sheet of them with a CD from my photo lab. And guess what? You can!

I'm going to share some screen shots of what I did using Adobe Bridge. It's very easy. Then I'll describe in just words how to do this in plain old Photoshop. (My version of CS4 lacks the plug in or something to do it, so I can't show you in screen shots. But I can tell you in words!)

Okay... here goes. How to create the index prints (aka contact sheet) in Adobe Bridge:
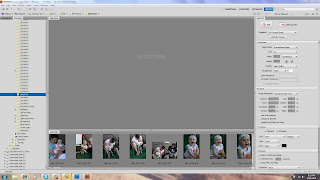
1. Open Bridge. Along the top menu bar, select "WINDOW", then "WORKSPACE", then "OUTPUT". Then select a file you want to create index prints for. If you want to makes prints of photos in multiple files it's probably easiest to save them all to one file first. This is what your screen will look like at this point.

2. Go ahead and select the photos you want to use so that they show up in the large window. Press control when you click to select multiple photos. Then you want to select your output options in the window on the right. You can see what I set mine to. Choose "PDF file" and 5*8 contact sheet in the template menu.

3. Hit "refresh preview" to see what you've created. You'll see that the files you selected in step #2 are now mini index prints set on a A4 sized paper. (8.5x11) That's the default sizing and if you like that....you are good to scroll down to the bottom of the right bar and find that little save button. Just save and print.

4. However, if you'd like to create index print sheets that would fit into the CD/DVD case the files are actually saved on, you need to change a few of the default settings. In the "Document" section in the bar on the right, choose custom for your size and enter 12.2 cm by 12.2 cm for the dimensions. (See my screen shot below). Then go down to the next section in the right side bar called "Layout" and enter 5 in the columns box and 7 in the rows box. Finally, make sure "auto spacing" and "rotate for best fit" are checked. Refresh preview again and viola! (Scroll all the way down to the bottom of the right bar to find that save button and save to print.)

Not too hard, right? :) Now, if you don't have Bridge or you'd rather do this in plain old Photoshop, you do the following:

1. In the "file" menu, select "AUTOMATE" and then "CONTACT SHEET II".

2. A box will pop up. This is where you select your file you want index prints from.

3. Also in this box you need to input your settings for the prints. Choose the size of paper (again, A4 is the default... if you want to fit the print inside the CD jewel box, change this to 12.2 cm x 12.2 cm), the orientation, the resolution (300 dpi is good for print) and the number of prints in each row and column. For the CD jewel box size, set column to 5 and row to 7 again.

4. Click OK and photoshop will go to work!

5. Print.

Hope this was helpful. Let me know if you have questions about this... I just learned it today myself and I'm no photoshop expert...but I will try to help!

August 18, 2010

Tutorial: Resizing Photos

Hey everyone! Susan here today with a tutorial on my photo resizing process.

A few of you mentioned that you'd like to know how to easily resize your photos to non-standard sizes for printing and use on layouts and projects. I frequently like to use what I call "mini-pics" on layouts as the supporting photos to my one main photo. OR - I'll just use a lot of mini pics to create one big photo collage page - as I did in this layout from the Summer Camp gallery last month.

The easiest (and probably cheapest) way to print these mini-pics is by getting a few pics onto one standard sized 4x6 print, and then having it printed at your regular photo printing lab/place.

For this tutorial I will show you how to crop and resize 2 seperate images to fit onto a 4x6 image. You can also apply these same principles to a 8x10 or 5x7 (like I did here) image if desired. >> I'm going to use a PC and Photoshop Elements 7.0 for my sample screenprints, since that seems to be what a majority of people use.

Start by opening up Photoshop and creating a blank 4x6 image. Go to FILE > NEW > BLANK FILE.


Then change the new file's parameters to "INCHES" in the drop down box next to the input fields. Type in 6 for the width inches, and 4 for the height inches. MAKE SURE that you select "WHITE" from the drop down box for BACKGROUND CONTENTS (this is what will make the nice white borders around your mini pics). ALSO make sure that you type in 300 for RESOLUTION (this means the image will be at 300 DPI).


You now have a blank white 4x6 print.


Open up the first photo in photoshop, that you want to make a mini-print out of, and select the crop tool. AT THE TOP of the screen, be sure to TYPE IN 300 next to 'Resolution'. If you know exactly what you'd like to crop your image to, input those parameters as well. Otherwise leave them blank, as I did, and we'll use the transform tool later on to adjust your image size to scale.


Drag the dotted line crop tool box around your image as you'd like it cropped. Once you have the box as you'd like, RIGHT click (on a PC) and select CROP.


Then (on a PC) hit "CONTROL + A" to select the entirety of your cropped image, and then "CONTROL + C" to copy your image.


Switch to your blank 4x6 white image and hit "CONTROL + V" to paste your cropped photo onto the white 4x6. Then hit "CONTROL + T" to use the transform tool to change the size of your image.


You want to make sure that you are keeping the correct scale dimensions on your cropped image when you use the transform tool - so in Photoshop Elements, you need to RIGHT CLICK on your photo and select SCALE to in order for the transform tool to keep the correct perspective dimensions.


Once the image is "transformed" to the size you'd like, click the green arrow on the photo. (If you change your mind on transforming or would like to start over simply click the red circle with the bar through it.)


Then use the "MOVE" tool - the four arrowed button in the upper left corner of your tool bar, to move your image to one side of the 4x6 print, to make room for a second mini-pic.


Open up your second image and repeat the process cropping, cutting & pasting, & transforming to add your second mini-pic to the 4x6 print.


Once your second mini-pic is in place, you'll need to flatten all of the layers that you created to prepare the 4x6 for printing. Go to LAYER > FLATTEN IMAGE to do this, and then save your 4x6.


You now have a 4x6 image ready to print that will yield you two mini-pics (with white borders if you want them!).


October 21, 2009

How To Add Texture WITHOUT Anything POPPING OFF the Page!

OK, today is Free Day Wednesday for us Studio Calico blog hosts and this is what got me all excited about focusing on textures this week. Way back when I first saw Tina's TTV frame, I started doing some searching and found LOTS of what I'll call texture overlays on flickr. If you google (isn't that amazing how it's become a verb?) the words, you'll find links to hundreds of sites that offer free (mostly) texture overlays for your personal, and in some cases, commercial use.

You might be asking, "Um, Emily, what is a texture overlay, and why do I need it?" I was hoping you wouldn't ask that, because I can't find a good defintion, not even wikipedia has one. It says I can create one, but I really am not a photographic genius, although I play one on T.V. (sorry, in a goofy mood this morning). Here's my answer, one that has come to me through simply playing with them and doing a few tutorials ala Jessica Sprague, and I am SO going to reveal that I really don't know what I'm talking about when it comes to Photoshop:

A texture overlay is a photo or image that you can use in your photo editting programs to manipulate another photo. You place the image OVER your current photo and then, instead of leaving the image as normal, you apply the overlay feature. That turns it slightly transparent and makes a REALLY COOL effect to your original photo.
Do not worry fearless reader, if you are totally confused, I have some examples for you to walk you through the process, AND I do know a thing or two about taking screen shots, so I can sort of help you that way too. Now I don't have PSE, so I'm not sure if this translates over, but I'm in the process of having my good friend Paula Gilarde check that out for us.

Here's what you do to use a texture overlay.

  1. Find one that you love. I'll link you at the end of this post to some sites I've used, but there are HUNDREDS of them, and you can even make your own (to be discussed later). This is the one I used, some cardboard, picked up from this website, I think it's called Desizn Tech. I just dragged and dropped the image to my desktop. I'm so sorry, I don't remember what you do with a PC, I think you might right click and save to your computer… How quickly we forget.
  2. Open the photo you want to use. I chose this cool barn because I don't know what else I'll do with it. It was just a cool photo I took, but there's no story behind it.
  3. You probably have opened your photo editing program before all of these steps, I forgot to mention that part, but if you've opened your photo, then you most like have your editing software open too.
  4. Let's all pretend you have Photoshop now, your screen should look something like this:
  5. Now take the overlay image, in this case the cardboard, and drag it onto the image of the barn, like this:
  6. Next step involves making the cardboard image cover the barn image. I resized it with the handles until it completely covered the barn image.
  7. Click on this image right now. It will get bigger and you can see what I'm talking about. Notice to the left, I've got the layers blending mode menu pulled down? Do that and select overlay.
  8. This is what happens, can you see the original picture's colors have totally changed, almost an urban acid look but with yellow? and can you see the cardboard? cool huh?
  9. The last thing you'd want to do is SAVE AS. DO NOT SAVE! You don't want to replace your lovely original image with this new one, but you do want to keep this new image, so save as.

Here are a few other examples and where I got the overlays. And if you do this, please, as a courtesy, link your use of the texture overlay to the contributing photographer if possible. In most cases, these are all free images, but it's really nice for the contributor to see how their work is being used. We do a lot of sharing of inspiration as scrapbookers, and if we give credit where credit is due, hopefully we'll be able to continue doing so in the future. Sometimes it's not easy to find how to link back, but you can usually find a contact button to let the page owner know. If you use any flickr texture group, it really easy. Always read any licenses, there can be specific requirements on usage. So if you make a layout using a manipulated photo, link it's gallery back to the texture overlay site to show off your work, you never know, you may get a really nice comment back!

Barn with wood texture from Zen Textures

Barn with painted and peeling asphalt from Urban Dirty:


And my final example is the barn with an overlay from a flickr set by Sterling Silverr:
Side note: Paula reported that the steps are exactly the same in PSE, so go, try it!

Finally, I mentioned you could make your own texture overlays. Take a picture of something has really cool texture, make sure it's a close up and doesn't have anything distracting in it, like a foot or some such. Use it in the exact same way I've shown using the textures here. Join a flickr group so you can share it. :)

June 24, 2009

Photography Week!

Well, now that it's Wednesday (eeek - sorry!) it's more like Photography Four Days! But I promise me and my co-host, Maggie Holmes, will cram a ton of great photography stuff into the next several days. So let's get started, shall we?

Converting Black & White Photos in Photoshop

I know I covered this during my last week in late March/early April, but I'm hoping to take things a bit further. My preferred method of conversion is with Gradient Map. I use a Mac and have PS4 but this method should work for older versions of Photoshop and may also work the same way in PSE (but I don't know because I don't have PSE).

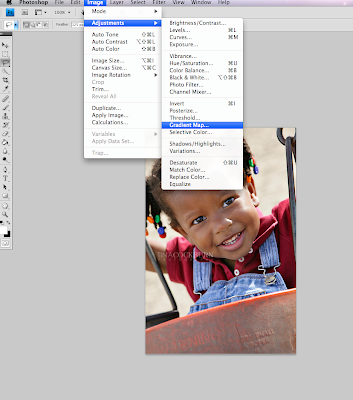
I usually begin with a photo in color and edit it in color first. Then, once my color version has been edited and saved with its new file name (leaving the original SOOC image intact), I convert that edited color image to B&W with the Gradient Map (Image>Adjustments>Gradient Map):


See that little white/black box there on the bottom left of my screen? That should actually be black/white. Make sure those two boxes are black/white or you'll get the inverse in your conversion. If there are any other colors there, you'll get a Warhol-esque result.

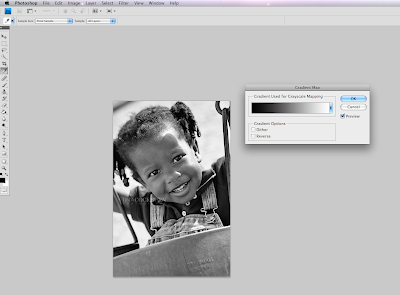
You'll see that your image is now B&W and that the Gradient Map dialog box is up:

If you like this result, you're done! If it's too contrasty for your taste and you want to play around with the lights, darks and mid-tones, click directly on the black-to-white gradient and another larger gradient dialog box will pop up:

To lighten mid-tones, click on the bottom right slider, the white one. When you click on it, a small diamond-shaped marker will appear in the middle of the bottom two sliders. Click directly on that smaller marker and drag it to the left a bit and release. Note that the results of moving the slider will not appear until you release the click:


I usually drag the middle marker to around 45 then release to see the results. (That wee little middle slider is very persnickety. If you don't click right on it and B&W hell breaks loose all over your photo, just click "Cancel" in the large dialog box and start over again by clicking on the gradient in the smaller box.)

Next, you can move that white slider at bottom right to brighten highlights.

Move that white slider over to 99 or 98 and release to see the result. If you want less or more effect, drag and move to the left some more. When you're done, click "ok" on the larger dialogue box and then "ok" on the smaller box and you're done! Just save your B&W conversion to a new name and voila!

Here's my original edited color image:

Here's with the straight Gradient Map conversion:

And here's the gradient conversion with some adjustments to mid-tones and highlights:

If you still wanted any additional tweaks to your conversion, Curves or Levels would be your best options.

And if you'd like to share any of your own B&W conversions using this process of one of your own favorite methods, please post them in the SC gallery. I'd love to see what you do and how you do it. Who knows? There might just be a prize involved!

To see more about the different methods for converting your color photos to B&W, see my previous post here. And if you have any questions about photo editing or photography, speak up! We'd love to hear from you.

Stay tuned for a post from the super fabulous Maggie!

April 18, 2009

Having Fun with Actions

If you are going to use actions on your photographs, it is important to remember that you can mix and match them and have a lot of fun trying out different combinations! You don't just have to run one action on an image and then be done. You can run two or three or even more actions on the same image if you want. There are so many different effects you can get depending on which actions you run and also which order you run them in.

I chose two pictures that I took of my little sweetheart recently and I just played around with all three sets of my actions to show you how many different looks you can really get! And I could have kept going... this isn't it!


And the thing that is exciting to me is that there is no right or wrong here! Each of these images is a little (or a lot) different than the others and yet I like them all. As a sidenote: There are definitely times when I will run an action on a certain image and I will not like the results. This can be due to the lighting or the coloring in the original photograph and the way the action is processing it. So you do have to remember that not all actions will work on all photographs, especially the ones that have a more extreme effect. Actions like my simple color boost, on the other hand, are made to give you a nice subtle pop of color, without changing the tone of the image much, if at all. These types of actions typically will work on every photograph and can easily be used as part of your every-day workflow.

That wraps up my installment of photoshop action tips for the week. I hope that you had fun learning more about actions and the different ways you can mix and match them! Please feel free to email me if you have any more questions about my actions. I am always more than happy to help!

April 17, 2009

A little post to give praise to Maggie's actions ;)

I'm fairly new to photoshop and really know how to do next to nothing with it. But a few months ago I decided to try this whole action thing and started with a set of Maggie's actions. They came with full instructions on how to install them and how to run them and it could not be any easier. I just thought since she was posting this week about how to use actions, I would give her a little shout out about hers! Here are a few photos that I used them on. I ONLY ran her action on them...no other editing at all!

Here's the SOOC version...

Here's the same pic with Simple Color Boost action:


I think Simple Color is my favorite because it works on pretty much all photos and it's somewhat subtle. Here'a another SOOC shot of my adorable nephew:


And here it is with Simple Color + the Lighten Up action:


And finally, here's one more:

With just the Lighten Up action (which you can adjust to your liking):

So, even a photoshop newbie like me can use these or any actions. They help kick your photos up a notch. Plus, it's just fun to play around! :)