May 15, 2010

Some inspiration before we bid you adieu


blog-header

Today Miss Emily and I must bid you adieu. Thank you for joining us for our week of scraplifing and scraplifting etiquette. Don't forget to complete our challenge and post a link to your creation on the Studio Calico Message Board by tonight at midnight EST. (And please oh please, do not forget to list your source ;)

One last thing I want to share before we go. We all love inspiration and we find it everywhere around us. One of my favorite things about scraplifting and the internet is that one can find inspiration galore in tutorials, and there is NO QUESTION as to whether or not the person writing cares if you use their idea. They are creating the piece for the express use of scraplifting.

The story behind this tutorial is this: I was trying to recreate a marigold for this layout using a photo of my son holding; wait for it, a marigold. I wanted something 3-D, but not "too techniquey" As I was sitting there the thought occurred to me to use different sized scalloped circles stacked and ruffled to make the marigold effect. Alas, I only had one size of scalloped circle, so I was trying to figure out how to make the flower 3 dimensional. I started manipulating and folding the circle. I came up with the marigold on the layout below. I'm sure I'm not the first person to make this, but I was pretty proud of myself!


Here's how you create them:


Cut out 5 scalloped circles. You can punch them out, or use a die cutting machine. Studio Calico carries this 3 inch and this 2.5 inch punch. I used a 3 inch.


Fold the scalloped circle in half, crease on your fold. Fold both horizontally and vertically and then spread it back out, like so.

Squeeze in the sides with the creases between each finger. Your circle should look like this now!

or like this from the top.

Flatten out your now 1/4 circle so it looks like a fan. You may have to manipulate the tip a little bit to make it sharp. Crease down all the edges with your fingernail so they are crisp folds.

Repeat this with all 5 "petals"

Punch another scalloped circle for a base for your flowers. Glue each "petal" on, overlapping the petals in an over under pattern.


This is what my completed card looks like. I added a brad to the center, and a jewelry tag tied with my favorite baker's twine!


Here's another card I made with plain circles and different patterned papers! I LOVE how this one turned out. I fringed the grass with my own Tim Holtz scissors, but I used my friend's MS fringe scissors the other day and I would have used them here if I owned them myself. I also used my favorite black pen. The American Crafts .08 pen.


I made this for National Scrapbook Day for scrapbooks.com I love the 1 petal here. I think it looks JUST like a buttercup! I used the olive twisted burlap here.

Sneak Night Winner!

And the winner of Camp Scrap taught by May Flaum is.............

Various said...
I have to take this camp as I've bought the punch May blogged about yesterday and said she would be using. Plus being English I've never been to summer camp its not something we did in England when I was young!
May 14, 2010 6:23 AM

Please send an email to info@studiocalico.com with the following information:
  • Name
  • Contest: Sneak Night Giveaway
  • Prize: Camp Scrap Online Class

Circle Flower Tutorial

Hello everyone. Waleska here with a flower tutorial.

When I posted this layout to the gallery I got a lot of questions on how to make this flower so here it is (finally)!

  • Slightly bend the circle in half and punch a small hole at the top

  • String the twine through all the circles (note: if you don't want to use a flower center the smaller the whole and string the better- i'll show you an example at the end :))

  • Tie the string tightly (This part is tricky. The circles will try to go all over the place so you'll have to be patient)
  • Open and arrange the circles to look like a flower
  • Add a flower center (optional). You can also make your own brad using fabrips + itop tool ;)

  • Play around and have fun!

You can make these many different ways by using a variety of material (fabRips, paper, cardstock), different size punches (small, big, scallop), add a flower center or not... it's up to you.

I hope you enjoyed this tutorial. Please let me know if you have any questions.

May 13, 2010

Sneak Night Giveaway


Wouldn't you love to sign up for a month-long scrapbook camp? What if such a place existed; where crazy ideas were welcome; where you could come to gather ideas for your next layout and have fun—guilt free. Would you love a place where prizes, inspiration, instructor interaction, and all the fun of summer camp are delivered to your computer?

Instructor May Flaum is a veteran Big Picture teacher and long time crafter. She is a co-author of Paper + Pixels: Scrapbook Layouts, has been published in numerous idea books and magazines, and has taught scrapbooking classes for years. She encourages scrapbookers to run with their wild ideas, and believes that the creative process should be a fun-filled one year round.

Camp Scrap is a product of her imagination and a collection of ideas that she has always wanted to bring to Big Picture. With over twenty new layouts by May, prizes from a variety of companies, inspiration from eight special celebrity guests, and so much more, this is an experience you don't want to miss!

May will bring the inspiration—you bring the photos and supplies.


Now's your chance to win a spot in this fabulous class. Simply leave a comment and let us know why you want to take this class.

To learn more about Camp Scrap or register, click here.

Member Spotlight


For this weeks member spotlight I chose Miss Rita. You can find her on the world wide web on her weblog Here's the Story and on the Studio Calico message board under the pseudonym rmoliverio. I chose Miss Rita from among the many wonderful Studio Calico members because I possess information about her that the rest of you ladies may not know. I know that she is a world class scraplifter!

I know that Miss Rita scraplifts in different ways. Some days she will just take an idea from a layout she sees and make it her own, and other days she will copy most of the layout. Rita chooses not to upload her layouts that she copies exactly, but I was able to obtain a few of them as evidence. I will also share a few of her inspired by layouts and original pieces.

What I love about Miss Rita is that not only is she an amazing artist in her own rite, but she also knows when to successfully use others ideas to quickly create some wonderful layouts with her own photos and journaling.

First though, I asked Miss Rita a few pressing questions:

1. What 3 items can you not live without?


My daily latte, cell phone and DVR. I'm cranky without my morning coffee and I can't remember the last time I watched a show live with commercials! For scrapping, it would be patterned paper, tiny alphas, and my exacto knife. I love using my exacto knife to cut out bits from my favorite patterned papers to use as embellishments.

2. What are your thoughts on scraplifting?

My approach to scraplifting has changed over the years. When I first started scrapbooking, almost all of my pages were lifted from a magazine or sketch book. It was a great way to try a lot of different techniques and styles without the fear of messing up. As I have become more immersed in this hobby, I have come to love the creative process as much as the finished product. There is something about pushing around the papers and embellishments on my desk and coming up with something I love on my own that just makes me happy. I know my creativity ebbs and flows, and scraplifting is a great way to get the creative process flowing when I'm in need of some inspiration. Sometimes it is just a little detail, and sometimes it is the whole layout. When I scrap at home, I am relaxed and it doesn't matter if it takes me one night or a whole week to feel like my page is complete. I tend to scraplift more when I'm scrapping away from home because I have this irrational fear of wasting my precious scrapping time, lol. I love knowing I can pull out my SC kit, my favorite DT layouts from the gallery and get to scrapping with my friends!

3. What's your favorite Studio Calico kit?

That's a toss up between Whodunit and Baker's Dozen, for very different reasons. Whodunit got me excited to create again after the busy holiday season. It seemed like those layouts just fell together perfectly. I love the colors and patterns in that kit! For Baker's Dozen, it was all about the embellishments! I loved the doilies and AC frames and made some of my very favorite layouts with that kit.

4. What are you listening to right now?

I'm old school all the way and mainly listen to the radio. My DH got me a Zune two years ago for Christmas and it still has the original songs he downloaded on it, lol. Wouldn't that playlist make a great scrapbook page? Some of my favorites right now are One Republic and Kings of Leon.

5. Any guilty pleasures?

Watching whole seasons of TV shows on Netflix. I'm addicted to the instant streaming feature and am watching the old seasons of Bones right now, one of my favorite shows. I caught a few episodes that I missed the first time around. I just added Buffy the Vampire Slayer to my instant queue...should that embarrass me?

6. Choose a layout that best represents you as a scrapbooker.


Here are 2 of Rita's CASE (or in her case, CASA(almost)


Rita used Jenn O's "perfect mix" for this gorgeous photo of her little sweetie. I love how she added a few pieces that personalized her work, but her basic layout replicates Jenn's design.


This layout is a CASE of Kelly N's "yard work." I love the addition of the Dear Lizzy chick that matched her title instead of a butterfly.


This layout "Preschool" was inspired by Lisa T's "eight" Rita liked how Lisa used the striped paper and recreated that feel on her own layout.

Rita used a few of the elements of Kimmithy's "The Fair" as inspiration in her "Circus" layout. She loves the way Kimmithy did her title, and felt like it went well with her theme. She also included several other elements from Kimmi's layout. When you look at the next to each other it is obvious that Rita was inspired by "The Fair," but "Circus" could also stand alone.

These last two are some of my favorites from Rita's gallery at Studio Calico.


This layout was for some of the NSD challenges at Studio Calico. I LOVE the color scheme and the white space. The textured cardstock with the bit of inking is fabulous too.


This last one has great colors too! I love the cutie photo of her oldest son, and how she cut out the stamped letters for her title!

Well, I hope you have enjoyed this short journey through Miss Rita's gallery. She has a LOT of layouts posted, so you should go and wander through her layouts. They are pretty awesome!


Shall We Scraplift?


My dear friends, this is my final post for our week. Miss Joy will be back tomorrow and Saturday with more scraplifting inspiration. I have for you today, my version of a scraplift. I tried, with great difficulty to CASE Miss Joy's layout, but alas, I didn't have every single supply she used on any of her layouts, so I came as close as I possibly could. I call mine a CASA--Copy And Steal Almost. I must admit that I found such a direct scraplift to be rather difficult for me. I've scraplifted before, but I always add my own twist to the lift. Trying to do something so exact was tough for me. But if you are newer to scrapbooking, I know it's a wonderful way to get techniques tried and design learned. Here's Miss Joy's version:

The reason I decided to lift this layout is the Hambly transparencies, even though I LOVE how they look, scare the bejeebers out of me. The way Miss Joy took more than half a sheet and used it on her page inspired me. I also love the way she used the yellow jute, tying a little circle around the heart. It was also the only layout in her gallery that I had nearly the same supplies in my stash. :)

So I lifted the design, many of the products, most of the colors, and even the topic. I didn't want to hunt for the blue cardstock she used, so I went with a white base. I had used my Hambly transparency for another couple of projects so I couldn't cut the exact same piece out for my backdrop, but I don't think that matters. She used a Cricut for her red letters. I don't own a Cricut, so I used the red alpha from the Trinkets add on. I was out of white Pink Paislee brads (I didn't think I'd use them all up, I was wrong!), so I used the yellow one. I thought it matched the yellow jute quite nicely (this layout is the reason I bought my jute. I love the look!). I do not own a tiny attacher. After seeing the difference between her staples and mine, I think that needs to change. Her's are so cute and dainty. I had to change up the title just a bit, because the journaling, inspired by Miss Joy's, is about how I didn't get a middle name, so I gave it one to myself when I was a little girl. That's the "OK not really" part. The little card that says "They should have" houses the journaling, it tucks quite nicely behind the photo of a 3 month old me.
Miss Joy also did a lift of me. She picked this layout because she liked how I used the umbrella. Quick story about that umbrella. When I started designing this, I started with the title. I loved the graphicness of the vertical and horizontal combination. I usually start my process with the design, so once I had the title, I was a little perplexed about where to go next. I decided to put the project away for the night, but as I cleaned things up, the umbrella slid onto the page, just about where it is now. I was in love! It has nothing to do with the subject, but the design was so strong, I kept it there. As luck would have it the journaling lines and the photo fit perfectly under the umbrella. So go with your happy mistakes. They can turn into nice surprises.

Miss Joy liked that umbrella and title, but her's actually fit the theme. :) She took my design and stretched it a bit taller to fit her journaling. I love that she added a block of the red paper to house both her journaling and photo. It still echoes my original design, but works for her better this way. That's an important thing you can learn from scraplifting. Make it work for you. They are your stories.


One final note: I found this lovely article about where and how the hugely talented and equally sweet Dina Wakley gets her inspiration. The things she says about gathering ideas from art further compliment the theme of our week. No ideas are original, it's how you make them authentically you is what matters!


May 12, 2010

Where Shall We Store Inspiration?

There is no reason why you should be bored when you can be otherwise. But if you find yourself sitting in the hedgerow with nothing but weeds, there is no reason for shutting your eyes and seeing nothing, instead of finding what beauty you may in the weeds. To put it cynically, life is too short to waste it in drawing blanks. Therefore, it is up to you to find as many pictures to put on your blank pages as possible.

--Emily Post

Greetings again, my dear readers! Miss Emily here another day. Yesterday we discussed scraplifting etiquette, and a few of you commented that sometimes we don't realize we may be lifting another's idea because we see SO VERY MUCH inspiration all around. I whole heartedly agree with that statement.

I used to pull things off the web and store them on my computer, ads for design inspiration, color combos, art pieces, photos that spoke to me. I kept them in a folder called "Inspiration." But I didn't have a way to properly site the source. Then my friend Elizabeth directed me to tumblr.com. It's quick and easy to set up an account, all you need is an email address, password, and a name for your account. You may customize it, lots of backgrounds and display options are available.

Tumblr is a virtual bulletin board of sorts. Think of it as your online notebook of inspiration, just like the one you paste, staple, or sketch those ripped out magazine pages, color swatches, and design ideas into. Now instead of saving an inspiration piece to my desktop folder, I can now click on the copy the image location, load it to my tumblr account, then add a click through link to the original source. This allows me to always be able to cite my inspiration, and that dear friends is rather valuable to me as an artist.

I'll walk you through the basic process of posting an inspiration piece. Once you set up an account and log in, you will be on your dashboard. See in the upper left corner, under the word "tumblr" there's a picture of a filing system and the first letter is E? That's me.

Right next to the picture of "me" there are icons for the various things you can add, those being: text, photo, quote, link, chat, audio, and video. I only utilize the photo and link options, to be honest, I haven't explored further. When I'm out surfing the web for inspiration, say I'm on this site:


and I want to store an image from this post in my tumbler account, say, this photo of the banners:


I would click on that photo and a new screen pops up with just that photo.

I have a Mac so I hit the CONTROL key on my keyboard, and then click on the image. A window pops up like this:

I select "Copy Image Location" (For a PC, thanks to Miss Joy I suggest you RIGHT CLICK on the image, then COPY IMAGE URL) then I go to my tumblr account and click on the "Photo" icon. This window opens up:


From here you can browse your hard drive and load a picture, but the whole reason I use tumblr is so I don't have to keep things on my hard drive. Just below the "Browse" window you can see the words, "Use a URL instead" (it's underlined). I click on that, and this is what shows up:


It's SLIGHTLY different, instead of being able to browse your computer, there's now a spot for you to paste a URL. I'll now paste that URL I copied.


You can then add a caption or description in the appropriate box. Just below that box is another underlined sentence that says, "Set a click-through link." This is how I can link back to my source. I click on that, go back to the source, in this case it is http://simpleblueprint.typepad.com/blog/2010/05/brionesco.html, I copy that and paste it into that space.

Then I hit "Create Post," tumblr saves it and immediately takes me to my dashboard and voila! my post is now there. A dashboard is kind of your behind the scenes, nuts and bolts part of tumblr. If you want the pretty, neat and clean version, look over to the right, just under my name, is my web address: emilygpitts.tumblr.com


If you click on that, you get to my tumblr blog, the pretty version :)


Another fun thing about Tumblr is the "follow" feature. You can follow other inspiration seekers and find even more inspiration. The people I follow are not all scrapbookers, I get inspiration for home decor, stitchery, art posters, photography, sewing projects, bookbinding, and more. Here are some fellow SCers' accounts to check out while you are setting up your own account:
Once you start following other people, their posts show up on your dashboard as well and you can reblog them to your personal account. You can "heart" them. If you find something you LOVE that someone reposted from someone they follow, you can go to the original poster and start following them. It's a virtual web of inspiration. It's rather humorous when 5 or 6 people that I follow all post the same thing to their blogs, you can see we all have similar tastes :)

So all this talk about giving credit where it's due, and even more discussion of the scads of inspiration available to us, I suggest you check out Tumblr. The learning curve is rather slight, it's pretty self-explanatory.

Hopefully this post will be of great help to you in figuring it out.

Until tomorrow dear readers,
Miss Emily

May 11, 2010

How Shall We Be Inspired?

“To do exactly as your neighbors do is the only sensible rule.”

--Emily Post


Well hello good friends! Miss Emily here, thrilled to be hosting the blog today.

Today we will discuss various aspects of scraplifting. As Miss Joy mentioned yesterday, there are MANY ways to scraplift someone, but only ONE right way to credit your inspiration. Please, dear ladies, if you do scraplift someone, in ANY way, shape, or form, always give credit to your inspiration. And if luck would have it such, and you do not remember for the very life of you, please say something to the effect of, "I was inspired by someone and cannot for the very life of me remember who that might have been." At least you'd be acknowledging your idea was not your own.

This can be a sensitive issue. Neither Miss Joy nor I claim to be an expert, we've just been around for a while. Here's what we've concluded though:
  • Scraplifting is great for trying out new ideas.
  • If you don't feel comfortable sharing your scraplift online without giving credit to your inspiration, keep it to yourself. That's perfectly OK.
  • I submit and do assignments for magazines. Personally, I don't think it's right to submit anything that I've KNOWINGLY lifted a design from. I think elements, techniques, and color schemes are different. There was one time I had a layout that fit a call exactly and my layout was really different, but I'd gotten the idea from a layout by Shannon Taylor. I emailed her to be sure she wouldn't mind if I submitted. There wasn't an issue, the layout didn't get picked up. I've had others do the same for layouts I did that inspired them. I appreciate knowing this before I see something in a magazine that could have been inspired by my work. I know I didn't come up with the idea, but I appreciate someone acknowledging their work was inspired by me. There's a gray area for sketches, I'm really not sure what the rules are. I talked to Kelly Purkey about this exact thing, she said she was fine if I submitted a layout based on one of her sketches. Asking is always the best policy I believe, especially if you could benefit financially from that inspiration.
  • Always give credit to your inspiration piece. The first piece I ever scraplifted and posted in my gallery at Two Peas I attributed to "a Vicki Boutin." What fun it was to show it to her years later! She got a kick out of it, and I was relieved that I'd credited her way back when!

There really are no original ideas, but it sure is nice if you were inspired by someone or something to point the viewer in their general direction. Here is where I must post one of my favorite quotes about inspiration:
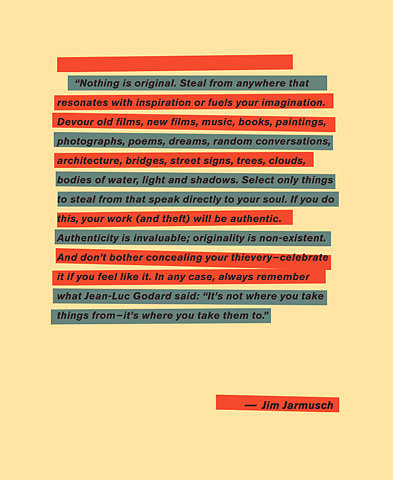

Now I must blush here and admit, I do not have a source for this lovely little piece of artwork. I pulled this off the web prior to my days of crediting correctly. Will you forgive me dear reader? I hope that is the case!

Some of the many ways you can scraplift include:
  • CASE (copy and steal exactly)
  • technique
  • design
  • use of a particular element
  • color scheme
  • title
  • journaling
  • topic
  • photo angle
  • creator's style
  • photo placement
  • journaling style
  • product choice
To illustrate some of these ways, I asked a few members of Studio Calico to help me out. Our first example comes from the British Isles. AllieH has a lovely minimalist style and it tickled my fancy to ask her to look for a TECHNIQUE to scraplift. She went on the hunt and discovered this layout in the gallery of Donna (dmbd). She admired the color scheme as well as the all the fun little bits that Donna always adds, but in the end, it was the way Donna had cropped her photo in a circle that led Allie to choose that particular technique to lift. Now cropping your photo in a circle is not something Donna made up, but the way she did it on this particular layout spoke to Allie, who was then inspired to do the same technique on her layout, so she's going to give Donna the credit she deserves for the inspiration. Allie comments that she will definitely try new techniques because of this challenge. Thank you Allie for such a lovely example of technique lifting.


My next example comes from the wide open plains of the Midwestern United States. I asked Kelly (baylorgrad) if she would lift a specific ELEMENT from another member's layout. She fell in love with the look of this layout by our own DT member, Ms. Stephanie Howell. The element she chose was the photo. She found the printing of your photo directly onto textured cardstock to be rather intriguing. So she did just that. She played around with the idea, settling on a larger photo, just like Stephanie's, added minimal embellishments, and let the photo do the talking. She said that this lift forced her to think outside the box, and she ended up with a gorgeous layout. Is Stephanie the first person to ever print a photo directly onto cardstock? No, but what Steph did sparked an idea in Kelly's head, so by giving Stephanie credit for that particular inspiration, she's made Steph's day. Being scraplifted is a huge compliment.


Jen from Down Under played right into my hands for the next example. She'd commented on this layout I'd done for NSD, saying, "Oh I LOVE this Emily! I think I saw it over at the Crate Paper blog? I fell head over heels when I saw it and now I must lift it ;) love, love, love!" How could I resist asking her to do just that? So gentle readers, Jen's lift is an example of DESIGN lifting. Note how she kept the design quite similar, three photos in a row, title to the lower left of the row. She however made it very much her own by changing up the floral element a bit, adding tabs, journaling down the right side of the photos, a tag as the base of her title, and some fun swirls of baker's twine, to name just a few of her adaptations.


Now I, as the original creator, must not claim credit either. I used this sketch by the talented Becky Fleck, which she created for the Scrapbook and Cards Today blog, as my inspiration piece:

There was something in my original layout that appealed to Jen, but she made it very much her own, and when posting this layout to any gallery, giving credit for the inspiration would something like this, "I was inspired by Emily's layout, which was based off a sketch by Becky Fleck, who created her sketch for the Scrapbook and Cards Today NSD challenge." Yes, dear readers, it can be a bit tricky giving credit where credit is due, but it makes those credited so very grateful.

My final example comes from France, where Francine (scrappyfran) was asked to pick a layout that inspired her color selections. I am fully aware, kind friends, that this is not the first time blue and yellow have been paired together. HOWEVER, if you see a layout that has a rather elegant pairing of colors and that inspires you to create your own, please, share the inspiration piece as a courtesy. Francine's inspiration comes from this lovely layout by ania-maria. Francine picked this particular color scheme because she said it reminded her of Spring and Summer and just made her feel happy. She notes that she normally doesn't use the blue/yellow combination, but the color combination works smashingly well in both layouts. Since doing this lift, Francine has decided that she'll try using color schemes that she wouldn't normally gravitate toward. And she also found out that she enjoyed matching the color scheme of the photo, something that she normally doesn't do. In the end, the two layouts look nothing alike, but it would be proper for Francine to acknowledge the color inspiration.

It is with much gratitude that I end this post. I appreciate the examples these fine members have created of scraplifting. I end with a quote from Jen, I love how she put it, I couldn't say it any better:
In general, I don't like doing lifts. I feel like I'm cheating, which I know is ridiculous! But as I was working on this page I was subconsciously thinking of other layouts I have in mind which would work great with this design! When I'm doing a layout I feel like so much of my time is wasted on trying to come up with a design I'm happy with, it's really the hardest part of scrapping for me. Lifting really is a time saver, giving me more time for more layouts!
So scraplift away, and please, cite your sources!

May 10, 2010

We would like to challenge you.

Greetings fellow paper aficionados, this is Miss Joy. This week on the Studio Calico weblog, Miss Emily and I will be discussing the fine art of inspiration. We will be discussing scraplifting and scraplifting etiquette. Inspiration is abundant on the world wide web, so we will also touch on the different types of lifting, and how and when to site the source of your inspiration. There will also be many examples of using other's work as a catalyst for your own.

There really is nothing new under the sun, but there are different levels and categories of using other's work to inspire creativity in yourself. This week will be filled with information old and new. We hope you enjoy this series on the etiquette of inspiration.


blog-header


This week's challenge is this:

Use another Studio Calico member as inspiration for a layout. Scraplift one of your favorites that you've saved in your gallery, scraplift something that just catches your eye, scraplift a DT member, any scraplift counts. You can CASE a layout (copy and steal everything) or just use their layout subject matter to create your own. Whatever you do, upload your layout and the layout you scraplifted to the gallery by 12 midnight EST on Saturday and link us up in THIS post. We'll pick a random winner of a $5 gift certificate next Sunday.

May 9, 2010

"Leftovers" Challenge Winner!

the random winner of this week's "Leftover's" challenge...

and a $5 Studio Calico gift card is.....

.........

.................

.......................Geralyn!!!!

with this stunning layout that she created for Nic's old photo challenge!

congrats Geralyn...

Please send an email to info@studiocalico.com with the following information:
  • Name
  • Contest: Sunday Sketch
  • Prize: $5 Studio Calico Gift Card
:)