
Well, now that it's Wednesday (eeek - sorry!) it's more like Photography Four Days! But I promise me and my co-host, Maggie Holmes, will cram a ton of great photography stuff into the next several days. So let's get started, shall we?
Converting Black & White Photos in Photoshop
I know I covered this during my last week in late March/early April, but I'm hoping to take things a bit further. My preferred method of conversion is with Gradient Map. I use a Mac and have PS4 but this method should work for older versions of Photoshop and may also work the same way in PSE (but I don't know because I don't have PSE).
I usually begin with a photo in color and edit it in color first. Then, once my color version has been edited and saved with its new file name (leaving the original SOOC image intact), I convert that edited color image to B&W with the Gradient Map (Image>Adjustments>Gradient Map):

See that little white/black box there on the bottom left of my screen? That should actually be black/white. Make sure those two boxes are black/white or you'll get the inverse in your conversion. If there are any other colors there, you'll get a Warhol-esque result.
You'll see that your image is now B&W and that the Gradient Map dialog box is up:
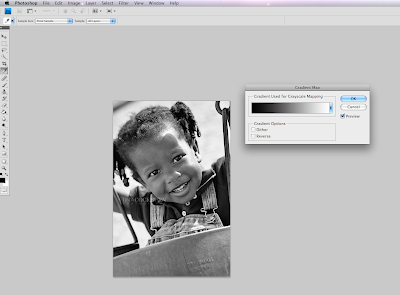
If you like this result, you're done! If it's too contrasty for your taste and you want to play around with the lights, darks and mid-tones, click directly on the black-to-white gradient and another larger gradient dialog box will pop up:

To lighten mid-tones, click on the bottom right slider, the white one. When you click on it, a small diamond-shaped marker will appear in the middle of the bottom two sliders. Click directly on that smaller marker and drag it to the left a bit and release. Note that the results of moving the slider will not appear until you release the click:

I usually drag the middle marker to around 45 then release to see the results. (That wee little middle slider is very persnickety. If you don't click right on it and B&W hell breaks loose all over your photo, just click "Cancel" in the large dialog box and start over again by clicking on the gradient in the smaller box.)
Next, you can move that white slider at bottom right to brighten highlights.

Move that white slider over to 99 or 98 and release to see the result. If you want less or more effect, drag and move to the left some more. When you're done, click "ok" on the larger dialogue box and then "ok" on the smaller box and you're done! Just save your B&W conversion to a new name and voila!
Here's my original edited color image:

Here's with the straight Gradient Map conversion:

And here's the gradient conversion with some adjustments to mid-tones and highlights:

If you still wanted any additional tweaks to your conversion, Curves or Levels would be your best options.
And if you'd like to share any of your own B&W conversions using this process of one of your own favorite methods, please post them in the SC gallery. I'd love to see what you do and how you do it. Who knows? There might just be a prize involved!
To see more about the different methods for converting your color photos to B&W, see my previous post here. And if you have any questions about photo editing or photography, speak up! We'd love to hear from you.
Stay tuned for a post from the super fabulous Maggie!


4 comments:
Yipee, it does work in PSE6!
I've been using gradient map to convert to B&W for a while, but didn't know you doing edit it.That's what happens when you don't read the manual, I suppose.
Thanks for the tutorial Tina!
thanks for the post Tina and love your examples - I really love using the EZA Porcelan action (it even works w/ Elements) and uploaded some examples
http://www.studiocalico.com/forums/galleries/show/12085
Thanks Tina, I'm going to post one in the gallery that I was just playing with!
I really need to get PhotoShop on my computer! I would be all over the subtle differences that it could make to my photos!
Post a Comment