

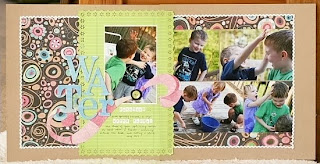
Tip #3: Let photos and papers overlap across the page break to unify the two pages. (Just be careful to not crop faces!!!) :)
Tip#4: Scale is important. Your canvas is larger, so your title, embellishments, etc should be a little larger or carry more "weight" too. You don't want a teeny title to get lost.
Tip #5: Use photo blocks if you feel like your photos are getting lost on the page. I love to do this on two pagers. You can even put the bulk of the photos on one side of the spread and leave the other side relatively open.

Tip #6: Repeat patterns, embellishments, etc through both sides of the layout to make them cohesive and draw the eye through the spread. I love how April did this with the numbers on each photo across the two pages.

Tip #7: If you are a 12x12 scrapper, but 24x12 scares the you know what out of you try something a little smaller. Like a double pager using 8.5x11 instead! Switch it up!
Tip#8: Make a clear focal point. Your eyes need a nice, comfy place to set on at first glance. Especially on a two pager! Then the other details can draw them through the design. Here I highlighted one photo to stand out from the rest.

Tip #9: When dealing with a bunch of photos for a two pager, consider cropping them all to the same size or even similar sizes (all 4inches wide for example). This makes it easy to put them in rows or columns or photo blocks.
Tip #10: Get creative and have fun! The larger canvas of a 2 pager gives you lots of options for unique and eyecatching designs and playful elements.
And that's it. Not too hard, right? I know I may not have you all convinced, but tomorrow I shall issue a challenge! Maybe the possibility of some Studio Calico cash will help motivate you! ;) Thanks for reading!


8 comments:
Oh how I needed this post! I really appreciate the tips.
Yeah! I love 2 pagers, and would love to get some new ideas! I love all your tips too! Thanks
I really love all of these samples! Thanks so much for sharing with us!
I did this one last week with the Looking Glass kit - so just for sharing...
http://www.studiocalico.com/forums/galleries/show/5423
alissa_palm
Terrific two page designs!
Good ideas--I love "spreads" -- a word from my magazine days. Thanks for the refresher.
I love this post. Some great tips. I love my random 2 pagers! Thanks.
Again, not sure where to link LOL. here's mine!! I loved the challenge..it was A big change for me!
http://www.studiocalico.com/forums/galleries/show/5709
Post a Comment