
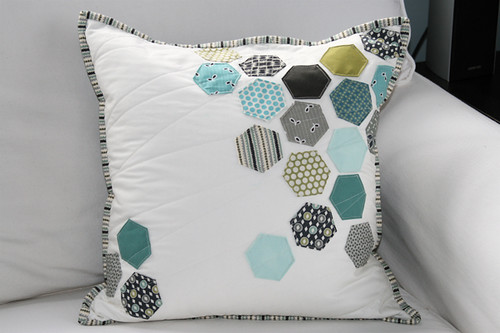
I started with this piece as my main inspiration. I loved the way the hexagons were scattered on the background, and wanted to use a similar design on my page. I cut one hexagon from the Studio Calico exlcusive paper in Granny's Cupboard, and then used it as a pattern to cut more from other patterned papers from Anthology and Granny's Cupboard.

I played around with the placement of the hexagons and drew in where I wanted to add stitching, stamped journaling lines and some border punched paper. I use this trick a lot - once you stitch and stamp, there's no going back! This gives me a better way to visualize how it will look once I've added those elements. Once I'm happy with the basic design, I usually snap a quick photo. Because if I'm going to add stitching to the background I've got to go back to the beginning.

Yep. Everything came off the kraft cardstock. I added the strips of red at the top and bottom and stitched around my border, then added the graph patterned fabrip and the blue punched paper and did some zigzag stitching. I also stamped the journaling lines in pumice stone down in the bottom corner.

Then I need that photo that I snapped so I remember how to put it all back together! I added a few more hexagons and another fabrip to the page, and the stitched them all in place. The American Crafts glitter brads from Linens and Lace were the perfect accent to my small punched circles. At this point, if at all possible, I walk away from the page for a while. It's almost done, but I know it needs some finishing touches.

The next morning, I added the tab at the top of the photo (it's a sticker from the Anthology Labels - I punched a few hearts in it and backed it with the grey Aperture paper), the layered accent at the bottom right of the photo (that space just felt empty to me - I layered a piece of October Afternoon Thrift Shop paper punched with my Fiskars L Seal of Approval punch with a stickers from October Afternoon and Anthology, and then topped it with chipboard hearts). I also added a couple more small chipboard hearts tucked in with the other elements on the page. I added my journaling and did some stapling with my tiny attacher to finish the page.

I used some of the other ideas from the original inspiration post - the circles within the hexagons and planning my cuts around an element in the patterned paper. These ideas helped make my groupings more interesting than if it had all just been patterned paper.
So that's a little peek into my creative process - let me know if you have any questions! =)


16 comments:
Oh, Lisa, this is so helpful, you have no idea how much!! Thank you so much! Drawing stitching & journalling lines - brilliant. such a simple idea, yet so effective. And taking a photo!this will get rid of a lot of my frustration (hopefully)
Marina
Thank you this is such an awesome tip!!!!!
so cute lisa! i love your hexis!
I love your tip of taking a photo! Thank you for your insider tips, Lisa!!
absolutely love seeing your creative process!
Great tips Lisa, thanks for sharing! Will be going back and looking at this post a time or two for sure.
LOVE seeing your process lisa. this page is fantastic.
one question do you sew right over the pencil and then erase? or do you flip the cardstock over?
thanks again for sharing!
Such useful information, and a fantastic layout! Thank you for sharing!!
Awesome post! Love the peek into your process! I really found it interesting about the drawing in elements and also photographing your layout in process to remember where things go. Thanks so much!
I love seeing how you used inspiration from the pillow on your layout, but I really love seeing and reading about your process. Thanks for the tips. :)
That's a realy cool page!
thank you so much, lisa, for sharing your process - so helpful and full of amazing tips. i also especially like the one about taking a pic of the layout before you take it apart! i have been moving the pieces of a page to lay out in the same spots on a scrap page, but somehow the final never turns out exactly as the original thought I laid out before gluing down. hopefully this will help.
quick question - do you just sketch everything in pencil and then erase, or do you just do that for the sample pic and then start with a new page for the final layout?
sarah - i stitch over the lines and then just erase them. =) i invest in good erasers!!
maria - i just erase the lines. =) sometimes i'll draw lines to indicate where pp was if i take things off to mist the background, so i know exactly where i had it before.
great tutorial and awesome layout. many thanks lisa - hera
Thanks for sharing Lisa. I love how you plan your page in pencil first then take a photo. I'd never thought of that and just tend to design as I go along. The "walk away" idea makes a lot fo sense too. TFS.
what a fabulous page! love that you could share your process with all of us!
Post a Comment