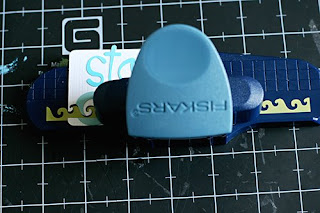
First things first, a lot of people are confused on just how to use their border punches when they use them for the first time. It’s really simple once someone shows you how. First, just back your paper up into the punch, so it is straight along the edge like this:
 Push the lever down till you hear the paper punch, then slide your paper down making sure (this is KEY!) that the design you’ve punched matches up with the design printed on the punch itself. Here is how it should look:
 Here is how it should NOT look. ;)
 Now, you’ve got it down…just keep punching and sliding the paper down being sure to match it to the design printed on the punch. Do this over and over until your entire border is punched. Trim border to your desired width using your paper trimmer and voila! You’ve got a fun border!
Now that you’ve got the basics down, try and look beyond borders with these punches. There are so many creative ways you can use them. Take a look at this card…a pretty basic card, but check out the dimension you get when you layer two punched borders atop each other. Just punch one border and trim to the desired size, then punch another the same size. Adhere the first border to your project and then use pop dots to adhere the second border to add that neat dimensional look.

Here I used the scalloped edge punch to punch a border. Then simply used ribbon to weave in and out of each hole.
 I trimmed the ribbon and adhered the loose ends to the back of the border.
 Finally, I adhered the border to my card for a fun detailed look.
How about using the weaving border punch to create a monogram for your project? I simply punched a long strip of border, then cut it into 3 pieces. I weaved the yellow ribbon in and out of the slits and adhered the loose ends to the back of the border strip.


Finally, I simply arranged the border strips into the shape of my letter, in this case the letter K, and adhered them down.

Here’s an idea for adding a fun treatment to your title. I simply adhered sticker letters to a piece of white cardstock for my title block.


11 comments:
That wave punch is SO cute! Awesome ideas and tutorial!!
Love the monogram idea!
I love these ideas!
great ideas!! tfs!!
Thanks for the ideas!!! soooo cute use for the punches! =9
WOW, thank you so much, really, I did not know how to line up after the first punch. thanks you..
Great ideas thanks so much!
What a bunch of great ideas! Thanks!
B
cool uses for punches. thanks kelly!
Great ideas & great tutorial! Love the tutorials on here.
Those cards are so cute !
Post a Comment