
It's Susan here again today with a tutorial post on two of my favorite things > Punches & Mists!
Along with punches & mists, I simply used cardstock and a few embellishments like pearls, rhinestones, & pom-pom trim to create this layout about my niece...

The technique of layering & misting punched shapes is what adds the dimension and depth to my super-simple & very basic cardstock page.

The first technique I'll show you is punching and layering the SAME shape punch, like I did here with my butterfly accent. Start by punching two butterflies out - one out of a lighter cardstock color, and one out of a darker cardstock color. This butterfly punch in the SC shop would also work really well for this technique!
 Next, MIST only the punched butterfly that will be the top layer of your accent. I used the Lemon Mist which happens to look really nice on aqua... :)
 Use foam adhesive to adhere only the middle part of your top butterfly punch to your bottom butterfly punch. Gently pull up the wings of your butterfly, and add rhinestones to the center of your butterfly accent. Your dimensional butterfly embellishment is complete, and ready to be added to a project!
 Next I'll cover the steps that you need to follow to create a four-layer punched flower similar to the one on my layout. Start by punching a 2 and a half inch scallopped circle from cardstock using this Marvy punch in the SC shop. Also punch 3 smaller sized circles from various colored coordinating cardstock.
 Mist all layers of the flower - I used Silver Metallic Mist and also Irridescent Pearl Mist - combined they create the perfect glitz & sheen!!!
 Complete your flower by adhering the largest circle to the top of the scalloped circle, and then machine stitching around the edge. Adhere the smallest circle on top of the middle sized circle and use foam adhesive to place your flower center on your flower. Accent with color-coordinated pearls. This completed flower accent would also be gorgeous on a card!
The third (& final!) "punching & misting" technique that I'll show you involves masking. Masking is a subtle way to accent your page, and it will also allow you to coordinate your background cardstock design with the punched & layered embellishments that you've already created for your layout.
Start by punching the shapes that you'd like to "mask off" on your background cardstock. I choose to repeat the punched butterfly design in the upper corner of my layout. LIGHTLY adhere the shapes to your page to prepare them for the misting step.
 Mist as much as desired directly over the punched shapes. I used the Silver Metallic Mist again for this step. Then gently peel back the punched shapes and discard. Your underlying and original carstock color will be revealed! Accent the shapes with rhinestones or pearls to highlight your masked design.
 I hope you've enjoyed this little lesson on misting, punching, and layering. There are so many ways to incorporate each into your projects. Added elements like machine stitching and foam adhesive for dimension will only add more interest to your designs. Have fun trying out this new technique!!!
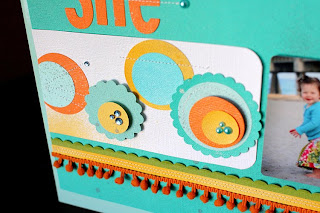
:) -Susan


18 comments:
very nice tutorial !~ definately gonna try my hand at misting soon.
great tutorial! i was actually going to work with layering circles on my next layout. i like what you did here!
First, can I just say that I love this layout! THe colors and design are stunning! Thanks for sharing some great ideas with us!
i am loving these color combos Susan - yum!!
Beautiful LO! Love all the little details, especially the stitching :)
Gorgeous techniques!! I love the layered flower and the 3D butterfly is so pretty with the lemon mist on it!
Great tutorial!
I love this tutorial.. haven't quite gotten up the guts to try misting yet ;)
Great stuff Susan! I love the layout and am becoming addicted to misting...your ideas rock!
such a cute page...great tutorial!
What an awesome page and tutorial! Thanks so much!
I always love your layouts, so it was fun to read your tutorial! Thanks so much!
this layout is great to use those teeny wallet prints we get of everyones kids without the page seeming so bare. made my own last nite - thanks for the ideas!
Great tutorial!!!! thanks!
WOW!!! Great tutorial and layout!! Love the butterfly punch!! Thanks for sharing.
Hi Susan, I do this quite often with my butterfly punch but without using the adhesive foam squares to give a raised image. I think it just as effective with the body of the top butterfly glued onto the body of the bottom one. I do like the beads down the center of the body tho.
I high appreciate this post. It’s hard to find the good from the bad sometimes, but I think you’ve nailed it! would you mind updating your blog with more information? nebulizzatori per raffrescamento prezzi
I have read your blog it is very helpful for me. I want to say thanks to you. I have bookmark your site for future updates. nebulizzatore ad ultrasuoni
Post a Comment