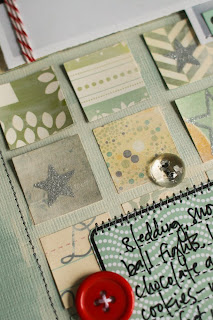
The January kit, Whodunit, has a gorgeous color scheme that is awesome for any season - but I wanted to make it even *more* winter-y for a page featuring my older boys sledding with friends. I started my page by drawing a border 1in in from the outside of my 12x12 cardstock, and then punching squares of various patterned papers from the kit and arranging them in rows inside my square. I used a square punch from Fiskars, but you could simply use your trimmer to cut squares if you don't have a punch. I attached each square of patterned paper to my background using just a bit of adhesive in the middle of the square.

Now, I'm loving this color scheme, but it's a bit spring-y for what I'm going for. I could have left out the greens and yellows, but I really liked the pattern that those pieces added. I knew a wash of white paint could tone down the colors and give me the effect I wanted. I used Manila paint by Making Memories, but Claudine Hellmuth's Blank Canvas paint would work just as well. I love these brushes - the set is inexpensive and they are *much* nicer than the brushes I used to pick up at my local craft store! I put a glob of paint on a paper plate and then soaked my brush in water. I dabbed the brush in the paint and then brushed it across the plate a couple times to remove the excess paint and water. Remember - you can always ADD more paint to the background, but you can't take it away - you'll want to start with very little paint on the brush. If you get a spot that looks too watery, press a paper towel over the top to soak up the excess.

I brushed my watered down paint across the background, adding more paint and water as my brush got dry. I ended up doing two coats to get the shading that I wanted. I painted a little outside my block of squares on all sides to give the piece a nice border. While the paint was still wet, I sprayed the whole background with Silver Plated Maya Mist - the Iridescent Pearl would give you a similar effect. It didn't add any color, but it *did* add a frosty shimmer. Since I only adhered each square in the middle, the water in the paint warped each piece a bit, giving the background some dimension. I hadn't planned on this, but really loved the effect.

I love the star stamps that came with the main kit, and wanted to work them into my design. I laid my photos and journaling block onto my page so I had an idea of what areas would be covered, and then added a couple of stars to each row. I stamped with silver pigment ink and embossed them with clear embossing powder - the stamping is subtle, but adds an extra bit of shimmer and interest to the background.

I cut the scallop sticker from the sticker sheet in half and added it to the top left and bottom left of my square of blocks and then I stitched a border with grey thread. I stamped the journaling stamp with black ink on blue patterned paper twice, and cut each block out. I used one whole to hold my journaling, and cut the top off another and used it as a date tab at the top of my page. I took advantage of the white space in my larger photo and layered the smaller one on top of it, and then added them to my page with foam adhesive. I wrapped the photo with red baker's twine and finished the layout with a few button accents, and a label sticker embellished with star rubons.

While I've used this white washing technique to get a snowy look, it can also be used to unify *any* collection of patterned papers. This would be a great way to use up a bunch of scraps that don't quite match. You could also add a twist to it by using a bolder mist over the top of your background. I hope you get a chance to try this technique, and please link me up if you do!!


14 comments:
I'm going to try this one. Can't wait for my kit to arrive! Nice way to use those scraps. Thank you Lisa for the inspiration!
Love it and will definitely try it- thanks for sharing!!
Fabulous! Thank you so much for sharing! Can't wait to try it!
Absolutely gorgeous! I love the wintery feel - thanks for sharing Lisa!
Thank you! Your blog post will be advertised on the DigiFree Tutorials search engine today (look for timestamp: 31 Dec [LA 04:00pm, NY 07:00pm] - 01 Jan [UK 12:00am, OZ 11:00am] ).
Happy New Year Studio Calico!!!
wow love this LO ! i'll do it ! thank you for the tutorial !
Thank you so much for a great tutorial! Loved the effect the paint made - will try!! :)
Happy new year, by the way! :D
this is a great idea :) i love grids... i hope i can try this soon!!
Amazed - love this idea and will defiitely be trying it.
Love this Lisa!
What a great idea! Very neat!
Thanks for the tutorial Lisa...I love this layout and will definitely be trying this technique!
Love this tutorial! Thank you so much for sharing :o)
And the layout is gorgeous!!!
Post a Comment